If you’re just getting started with building your own website, you’ll be happy to know that there are actually only two beginner-friendly WordPress theme install methods you need to understand. And in this guide, I’ll walk you through both of them step by step – no confusing jargon, no developer skills required. Before we go any further though, let me make one thing super clear: when I say WordPress, I’m talking specifically about WordPress.org, not WordPress.com. If you’re using WordPress.com, you won’t have full control over your themes unless you’re on a paid plan, so this tutorial is strictly for self-hosted WordPress.org users.
If you don’t fully understand the difference between WordPress.org and WordPress.com yet, don’t worry—I’ve already covered that in another post. You can check it out here: What is WordPress? – it’ll help clear things up before we dive into the practical steps. Trust me, knowing which platform you’re on will save you from a ton of confusion later.
Now, back to our main topic. WordPress themes are what control the entire look and layout of your website, and thankfully, changing them is way easier than most beginners expect. You don’t need to touch any code or download complicated tools – just use one of the WordPress theme install methods I’m about to show you. Whether you want to install a free theme directly from the dashboard or upload a premium theme you’ve downloaded elsewhere, both options are fast and beginner-proof.
What Is a WordPress Theme?
A WordPress theme is basically the outfit your website wears. It controls how everything looks – your layout, fonts, colors, header, footer, page templates, and sometimes even animations. Without a theme, your site would still work, but it would look like a plain document with no personality. So if you want your website to look professional, stylish, or unique, installing a good theme is essential.
Think of your website as a house. The structure is built with WordPress itself, but the theme is the interior design – your furniture, decor, and paint job. You can completely change the vibe of your site in seconds just by switching to a different theme. Want a clean minimalist look? Easy. Prefer bold and colorful? Also possible. There’s a theme for pretty much every style and industry.
One cool thing about WordPress themes is that they come in both free and premium versions. Free themes are great for beginners or hobby sites, and you can find thousands of them inside the official WordPress theme directory. Premium themes, on the other hand, usually offer more customization, better designs, and dedicated support from developers – perfect for business or professional websites.
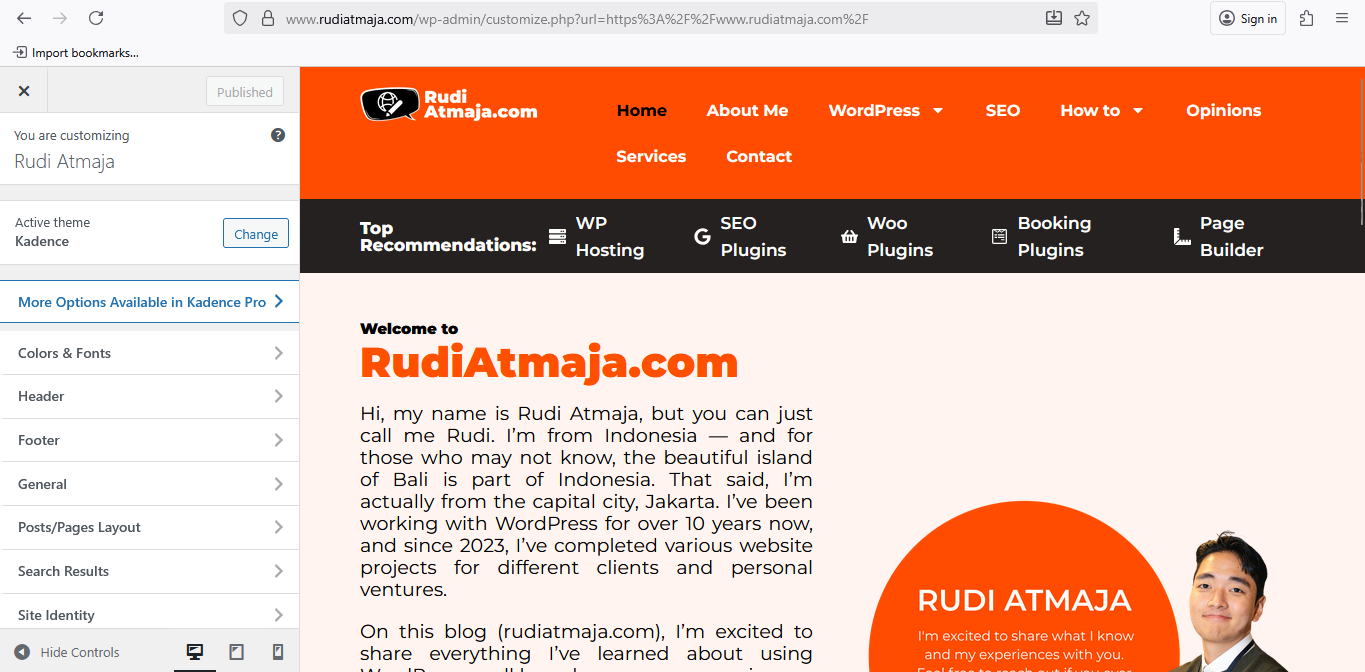
Most modern WordPress themes are customizable through something called the Customizer or through a separate theme options panel. This lets you tweak things like your logo, background, fonts, and layout without touching any code. Some themes even come with drag-and-drop builders, so you can design pages visually like you’re playing with Lego.
Now, here’s an important distinction: WordPress themes are not the same as plugins. A theme controls the appearance of your website, while plugins control its functionality. For example, a theme can change how your blog posts look, but it won’t help you add a contact form or improve your SEO. That’s the job of plugins.
If you remove a plugin, your website may lose a feature like contact forms or image sliders. But if you change a theme, your site will just look different – your content remains the same. This is why the golden rule is: themes are for design, plugins are for features.
Some beginners make the mistake of installing heavy all-in-one themes that try to do everything like a plugin. While it might seem convenient, it often leads to slow websites. It’s always better to keep things clean – let your theme handle visuals and let plugins handle functionality.
Another fun part of using themes is that you can preview them before activating. WordPress lets you install themes without actually switching your live website’s look immediately. This means you can experiment safely without breaking anything.
Once you find a theme you love, you can further enhance it with plugins to add features like email opt-ins, social sharing, or online store capabilities. Themes and plugins are designed to work together like a perfect tag team – one handles the beauty, the other handles the brains.
Now that you know what a WordPress theme is and how it differs from a plugin, it’s time to actually install one. And just like with plugins, there are two beginner-friendly WordPress theme install methods you can choose from.
WordPress Theme Install Methods
Now that you understand what a WordPress theme is and how it differs from a plugin, it’s time to roll up your sleeves and actually install one. Luckily, you don’t need to be a developer or touch any code to do it. WordPress gives you two super beginner-friendly WordPress theme install methods that anyone can follow in just a few clicks.
Both methods take place right inside your WordPress dashboard, so you won’t be dealing with FTP clients or complicated tools. One method lets you search and install themes directly from the official theme directory, while the other is perfect for uploading premium or custom themes that you’ve downloaded from somewhere else.
I’ll walk you through both approaches one by one. Feel free to follow along on your own site as we go – it’s way more fun to learn by doing. Ready to give your website a fresh new look? Let’s start with the first method.
Method 1: Installing a Theme via the WordPress Theme Search
The first and easiest method to install a WordPress theme is by using the built-in theme search feature inside your dashboard. This method is perfect if you’re looking for free themes that are officially listed in the WordPress.org theme directory. Everything is done online, so you don’t need to download anything to your computer – it’s all handled automatically by WordPress.
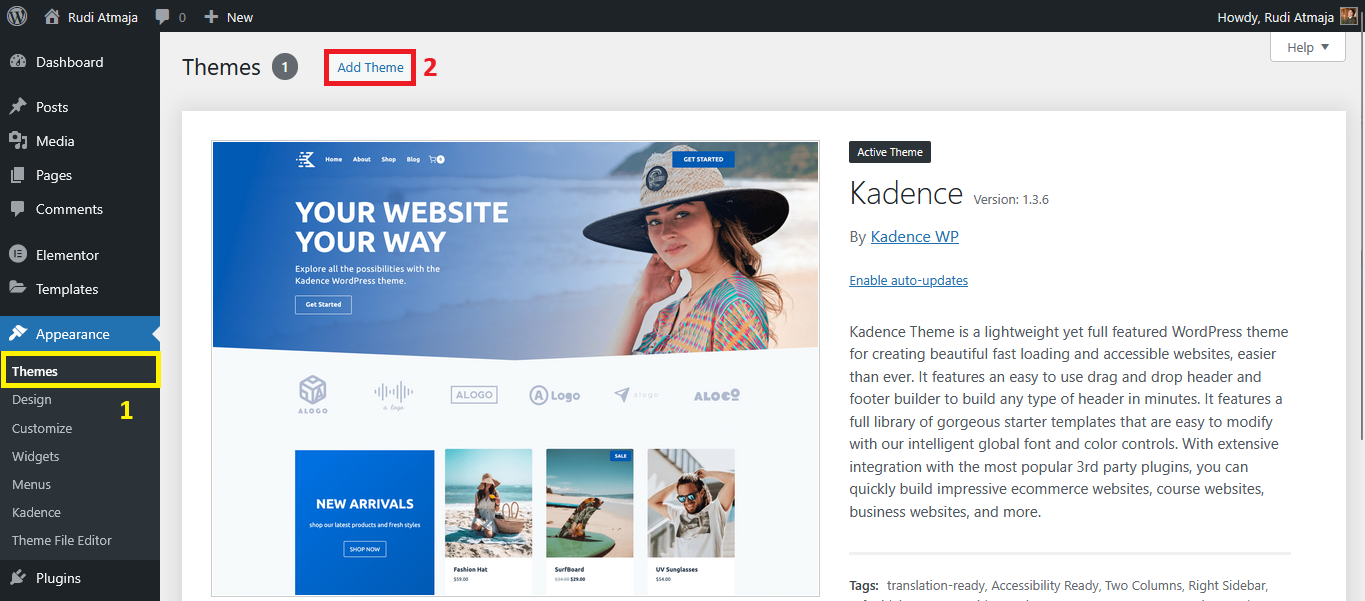
To get started, log in to your WordPress dashboard and look at the menu on the left side of the screen. Find the Appearance tab, hover over it, and click on Themes. This will take you to a page that shows all the themes currently installed on your site, including your active one. At the top of that page, you’ll see a button labeled Add Theme – go ahead and click it to enter the theme browsing area.
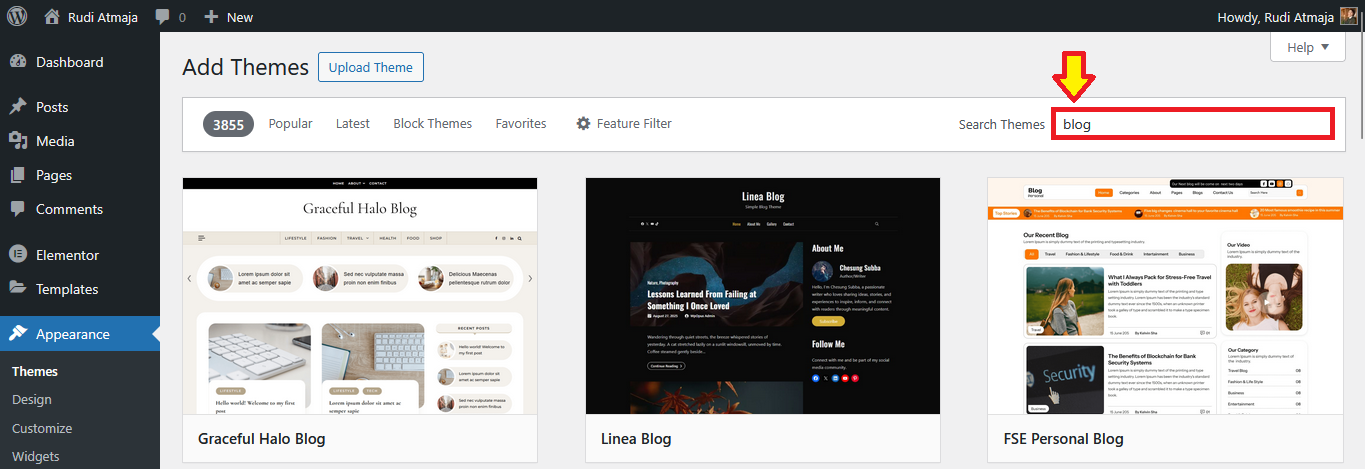
Once you’re inside, you’ll notice a collection of popular, latest, block themes, and favorites themes displayed right away. If you don’t have a specific theme in mind, this is a great place to explore. You can hover over any theme card to see a preview button and an install button. But if you’re searching for something specific, use the search bar in the top right to type in keywords like “blog”, “portfolio”, or “business”.
As soon as you hit enter, WordPress will filter the results and show you themes that match your keyword. Each theme thumbnail usually comes with the theme name, a short preview image, and a few basic details like ratings and how many websites are currently using it. These stats are helpful when deciding whether a theme is popular and well-maintained. A theme with lots of active installs and good reviews is generally a safer choice.
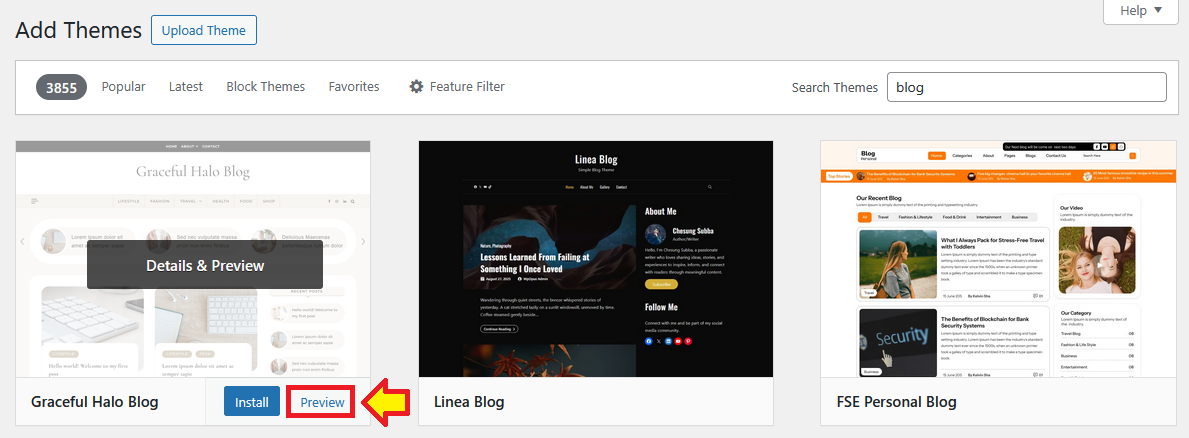
When you find a theme that catches your eye, you can get a better idea of what it looks like by clicking Preview. This opens a live demo of the theme using placeholder content, allowing you to see its layout and design before committing to it. Keep in mind that the preview might look different once activated on your real website, especially if your site has existing content.
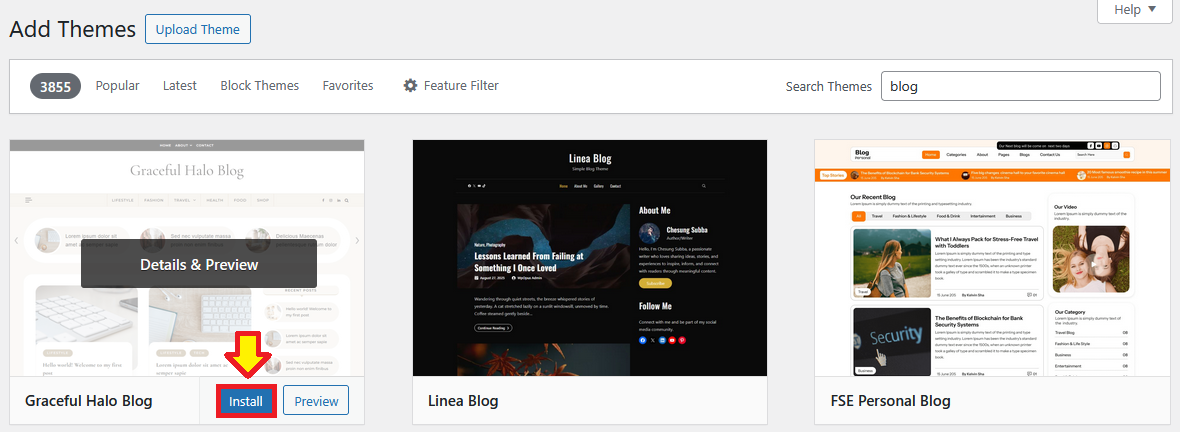
If you like what you see, close the preview and click the Install button. WordPress will automatically download and install the theme for you in just a few seconds.
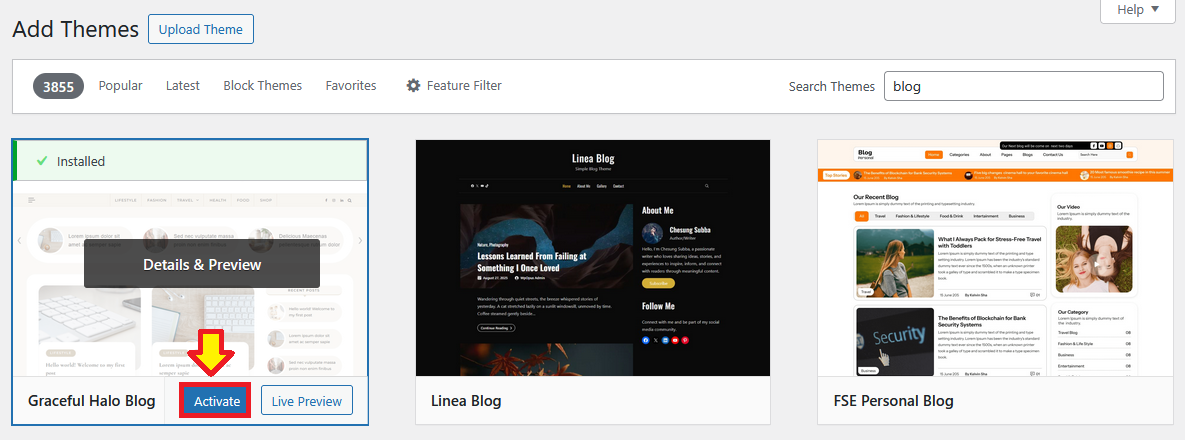
However, at this stage, the theme is not active yet – it’s simply added to your theme library. To make it live, click the Activate button that appears after installation.
The moment you activate the theme, your website’s appearance will instantly change. Don’t panic if it looks a bit messy at first – most themes require a little setup to look like the demo you saw earlier. Some themes will show a notification at the top of the dashboard suggesting recommended plugins or demo content that you can install to make your site look more polished.

It’s a good idea to visit your homepage right after activating the theme to see how it looks with your existing content. If something seems off, don’t worry – you can always go to Appearance > Customize to tweak layout settings, change colors, upload your logo, and make the design more personalized. The Customizer lets you view changes in real time before saving them, so feel free to experiment without fear of breaking anything.
If you realize that the theme isn’t quite what you hoped for, there’s no harm done. Just go back to Appearance > Themes and activate your previous theme or try another one. You can install as many themes as you like, but only one can be active at a time. It’s kind of like trying on outfits – switch until you find the one that feels right.
Once you’re happy with your theme, take a moment to explore any documentation or setup guides the developer may have provided. Some themes come with customizable page templates or special features that you might not notice at first glance. Learning how to make the most of your theme can dramatically improve your website’s appearance.
And that’s it – you’ve successfully installed a WordPress theme using the search method. It’s quick, safe, and ideal for beginners. Now that you’ve mastered the first method, let’s move on to the second one, which gives you even more flexibility for premium or custom themes.
Method 2: Installing a Theme via the Upload Method
The second WordPress theme install method is perfect when you’ve downloaded a theme from an external source – whether it’s a premium theme from a marketplace like ThemeForest, a custom theme from a developer, or even a free theme you found outside the official WordPress directory. Unlike the search method, this one requires you to have the theme file saved on your computer in .zip format, so make sure you’ve got that ready before starting. If the file you downloaded comes as a folder instead of a zip, compress it or check if the actual theme zip is inside.

To begin, head over to your WordPress dashboard and navigate to Appearance > Themes, just like before. Instead of browsing the available options, click the Add Theme button at the top.

Next, look for another button labeled Upload Theme. Clicking it will reveal a simple upload form with a “Browse…” button – click that and select your theme-name.zip file from your device. Once you’ve selected the file, hit the Install Now button and let WordPress unpack and install the theme.
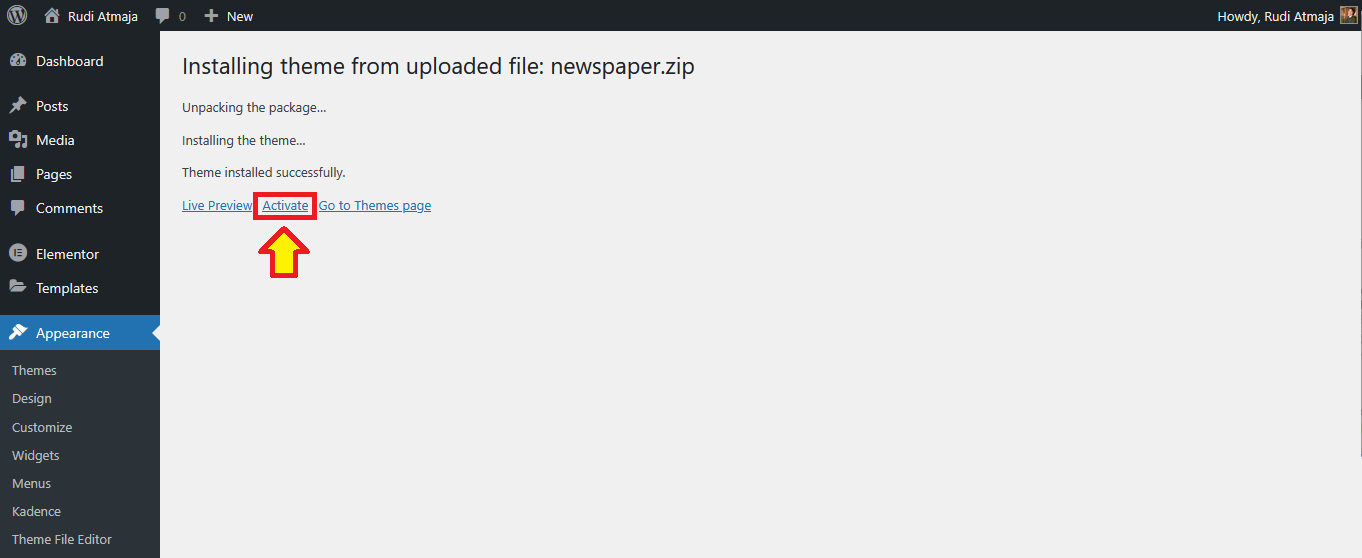
Depending on your internet speed and file size, this might take a few seconds. If the upload is successful, you’ll see a confirmation message along with links to Activate, Preview, or Return to Themes Page. Just like with the previous method, installing doesn’t make it live yet – so make sure to click Activate to apply the theme to your website.
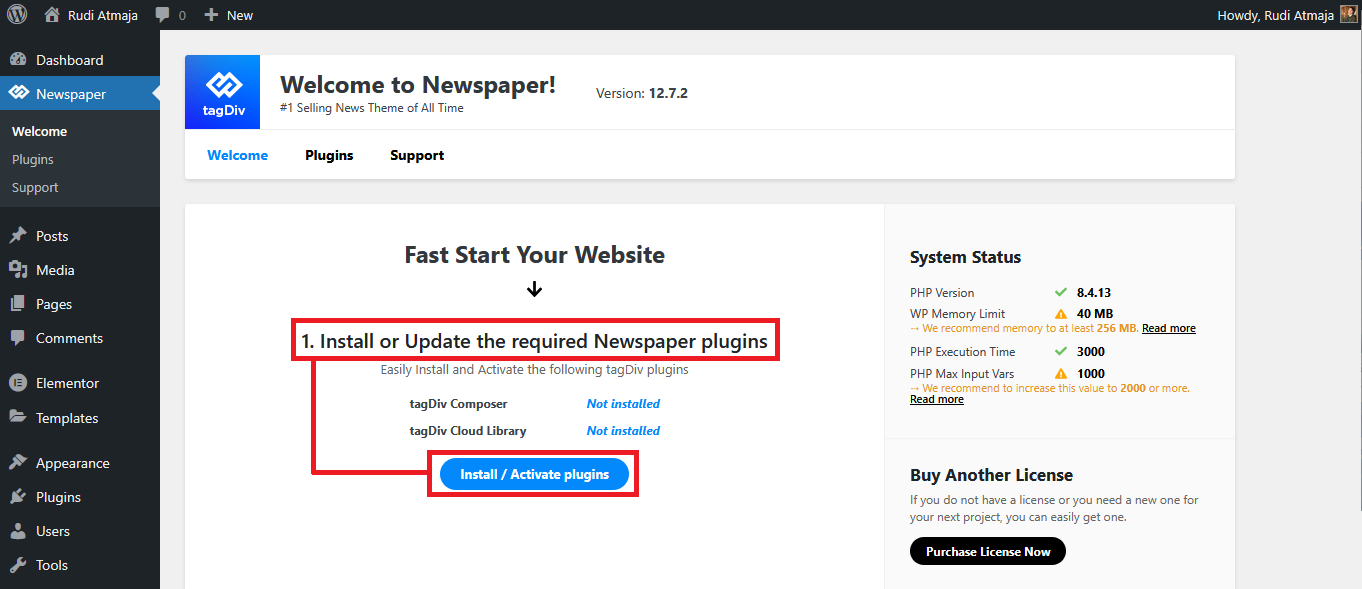
After activation, your website will immediately switch to the new design. Some premium themes may prompt you to install recommended plugins or input a license key to unlock full features and enable automatic updates. Don’t skip this step, especially if you plan to use the theme long-term – updates are crucial for both security and compatibility.
At this point, your site may not look exactly like the demo version you saw when purchasing the theme. Many premium themes rely on demo content or page builders like Elementor, WPBakery, or Gutenberg templates. If your theme includes an Import Demo Content option, go ahead and use it to quickly replicate the demo layout – it’s a huge time-saver and makes customization easier.
Once your theme is active and any necessary plugins are installed, head over to Appearance > Customize or the theme’s dedicated settings panel. This is where you can start adding your logo, adjusting colors, tweaking layouts, and replacing placeholder content with your own. Take your time here – this is where your website begins to truly reflect your brand or personal style.
One important tip when using the upload method is to avoid repeatedly uploading and activating random themes without a plan. Premium themes often come with extra scripts and features, which can slow down your site if you keep switching between them. It’s best to experiment on a staging site or at least preview first before committing to one.
If you ever run into an error like “The link you followed has expired” or “Theme stylesheet missing,” don’t panic. These usually happen when the file size is too big or you accidentally uploaded the wrong folder. In that case, double-check that you’re uploading the correct .zip file and make sure your hosting allows larger uploads.
Once everything is in place, congratulations – you’ve successfully installed a theme using the upload method. This approach gives you full freedom to use any theme you like, whether it’s free, premium, or custom-built. With both WordPress theme install methods under your belt, you now have complete control over your site’s appearance.
Final Thoughts
At this point, you’ve officially mastered the two most beginner-friendly WordPress theme install methods – search and upload. Whether you’re using a free theme from the official directory or a premium one from a marketplace, you now have full control over how your website looks. No coding, no complicated tools – just a few clicks inside your dashboard.
The best part about WordPress is how flexible it is. You can completely transform your website’s design anytime you want without losing your content. Don’t be afraid to experiment, switch themes, test new layouts, and preview different styles until you find the one that truly fits your brand or personality.
Just remember the key rule: themes are all about appearance, so keep the design clean and focused while letting plugins handle functionality. A beautiful theme is important, but a fast and user-friendly website is even better.
Now go ahead – give your site the makeover it deserves!


