If you’ve ever clicked a broken link and landed on a dull “Page Not Found” screen, you know exactly how disappointing – and unhelpful – a default 404 page can be. Most WordPress themes, especially free ones, only offer a plain error message with zero guidance on what a visitor should do next. That’s not just a missed opportunity – it’s a fast track to losing potential readers or customers. The good news? You don’t have to settle for that kind of dead-end experience.
In this tutorial, I’ll show you exactly how to create a custom 404 page step by step using Elementor Pro. We’re not just talking about throwing in a funny message or cute graphic – we’ll build a strategic, branded error page that helps users stay on your site instead of leaving immediately. Whether you want to redirect them to your homepage, display helpful links, add a search bar, or even showcase your best content, Elementor Pro’s Theme Builder makes it incredibly simple.
Before we dive in, a quick clarification: when I say WordPress in this guide, I’m referring to WordPress.org – the self-hosted version, not WordPress.com. If you’re still unsure about the difference between the two, I highly recommend checking out my article here: “What is WordPress?“.
Why You Should Create a Custom 404 Page
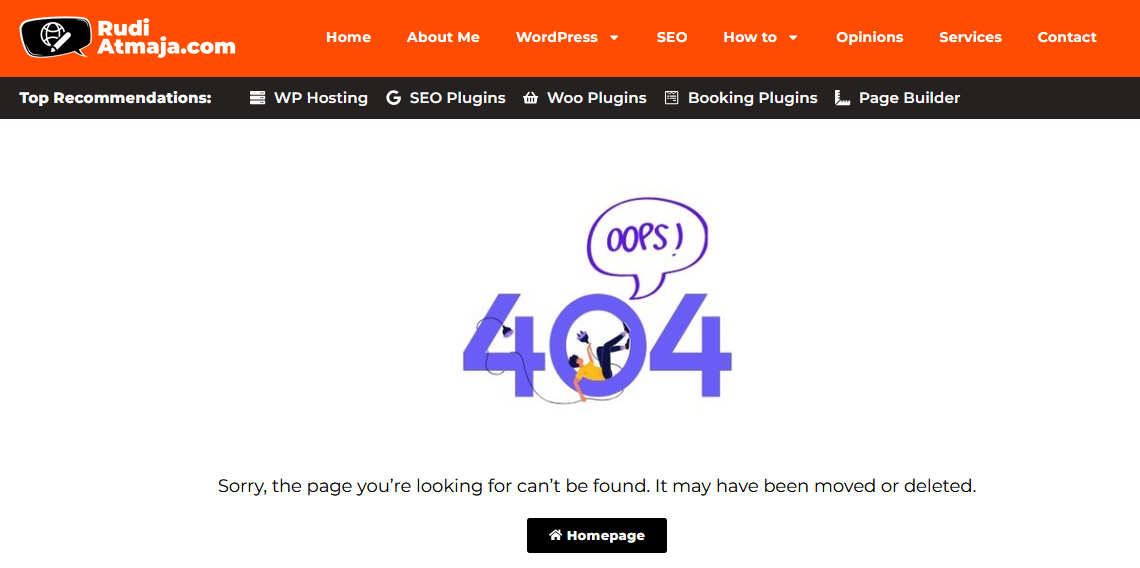
A 404 page is what your visitors see when they land on a URL that doesn’t exist on your website. It could be caused by a mistyped link, a deleted post, or sometimes even an external site linking to the wrong page. By default, WordPress themes display a generic “Page Not Found” message – usually just text on a blank screen with no direction or helpful guidance. While it technically serves its purpose, it doesn’t do anything to keep your visitors engaged.
The problem with these default 404 pages is simple: they stop the conversation instead of redirecting it. When someone reaches a dead end, their first instinct is to leave – and once they’re gone, they’re rarely coming back. That’s why website owners who care about user experience and conversions don’t ignore their 404 pages; they optimize them.
A custom 404 page allows you to turn an error into an opportunity. Instead of letting users bounce away, you can offer them something useful – like a search bar, suggested articles, category links, or even a friendly message that reflects your brand personality. It’s a small touch, but it makes your site feel more polished and welcoming.
Think of it as customer service. If someone walks into your store and accidentally opens the wrong door, would you just let them stand there confused? Or would you guide them to the right section with a smile? A well-designed 404 page is that friendly guide – quietly helping people find what they were actually looking for.
Beyond user experience, custom 404 pages also contribute to SEO performance. While they won’t magically improve rankings, they can significantly reduce bounce rates and increase time-on-site – two behavioral metrics that search engines pay attention to. Google might not reward your 404 page directly, but it will definitely punish a website that constantly loses visitors due to poor navigation.
So instead of treating 404 pages as dead ends, treat them as smart rerouting points. With a bit of creativity and the right tools – like Elementor Pro – your 404 page can transform from a silent exit point into a useful navigation hub. And once you build one properly, you’ll wonder why you didn’t do it sooner.
How to Create a Custom 404 Page
Before we jump into the actual steps, there’s one important thing you need to know – to create a fully customized 404 page like the one we’re about to build, you must use Elementor Pro, not the free version. The Theme Builder feature that allows us to override the default 404 page only exists in the Pro plan.
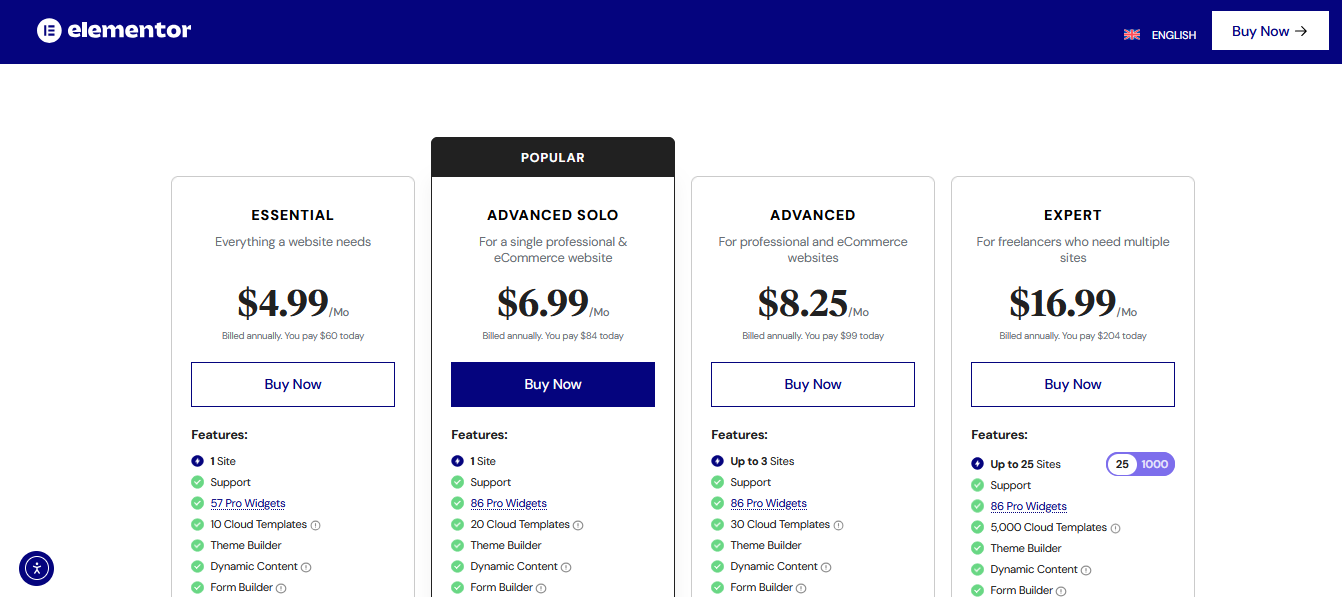
If you don’t have Elementor Pro yet, I highly recommend starting with the Advanced Solo plan, which costs just $84 per year for one website – perfect if you’re running a single project. But if you own multiple sites, you’ll save more by choosing the Advanced plan for $99/year, which covers up to 3 websites. Both plans come with a 30-day money-back guarantee with no questions asked, so you can try it risk-free.
You can get Elementor Pro using my affiliate link here: https://www.rudiatmaja.com/go/elementor. If you choose to purchase through that link, I’ll earn a small commission at no extra cost to you – and I truly appreciate the support. For transparency, you can read more about this in my FTC Disclosure here: https://www.rudiatmaja.com/ftc-disclosure.
I’m only recommending Elementor Pro because I personally use it and genuinely believe it’s the most flexible and beginner-friendly tool for building conversion-focused pages – including 404 pages that don’t just apologize but redirect users back into your content funnel.
Alright, if you’re all set with Elementor Pro, let’s get started with the actual steps.
Step 1: Install the Elementor Pro Plugin
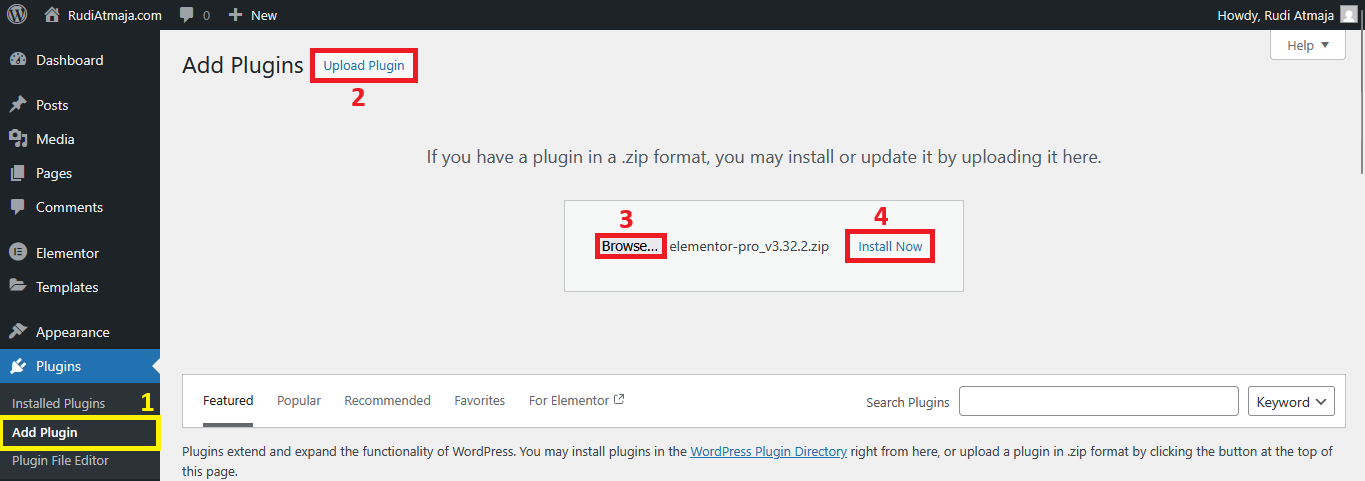
To get started, log in to your WordPress.org dashboard and navigate to Plugins → Add Plugin. Unlike free plugins available in the WordPress repository, Elementor Pro must be uploaded manually since it’s a premium plugin. After downloading the ZIP file from your Elementor account dashboard, click Upload Plugin, select the file, and hit Install Now.
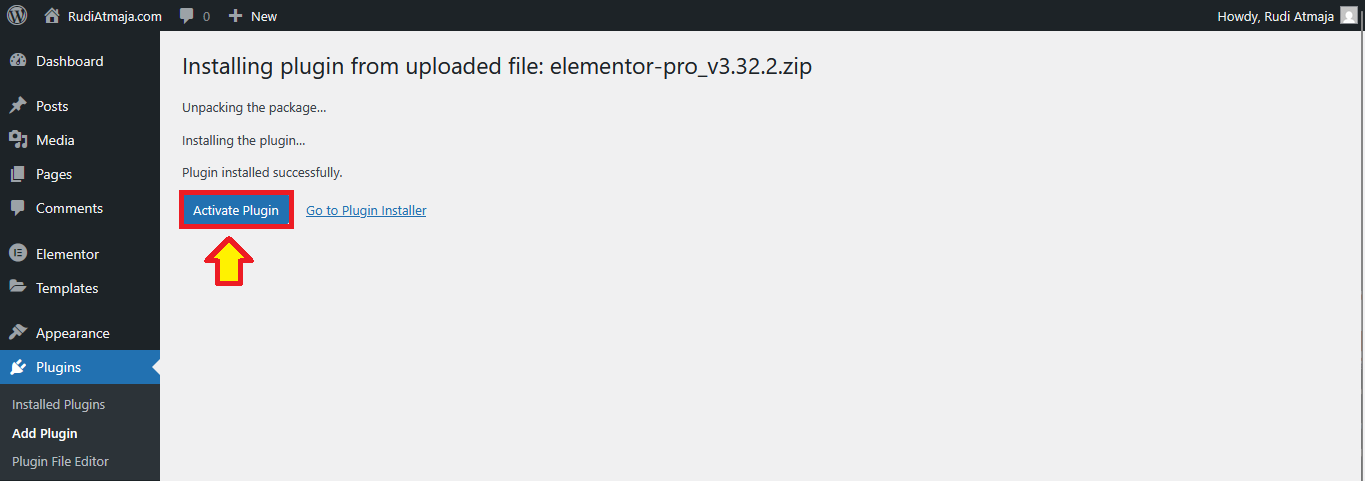
Once the installation is complete, don’t forget to activate it.
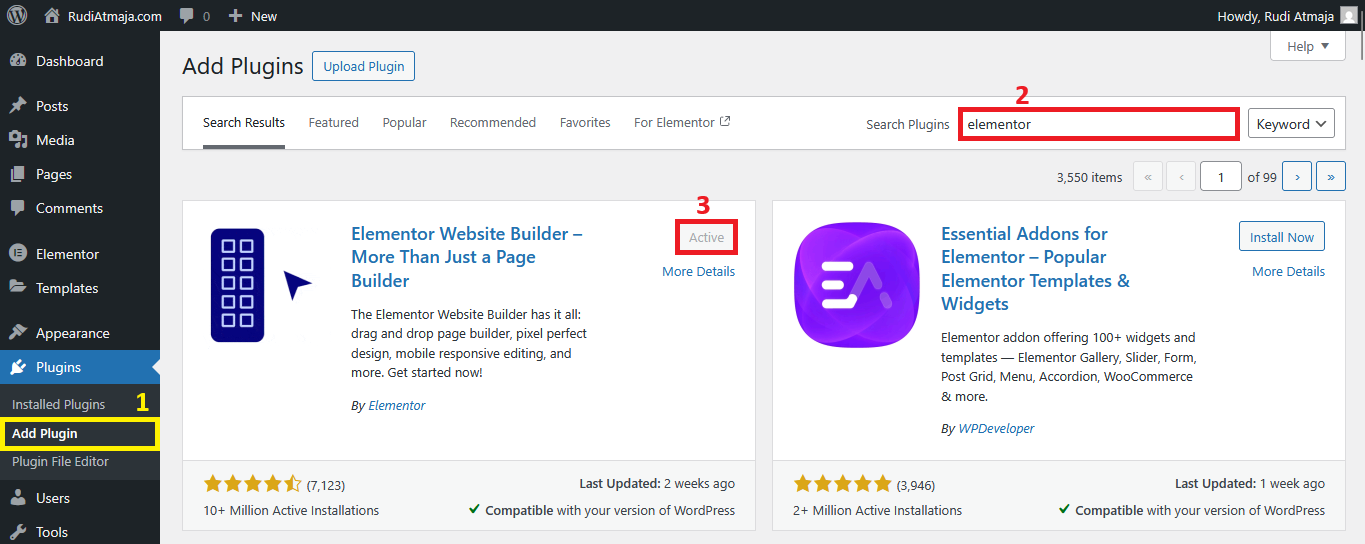
However, Elementor Pro alone won’t work unless the free version of Elementor is already installed and active. If you haven’t installed it yet, simply search for “Elementor” in the plugin repository and click Install → Activate. Think of it like this: the free version provides the core builder, while Pro unlocks advanced features like Theme Builder, Popup Builder, and Dynamic Content – all crucial for building a fully custom 404 page.
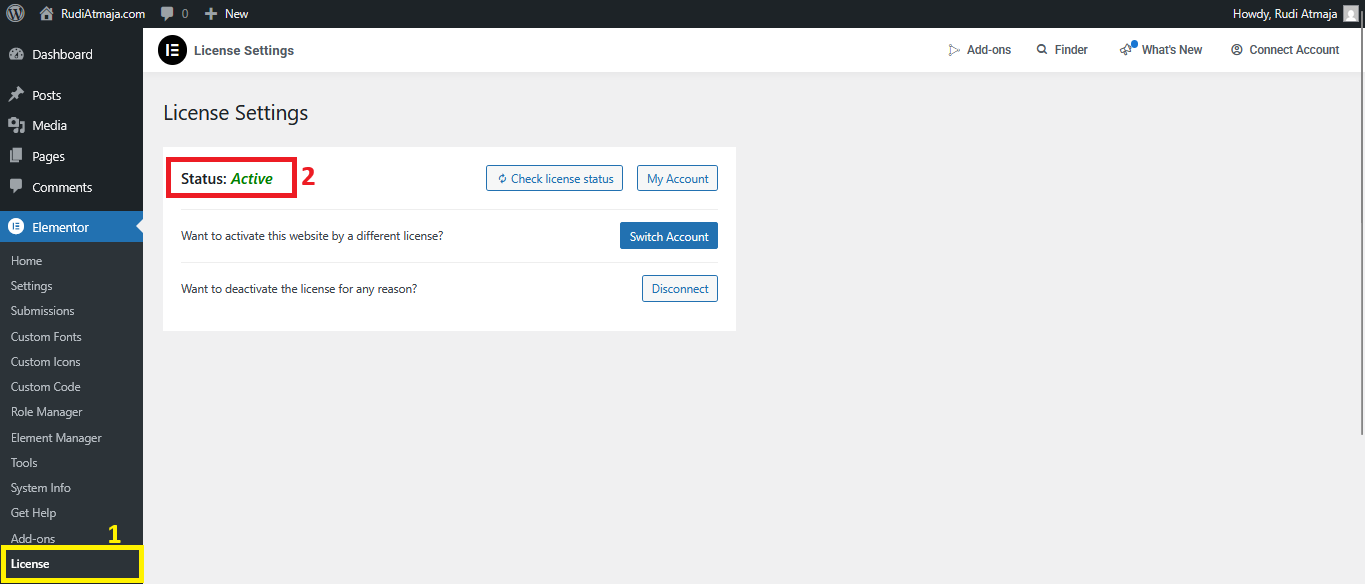
After both plugins are active, head over to Elementor → License in your WordPress sidebar. Paste your license key (available in your Elementor account dashboard) and click Connect & Activate. This step is important, as without license activation, you won’t receive Pro templates, widget access, or automatic updates.
With Elementor Pro now fully installed and licensed, your site is ready to create a custom 404 page that actually serves your users instead of leaving them stuck at a dead end. In the next step, we’ll access the Theme Builder to start constructing your design from scratch—or using a template if you prefer a faster workflow.
Step 2: Open Theme Builder and Create a New 404 Template
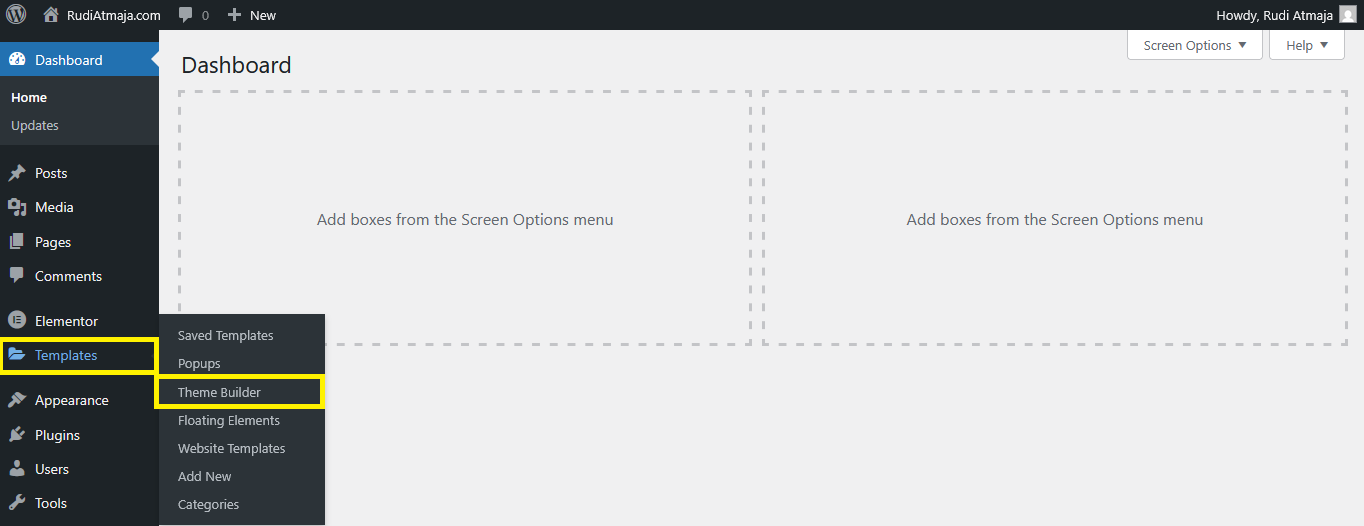
Once Elementor Pro is activated, head straight to Templates → Theme Builder from your WordPress dashboard.
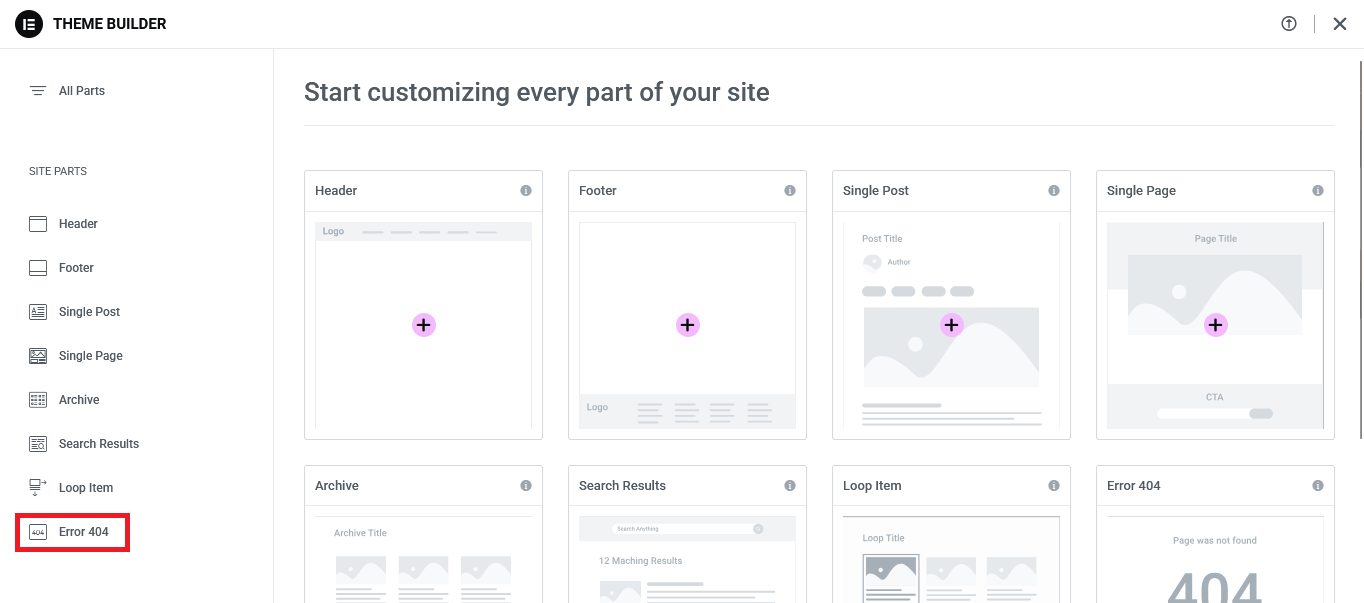
You’ll land on a screen exactly like the one in the image above — a clean interface showing different site parts such as Header, Footer, Single Post, Search Results, and of course, Error 404. Look at the left sidebar and you’ll notice “Error 404” listed at the bottom. You can click it directly to filter only the 404 templates.
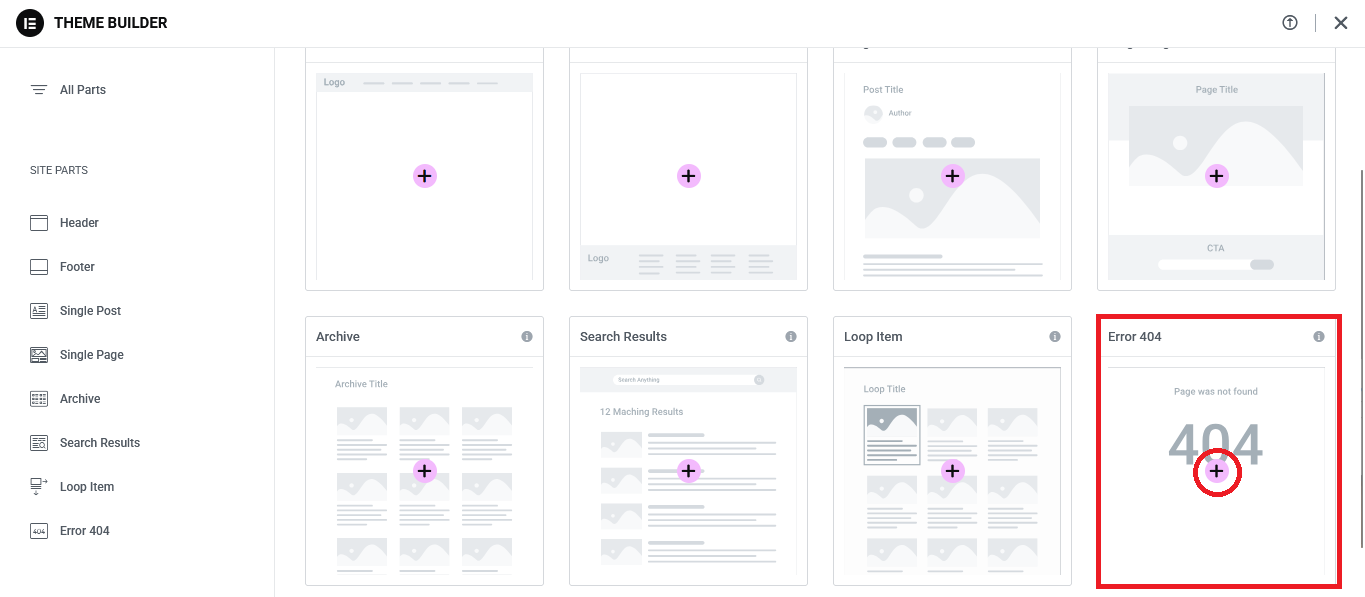
Alternatively, you can also scroll through the main grid and find the Error 404 block – it usually displays a generic layout with a large “404” placeholder. Either way works – just hit the “+” icon inside it to start creating your new custom template.
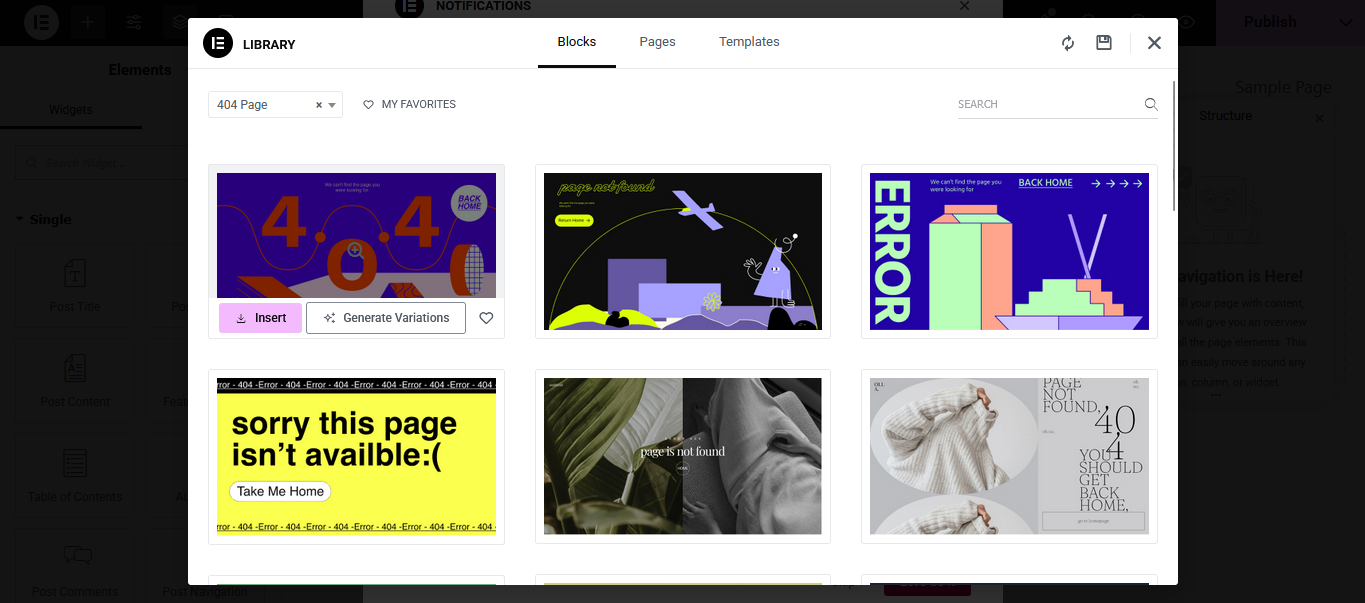
Once you confirm, Elementor will open up either a blank canvas or offer you a selection of starter templates. If you prefer speed, feel free to choose one of the pre-designed 404 templates included with Elementor Pro – they often come with friendly messaging and stylish layouts you can tweak in seconds. But if you’re like me and want full control over the design and messaging, click on “x” button to close.
From here, your 404 page is officially in your hands – meaning you can ditch the typical cold “Page Not Found” message and replace it with something useful, on-brand, and even fun. Whether you want to add a search bar, a CTA button back to your homepage, featured products, or even a funny GIF, this is where your creativity takes over.
In the next step, we’ll begin designing the layout and deciding what kind of tone your 404 page should have – professional, helpful, playful, or intentionally quirky. After all, a lost visitor doesn’t have to stay lost.
Step 3: Design the Layout and Add Essential Elements
Now that your blank 404 template is open inside Elementor, it’s time to structure the layout. Start by clicking the “+” button to create your first section. For most 404 pages, a single-column layout works best because it centers the message and keeps things simple — remember, your goal is to redirect the user’s attention, not overwhelm them with options.
The first element you should add is a Heading widget. Replace the typical robotic “Page Not Found” message with something more human — for example:
- “Oops! You’ve wandered off the map.”
- “This page took a vacation.”
- “Well… this is awkward.”
Right below the heading, drag in a Text Editor widget to provide a short explanation or guidance. Keep it friendly and reassuring, like:
“The page you’re looking for doesn’t exist or has been moved. But hey, don’t worry – here are some helpful links instead!”
Next, consider adding a Search Bar so visitors can immediately look for the content they intended to find. Elementor’s Search Form widget is perfect for this. Just drag and drop it right under your message.
To increase engagement, you can also include one or more Call-to-Action buttons, like:
- Back to Homepage
- Visit Our Blog
- Check Out Bestsellers (if it’s an eCommerce site)
You can place them side-by-side using a two-column inner section or stack them vertically depending on your design preferences.
Once the essentials are in place, feel free to elevate your 404 page with visuals. Drop in an Image widget, an Icon, or even a GIF to make it memorable. Humor works surprisingly well here – visitors appreciate a website that doesn’t take errors too seriously.
If you want to go the extra mile, you can even recommend popular content by adding Posts, Products, or Categories using dynamic widgets like Posts, Loop Grid, or Product Grid (if you’re using WooCommerce). A 404 page that recovers traffic is infinitely more powerful than one that simply apologizes.
Step 4: Save and Apply Your New 404 Template
Once your custom 404 design looks the way you want, it’s time to officially activate it across your entire site. Click the Publish button in the bottom-left corner of the Elementor editor. Elementor will immediately prompt you with a window labeled Display Conditions — this is where you define when your template should be used.
Click Add Condition, then set it to Include → 404 Page. You don’t need any additional rules — this single condition ensures Elementor replaces the default theme’s 404 page with your custom version whenever a visitor lands on a broken or non-existent URL.
Hit Save & Close, and your new 404 page is now live! To test it, open a new browser tab and type in a fake URL on your own site, like:
https://yourwebsite.com/this-page-does-not-exist
If your custom layout appears, congratulations — it’s working perfectly. If not, clear your browser cache (or any caching plugins you’re using) and try again.
The best part is that you can edit or improve your 404 template at any time without affecting the rest of your site. Just return to Templates → Theme Builder → Error 404, click Edit with Elementor, and tweak away. Treat it like a living asset — refine the message, update the visuals, or even use it for seasonal promotions or special announcements.
Final Thoughts on Crafting a High-Converting 404 Page
A custom 404 page might seem like a small detail, but it can make a surprising impact on how visitors perceive your brand. Instead of letting users hit a dead end, you now have the ability to guide them back with warmth, humor, or even a helpful CTA. With Elementor Pro and its Theme Builder, the process is not only easy — it’s actually fun.
If this is your first time building a 404 page from scratch, don’t overthink it. Start simple, publish it, and refine later. What matters most is that lost visitors are no longer abandoned. Whether your tone is playful or professional, your new 404 page is now a tool — not just an error screen.
And remember: just because someone landed on the wrong page doesn’t mean you’ve lost them. With the right messaging, a clear path forward, and maybe even a well-placed button or two, your 404 page can become a quiet conversion machine.
If you haven’t tried Elementor Pro yet, now’s the perfect time. Grab it, experiment, and see how many other boring templates you can replace across your site. Once you get a taste of Theme Builder freedom, there’s no going back.


