Buying hosting always looks simple from the outside. You choose a plan, pay for it, connect your domain, and your website is supposed to be ready. But once you actually get inside the account, that’s when you start noticing what you really paid for. That was the part I wanted to understand when I started using Bluehost.
For me, the most important question was never about complicated server terms. I wanted to know what I would actually receive after buying the hosting package. Would it be easy to manage more than one website? Would the tools inside the account feel useful, or would they just look good on the sales page?
Bluehost caught my attention because it presents itself as a simple option for people who want to build websites without making the process feel too heavy. That sounded practical to me because I didn’t want hosting that required too much effort just to get started. I wanted something that gave me the basics in one place. So I decided to try it and see what was really included after signing up.
After getting access to the hosting account, I started checking what was available inside. I looked at the website limit, storage, control panel, domain tools, email options, and other features that came with the package. Some parts were exactly what I expected, while others were things I only noticed after using the account directly. That kind of experience is difficult to understand from the pricing page alone.
I also realized that the value of a hosting plan depends a lot on what kind of user you are. If you only want to run one small website, your expectations will be different from someone managing several websites at once. If you are new to hosting, you may care more about simplicity than advanced settings. That’s why I looked at Bluehost from the perspective of what a regular user actually gets.
What I wanted from Bluehost was not something fancy. I wanted enough room to manage my websites, a familiar control panel, and features that made daily website tasks easier. I also wanted to see whether the package felt complete enough without needing to upgrade immediately. Those simple things matter a lot when you are choosing hosting for real use.
In this Bluehost review, I will share what I found inside the hosting package after becoming a customer. I will focus on what you get, how the package feels from a user’s point of view, and whether the included features make sense for everyday website owners. This is based on my own experience, not just a list of claims from the sales page. Hopefully, it helps you understand Bluehost more clearly before deciding whether to buy it.
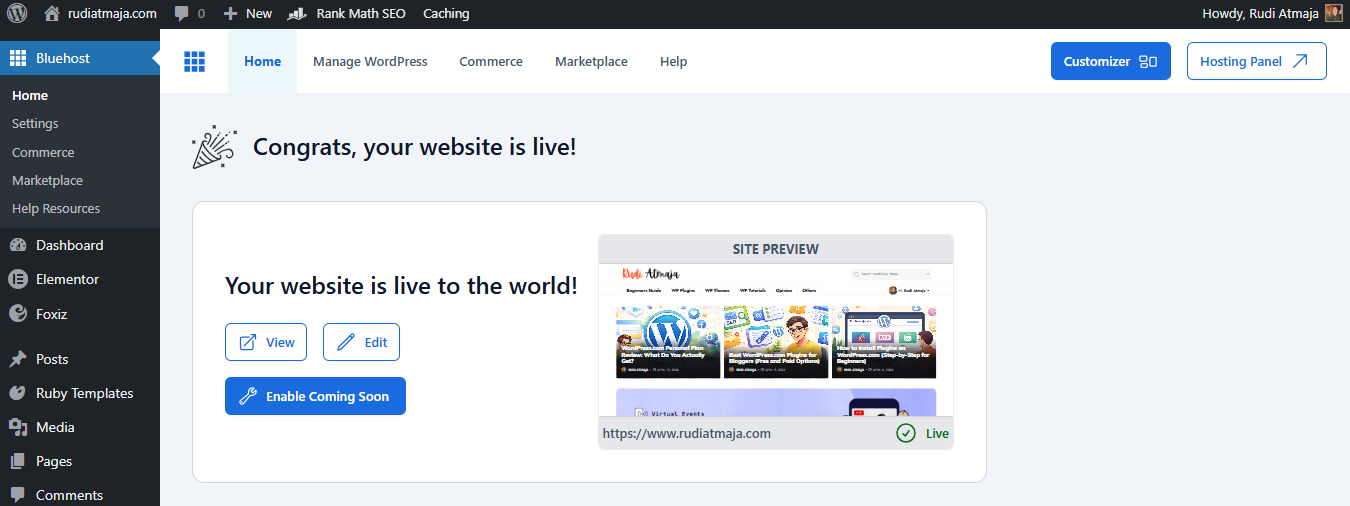
Bluehost Review 2026
In this Bluehost review, I want to be clear from the beginning that I’m not talking about every Bluehost hosting plan. The plan I use is the Bluehost Starter shared hosting plan, so my experience is based on that specific package. This matters because Bluehost has different hosting options, and each plan may come with different limits, features, and pricing. So if you are looking at another Bluehost plan, your experience may not be exactly the same as mine.
I chose the Starter plan because it looked suitable for managing small websites without jumping into a more expensive package. It is a shared hosting plan, which means it is made for regular website owners, bloggers, beginners, and small business sites rather than advanced server users. Inside this plan, Bluehost includes support for up to 10 websites, 10 GB NVMe SSD storage, and an estimated capacity for around 40K visits per month. Those are the main things I looked at before deciding whether the plan made sense for my needs.
So before I talk about whether Bluehost feels worth it or not, I think it makes more sense to start with what I actually received after buying the plan. Many people compare hosting only by price, but the real question is what you can use once your account is active. For me, that includes the website limit, storage, cPanel access, and the tools available inside the hosting account. That’s why the first part of this review will focus on what you get with the Bluehost Starter plan.
1. What You Get with the Bluehost Starter Plan
After buying the Bluehost Starter shared hosting plan, the first thing I wanted to check was what I could actually use inside the account. For me, this is more important than just reading the plan name or looking at the price. A hosting package can look simple on the outside, but the real value depends on what is included once you log in. That is why I started by looking at the main features that came with the plan.
With the Starter plan, Bluehost gives you the basic things needed to build and manage websites in one place. This includes the ability to host multiple websites, NVMe SSD storage, cPanel access, and other tools that support daily website management. I think this part is useful to explain first because not every buyer knows what they are actually getting before they pay. So before going deeper into each feature, let’s start with the most important things included in this package.
1. Manage Your Domain Names from One Place
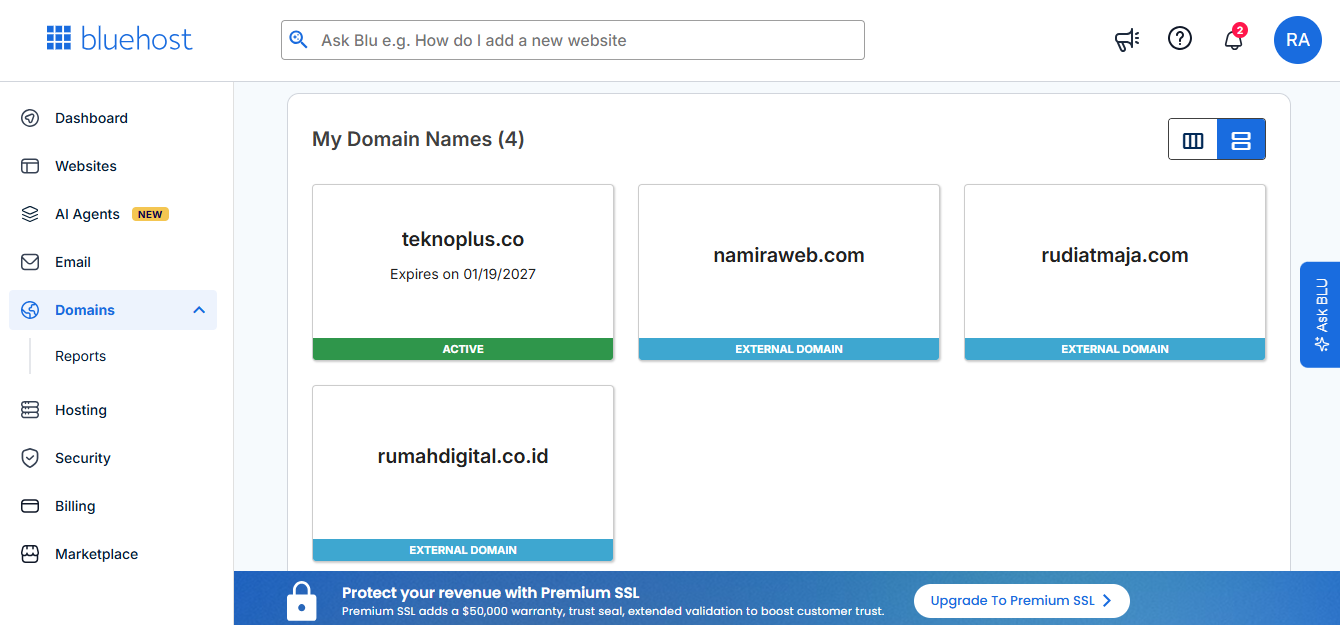
The Domains section in Bluehost is where you can manage the domain names connected to your hosting account. From this page, you can see which domains are already added to Bluehost, whether they are registered directly through Bluehost or connected from another provider. In the screenshot, Bluehost shows several domain names in one dashboard with clear status labels. This makes it easier to understand which domain is active and which one is an external domain.
This section is useful when you have more than one domain to manage. Instead of checking each domain separately, you can view them together from the same page. Bluehost displays each domain in a simple card layout, so you can quickly identify the domain name and its current status. If a domain is marked as Active, it means the domain is already active inside your Bluehost account.
You can also connect domains that were purchased from other providers. These domains appear as External Domain inside the Bluehost dashboard. This means you do not always need to buy a domain directly from Bluehost to use it with your hosting account. As long as the domain is connected properly, you can use it for your website setup.
This domain area helps you keep your website addresses organized inside one hosting dashboard. You can check your connected domains, see their status, and manage domain-related settings from the same place. If you plan to run several websites, this section becomes important because each website needs a domain name. With Bluehost, you can manage those domain names without leaving the main account dashboard.
2. Free Let’s Encrypt SSL
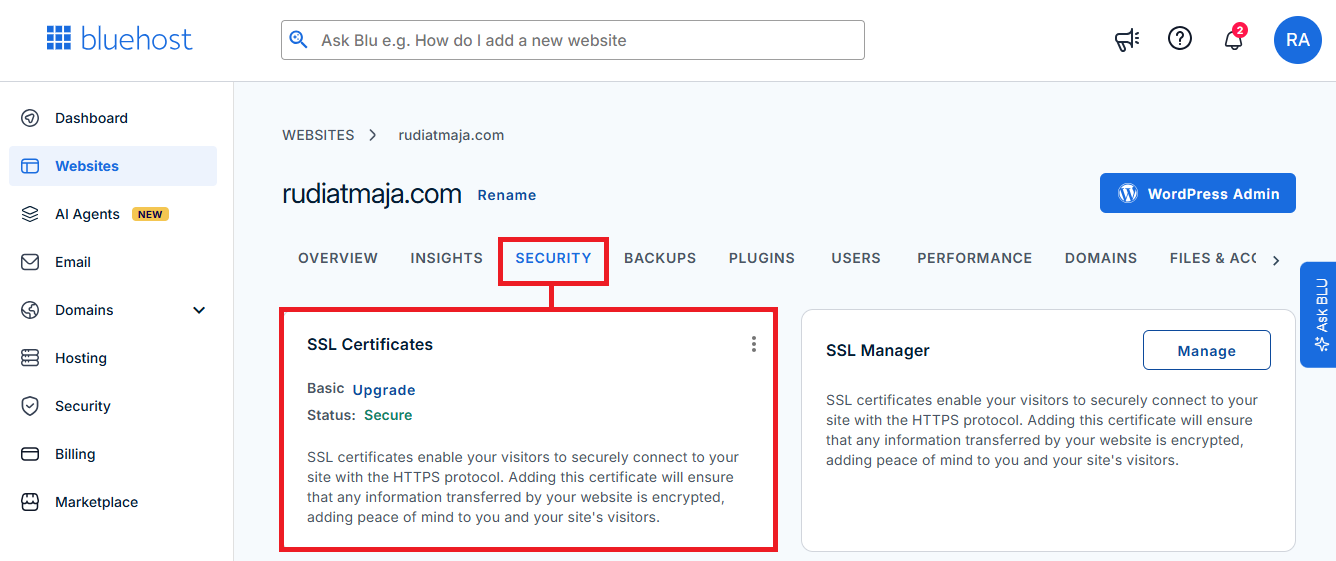
Bluehost includes a free SSL certificate from Let’s Encrypt for websites hosted on its platform. SSL is used to enable HTTPS on a website, so the website address can load with https:// instead of only http://. This certificate is connected to the domain name used by the website. Once SSL is active, the browser can recognize that the website is using an encrypted connection.
For domains hosted in Bluehost, the Let’s Encrypt SSL is installed automatically by the system. After you connect your domain name to Bluehost’s nameservers, Bluehost will begin processing the SSL installation for that domain. You do not need to manually purchase a separate basic SSL certificate for websites hosted under this setup. The SSL certificate is handled from inside the Bluehost hosting system.
The automatic SSL installation usually takes a few minutes after the domain is connected to Bluehost’s nameservers. During this process, the domain needs to point correctly to Bluehost before the SSL can be issued. If the domain connection is still updating, the SSL may not appear immediately. Once the process is finished, the website can load using HTTPS.
This SSL setup applies to websites hosted on Bluehost and connected properly to the hosting account. If you use an external domain, the domain still needs to be pointed to Bluehost’s nameservers first. After that, the Let’s Encrypt SSL can be installed automatically for the website. This is how Bluehost provides HTTPS access for domains hosted through its shared hosting account.
3. SiteLock Lite
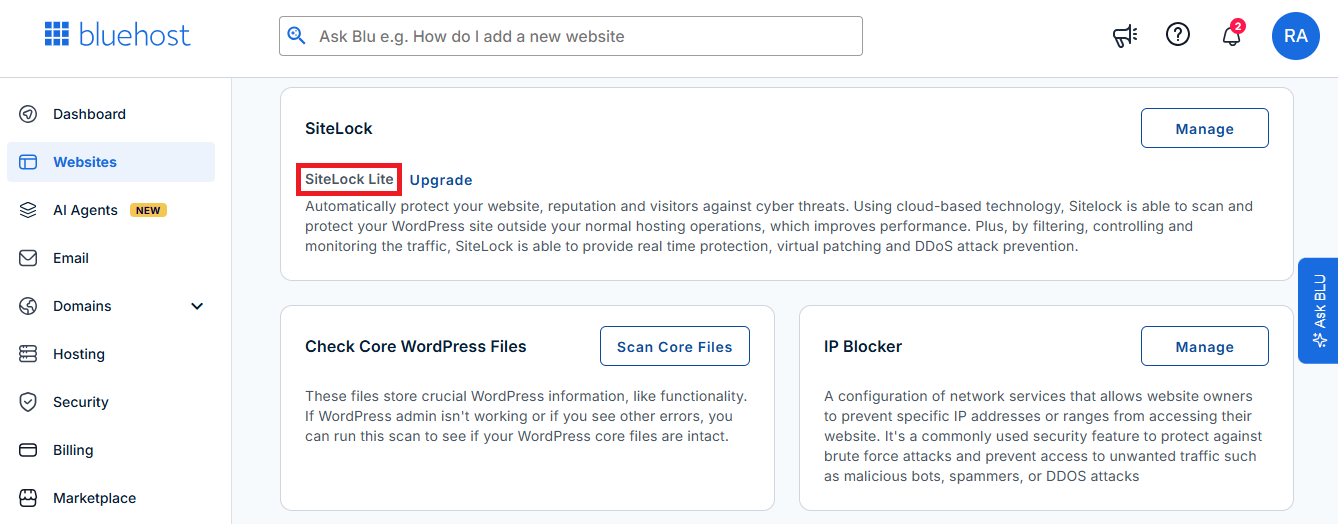
Bluehost includes SiteLock Lite for each website hosted in the account. This feature is used to scan websites for security-related issues. Inside SiteLock Lite, you can check the security status of your hosted websites from the Bluehost dashboard. The scan results help show whether a website has detected security risks that need attention.
SiteLock Lite comes with a Security Scan feature. This scan includes a Vulnerability Scan and a Webpage Scan. The Vulnerability Scan is used to check whether the website has possible security weaknesses. The Webpage Scan is used to scan website pages and detect issues that may appear on the site.
Another part of SiteLock Lite is the Risk Score. This score shows the security risk level of a website based on the scan results. It gives you a quick view of whether the website has a low or higher level of detected risk. You can use this score as a reference when checking the condition of each website hosted in Bluehost.
Since SiteLock Lite is available for every website hosted in Bluehost, each website can have its own scan status. This means you can check the security condition of different websites separately. If you manage several websites under the same hosting account, SiteLock Lite helps separate the scan results for each one. That way, you can see which website needs attention based on its own security scan data.
4. Basic Weekly Backup
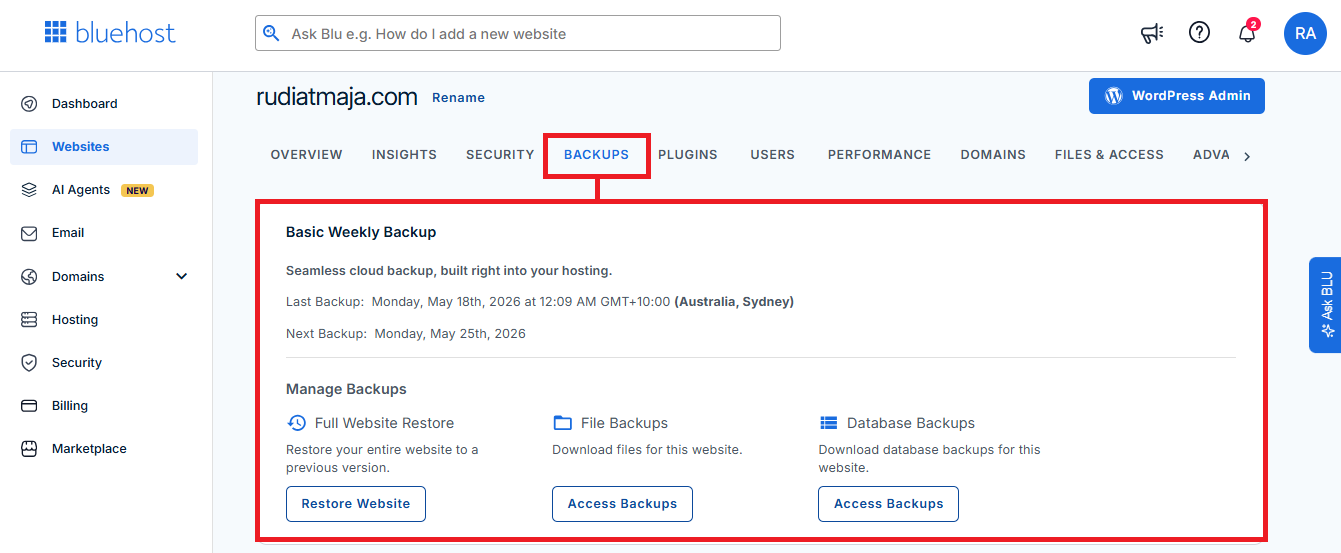
Bluehost includes a Basic Weekly Backup feature inside the website management area. This backup feature is shown under the Backups tab for each website hosted in the account. From this section, you can see the latest backup date and the next scheduled backup date. In the screenshot, Bluehost shows that the backup runs on a weekly schedule.
The backup section is divided into several parts. The first option is Full Website Restore, which is used to restore the entire website to a previous version. This can be used when you need to return the website to an earlier backup point. Bluehost provides a Restore Website button for this action.
There is also a File Backups option. This section is used to access and download backup files for the website. Website files usually include items related to the site structure, themes, plugins, media uploads, and other file-based content. Bluehost provides an Access Backups button for this file backup area.
Another option shown in the backup section is Database Backups. This is used to access and download database backups for the website. The database usually stores website content, settings, user data, and other information used by the site. Bluehost separates file backups and database backups, so you can access them from different backup options.
5. Plugin Management and Automatic Updates

Bluehost provides a Plugins section for each WordPress website hosted in the account. This page shows the plugins that are currently installed on the website. From this section, you can see the plugin name and whether each plugin is active. The installed plugins are listed in a table with an active toggle on the right side.
This section is used to manage WordPress plugins from the Bluehost dashboard. Plugins are add-ons that give your WordPress website extra functions. For example, a plugin can be used for security, forms, SEO, database cleaning, spam protection, or other website features. Bluehost displays the installed plugins in one place so you can check what is already running on the website.
There is also an Automatic Updates option in this section. When this option is turned on, Bluehost can automatically update the plugins installed on the website. This means you do not need to update each plugin manually from the WordPress dashboard every time a new version is available. The automatic update setting applies to the plugins listed under that website.
Each plugin also has its own active status. If the toggle is turned on, the plugin is active on the website. If the toggle is turned off, the plugin is not active. This makes the Plugins section a place where you can check installed plugins, see their active status, and manage automatic plugin updates from the Bluehost account dashboard.
6. Caching Control
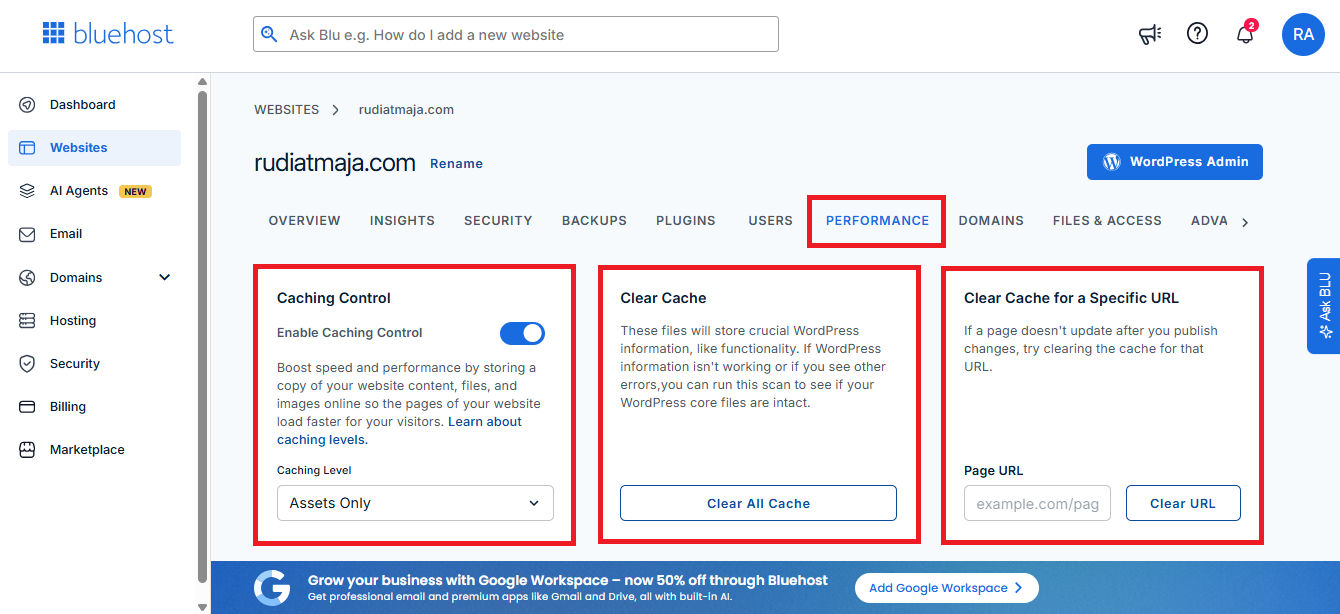
Bluehost provides a Performance section for each WordPress website hosted in the account. In this section, you can manage caching settings for the website. Caching is used to store copies of website content, files, and images so pages can load from saved data instead of generating everything again each time. In the screenshot, the caching option is shown under Caching Control.
Inside Caching Control, you can turn caching on or off using the toggle. Bluehost also provides a Caching Level option. In the screenshot, the selected caching level is Assets Only. This setting is related to how Bluehost stores cached website assets such as files and images.
There is also a Clear Cache option in the same Performance area. This function is used to remove cached website data from the hosting system. When you clear the cache, Bluehost refreshes the stored version of the website files. The screenshot shows a Clear All Cache button for clearing the cache from the website.
Bluehost also provides Clear Cache for a Specific URL. This option is used when you only want to clear the cache for one page instead of the whole website. You can enter the page URL into the field and click Clear URL. This is related to cases where a specific page still shows an older version after changes have been made.
7. Cloudflare Integration
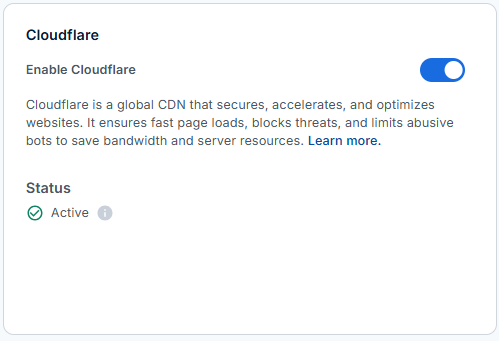
Bluehost provides a Cloudflare integration for WordPress websites hosted on its platform. Cloudflare works as a CDN, which means it helps deliver your website content through its global network. When this feature is enabled, your website can use Cloudflare for caching, traffic filtering, and performance-related delivery. The status will show whether Cloudflare is already active for that website.
Cloudflare can also provide a free SSL certificate for your website. This SSL allows your website to load using HTTPS through the Cloudflare connection. So when Cloudflare is active, your website can get an additional SSL layer from the CDN service. This is separate from the free Let’s Encrypt SSL that Bluehost provides for hosted domains.
The Cloudflare option can be turned on from the Bluehost dashboard if the website is built with WordPress. After it is enabled, Cloudflare will handle part of the website delivery through its CDN system. It can also help block threats and reduce abusive bot traffic before it reaches your hosting resources. The feature is connected directly to the WordPress site managed inside Bluehost.
One thing to note is that this Cloudflare integration is not available for every website type. If your website is not built with WordPress, this option may not appear inside the Bluehost website management area. In that case, Cloudflare has to be set up separately outside the Bluehost WordPress dashboard. So this included Cloudflare feature mainly applies to WordPress websites hosted on Bluehost.
8. Site Management Options
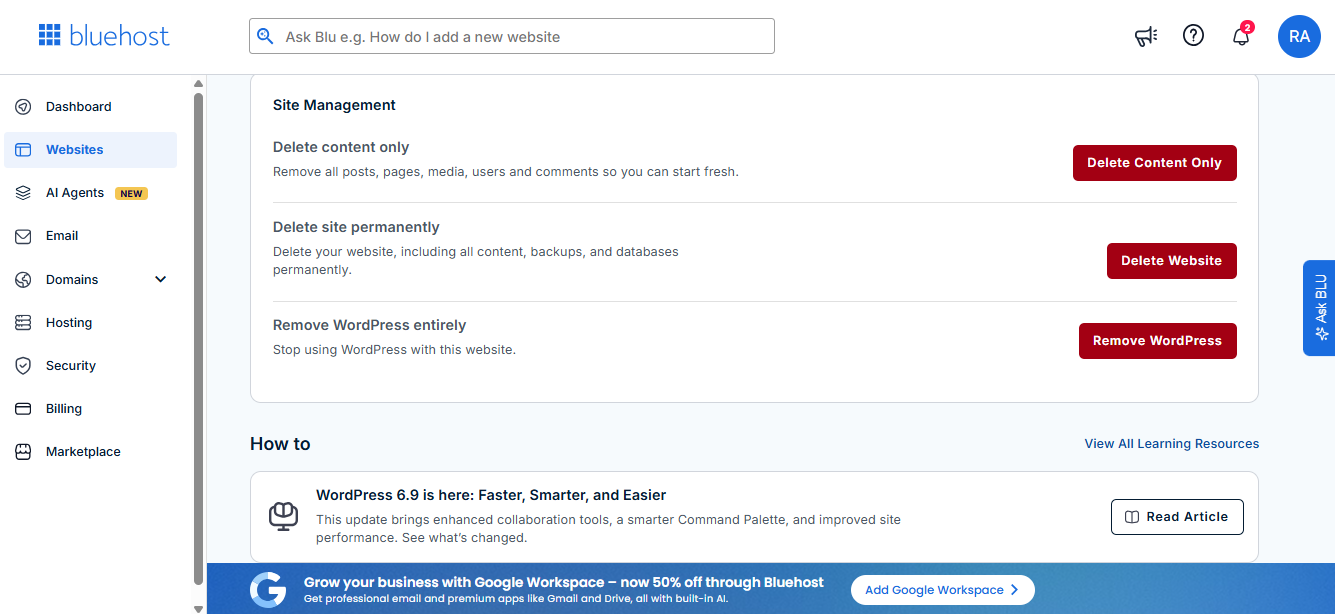
Bluehost provides a Site Management section for WordPress websites hosted in the account. This area is used for actions related to removing website content, deleting the website, or removing WordPress from the site. These options are placed separately because they affect the website directly. Each action has its own button, so you can choose the specific type of removal you need.
The first option is Delete Content Only. This is used when you want to remove posts, pages, media, users, and comments from the website while keeping the site itself available. It can be used when you want to clear the website content and start fresh. This option does not remove the whole website from the hosting account.
The second option is Delete Site Permanently. This is used to delete the website from Bluehost, including its content, backups, and databases. Since this action removes the website completely, it is different from only clearing the content. This option is for situations where you no longer want to keep that website inside the hosting account.
The third option is Remove WordPress Entirely. This is used when you want to stop using WordPress for that website. It removes the WordPress setup from the site, instead of only deleting posts or pages. This option applies when the website no longer needs to run on WordPress inside Bluehost.
9. Bluehost Plugin
Bluehost also provides its own Bluehost Plugin for WordPress websites. This plugin can be installed from the Bluehost client area, so you do not need to search for it manually from the WordPress plugin directory. After the plugin is installed and activated, it adds several website management options inside WordPress. These options are mainly related to performance, cache control, site setup, and staging.
Inside the Bluehost Plugin, you can enable Object Caching. Object caching is used to store certain database query results, so WordPress can reuse them instead of requesting the same data repeatedly. This setting is connected to how WordPress handles repeated requests from your website. When enabled, it becomes part of the performance settings available through the Bluehost Plugin.
The plugin also gives you a Clear Cache option. This is used to remove stored cache from the website when you want WordPress to load the latest version of your content, files, or design changes. If a page still shows old content after an update, clearing the cache can force the website to refresh the saved version. This option can be accessed directly from the plugin without opening a separate cache tool.
Another feature available inside the Bluehost Plugin is Link Prefetch. This feature is used to prepare certain links before they are clicked. When enabled, WordPress can start loading linked pages earlier based on visitor behavior. This is related to how pages are prepared and delivered when someone moves through your website.
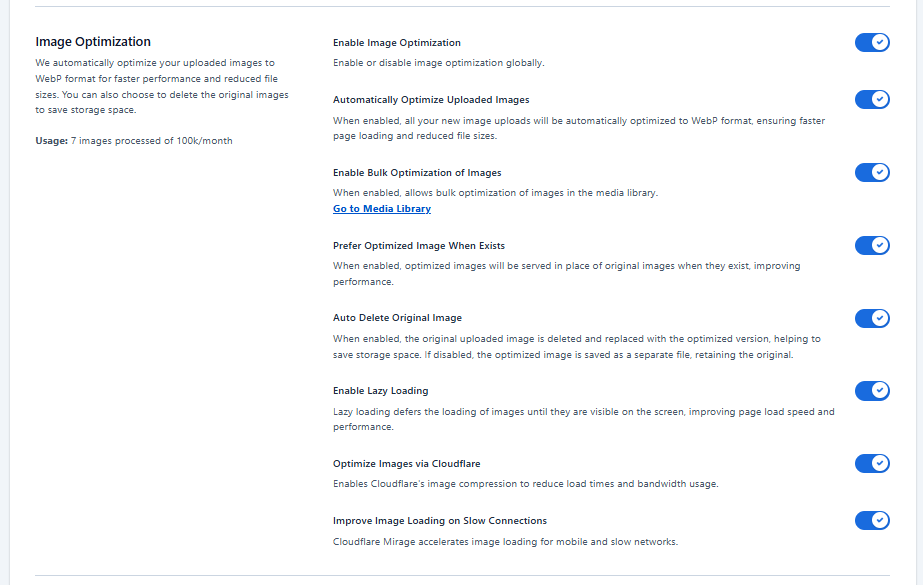
The Bluehost Plugin also includes Image Optimization. This feature is used to optimize images uploaded to the website. Image optimization usually works by reducing image file size or preparing images in a more efficient format. This setting is connected to website loading because images are often one of the largest parts of a web page.
There is also an option to Optimize Fonts via Cloudflare. This feature is related to how fonts are delivered on your website through Cloudflare. When enabled, font files can be handled through Cloudflare’s optimization system. This setting is available when your website is connected to the supported Cloudflare-related features inside Bluehost.
The plugin also lets you activate a Coming Soon page. This feature is used when your website is not ready to be shown publicly yet. Instead of showing an unfinished website, you can display a temporary Coming Soon page while you continue working on the site. This can be managed from the Bluehost Plugin without installing a separate coming soon plugin.
Another option inside the Bluehost Plugin is the ability to create a staging site. A staging site is a separate copy of your website used for testing changes before applying them to the live website. You can use it to test layouts, plugins, updates, or content changes without editing the public version directly. After testing, the changes can be moved from the staging site to the live site depending on the available staging controls.
2. What I Like About Bluehost
After explaining what comes with the Bluehost Starter plan, I want to move into the parts that stood out to me while using it. This section is based on what I personally found convenient after managing websites inside the account. I’m not talking about every Bluehost plan here, only the Starter shared hosting plan that I use. That matters because different plans may include different features.
The first thing I paid attention to was how Bluehost organizes everything inside the dashboard. When you buy hosting, you don’t only need storage and website slots. You also need a place to manage domains, websites, security, backups, plugins, and performance settings. Bluehost puts many of those controls inside one account area.
For me, this made the hosting account easier to understand from the beginning. I didn’t have to jump between too many separate platforms just to find basic website settings. The left menu already shows the main areas like Websites, Email, Domains, Hosting, Security, Billing, and Marketplace. That layout helps you know where to go when you want to manage something specific.
Another thing I noticed is that each website has its own management area. When I open one website inside Bluehost, I can access different tabs for that specific site. These include overview, security, backups, plugins, performance, domains, and files access. This structure makes it easier to manage each website separately instead of mixing everything together.
I also like that Bluehost gives access to WordPress-related tools from the hosting dashboard. For a WordPress website, I can go directly to the WordPress admin area from Bluehost. I can also see plugin settings, backup options, cache controls, and performance features without starting from scratch every time. This makes the dashboard feel connected to the actual website management process.
The domain management area is another part that I found practical. If you have several domains connected to your account, Bluehost displays them in one place. You can see which domain is active and which one is connected as an external domain. This helps you keep track of domains that are already linked to your hosting account.
I also appreciate that some features are already included inside the hosting environment. Things like free Let’s Encrypt SSL, SiteLock Lite, basic weekly backup, caching controls, and Cloudflare integration are available from the account area. These features are not hidden in complicated menus. You can find them while managing each website from the Bluehost dashboard.
So in this part of the Bluehost review, I’ll explain the things I personally like after using the Starter plan. I’ll focus on the parts that made website management feel more organized, easier to access, or more complete from inside the account. This section is not about listing every feature again. It is about showing which parts of the Bluehost experience felt useful to me while actually managing my websites.
3. What I Don’t Like About Bluehost
After using Bluehost for a while, there are a few things that I think are worth mentioning clearly. These are not dealbreakers for everyone, but they affected my own experience while managing websites from the Bluehost dashboard. Some of them are related to the dashboard experience, while others are related to support, domain setup, and Cloudflare limitations.
1. Frequent Product Promotion Popups
One thing I don’t like about Bluehost is how often the dashboard shows popups promoting their own products or add-ons. I understand why Bluehost does this because they have other services they want to offer to customers. But when I only want to access my hosting dashboard and manage my websites, these popups can feel distracting. Instead of going straight to the page I need, I sometimes have to close promotional messages first.
This also makes the dashboard feel slower in some situations. When a popup appears, it can delay access to the account area or make the dashboard feel less smooth to use. For me, this is annoying because hosting management should feel quick and direct. I already paid for the hosting, so I would prefer fewer interruptions when opening the dashboard.
2. Live Chat Does Not Connect Directly to a Human Agent
Another thing I don’t like is the live chat experience. When I open Bluehost live chat, it does not always connect me directly to a human support agent. The system usually starts with automated responses first. If I need real help from a person, I have to type something like “Connect me to agent” before the chat moves toward a human agent.
This adds an extra step when I need support quickly. Automated chat can answer basic questions, but not every issue can be solved with default responses. When the problem is related to a specific website, domain, SSL, or hosting setting, I usually prefer talking to a real agent directly. Having to push the chat system first makes the support process feel less straightforward.
3. External Domain Setup Can Take Time
Creating a new website with an external domain can also take some time. From my experience, when I connect a domain from another provider to Bluehost, it does not always work instantly. The domain needs time to connect properly with the hosting account before the website can be used. In some cases, this process can take quite a while, although it is usually less than one hour.
This waiting time is something you should expect if you plan to use domains from outside Bluehost. After changing the nameserver or connecting the domain, the website may not be ready immediately. You may need to wait until the domain connection is fully processed. So if you want to create a website quickly, external domain setup may require a little patience.
4. Cloudflare Is Limited to WordPress Websites
Another limitation I noticed is related to Cloudflare. Bluehost provides Cloudflare integration inside the dashboard, but this feature is only available if the website is built with WordPress. If your website is not created with WordPress, you may not get the same Cloudflare option inside the Bluehost website management area. This matters if you want to use Bluehost for non-WordPress websites.
Even when Cloudflare is connected, you do not get full control over Cloudflare settings from the Bluehost dashboard. The integration lets you enable Cloudflare, but it does not give the same level of control as managing Cloudflare directly from a Cloudflare account. So if you want to adjust advanced Cloudflare settings yourself, the Bluehost integration may feel limited. This is something to know before depending on the built-in Cloudflare option.
Final Thoughts on Bluehost
After using Bluehost Starter shared hosting for around 6 months, I can say that my experience has been mostly about what I actually received inside the hosting account. The plan gives me support for multiple websites, 10 GB NVMe SSD storage, cPanel access, free Let’s Encrypt SSL, SiteLock Lite, weekly backup, plugin management, caching options, and WordPress-related tools from the Bluehost dashboard. These are the main parts that make up the hosting package after signing up. So if you are considering Bluehost, it is better to look beyond the plan name and understand what is included inside the account.
One thing I also want to mention is that during these 6 months, I have never received a notification from Jetpack saying that my website was down. I use Jetpack monitoring, so if my site goes offline, Jetpack should send a downtime alert. So far, I have not received that kind of notification while using Bluehost. This is part of my own experience with the websites I host there.
Of course, there are still some parts I do not like. The Bluehost dashboard often shows promotional popups for their own products, and that can make the dashboard feel slower when I only want to access my account quickly. The live chat also does not always connect directly to a human agent unless you type something like “Connect me to agent”. External domain setup can also take some time before the domain and hosting are fully connected, usually less than one hour in my experience.
>>> GET BLUEHOST <<<
Overall, Bluehost Starter shared hosting gives you a package that includes website capacity, storage, SSL, cPanel, security scan, backup, cache control, and WordPress management tools in one place. My review is based on the Starter plan, so it should not be treated as the same experience for every Bluehost hosting package. If you want to buy Bluehost, make sure you compare your own website needs with what this plan actually includes. That way, you can decide whether the Bluehost Starter plan fits the kind of websites you want to build and manage.