Rank Math SEO Guide – If you’re running a WordPress website and want to improve your visibility on search engines, you’ve probably heard about Rank Math. SEO can feel overwhelming at first, especially with all the technical terms like meta tags, schema markup, XML sitemaps, and keyword optimization. The good news is that with the right plugin, you don’t need to be an SEO expert to start improving your rankings.
Rank Math is one of the most popular SEO plugins available today. It helps you optimize your website directly from your WordPress dashboard, guiding you step by step with suggestions and built-in tools. Instead of guessing what to fix, Rank Math shows you exactly what can be improved.
Before we go deeper, let’s clarify something important. This guide primarily focuses on users of WordPress.org, which gives full control over themes and plugins. However, Rank Math is also available for WordPress.com users – as long as they are subscribed to a paid plan that allows plugin installation.
On lower-tier WordPress.com plans, you cannot install third-party plugins. To use Rank Math on WordPress.com, you need a paid plan that unlocks plugin support. Without that upgrade, you won’t be able to access advanced SEO plugins like Rank Math.
>>> Start With WordPress.com <<<
If you’re still new to the platform itself, you may want to read our article about “What is WordPress?” to understand how WordPress works and why plugin access depends on the version and hosting setup you choose. Having that foundation will make this tutorial much easier to follow. Once you understand the environment, configuring SEO tools becomes far less confusing.
One of the reasons Rank Math has become so popular is its balance between power and simplicity. It offers more complete SEO features even in free version, but presents them in a clean and beginner-friendly interface. Whether you’re running a blog, business website, or online store, the plugin adapts to your needs.
Setting up Rank Math correctly from the beginning is crucial. If you rush through the setup wizard without understanding the options, you might miss important configurations that affect how search engines see your website. That’s why this guide will walk you through the initial setup carefully and clearly.
In this article, you’ll learn how to configure Rank Math for the first time and how to use its built-in features to optimize your content the right way. By the end, you’ll not only have the plugin properly set up, but you’ll also understand how to use it strategically to improve your website’s SEO performance.
How to Set It Up
Before we jump into the technical steps, let’s set the right expectation. In this tutorial, we’ll be using the free version of Rank Math. The reason is simple: the free version already includes powerful features that are more than enough for most beginners and even intermediate users.
Rank Math Free gives you access to on-page SEO analysis, XML sitemap configuration, basic schema markup, redirection tools, and integration with Google services. For many websites, especially blogs and small business sites, these features are completely sufficient to build a strong SEO foundation. Starting with the free version also allows you to understand how the plugin works before deciding whether you truly need advanced features.
If later you feel limited or need more advanced functionality, you can always upgrade to Rank Math Pro. Toward the end of this guide, you’ll also find a complete overview of Rank Math Pro features so you can decide whether upgrading makes sense for your specific goals and website needs.
1. Creating a Google Analytics Account
Google Analytics is one of the most important tools you can connect to your website. It helps you track visitors, see where your traffic comes from, and understand how people interact with your content. Before connecting it to Rank Math, you first need to create a Google Analytics account.
To get started, you only need a Google account. Simply visit https://analytics.google.com and log in using your Google credentials if you’re not already signed in. If you don’t have a Google account yet, you’ll need to create one first before proceeding.
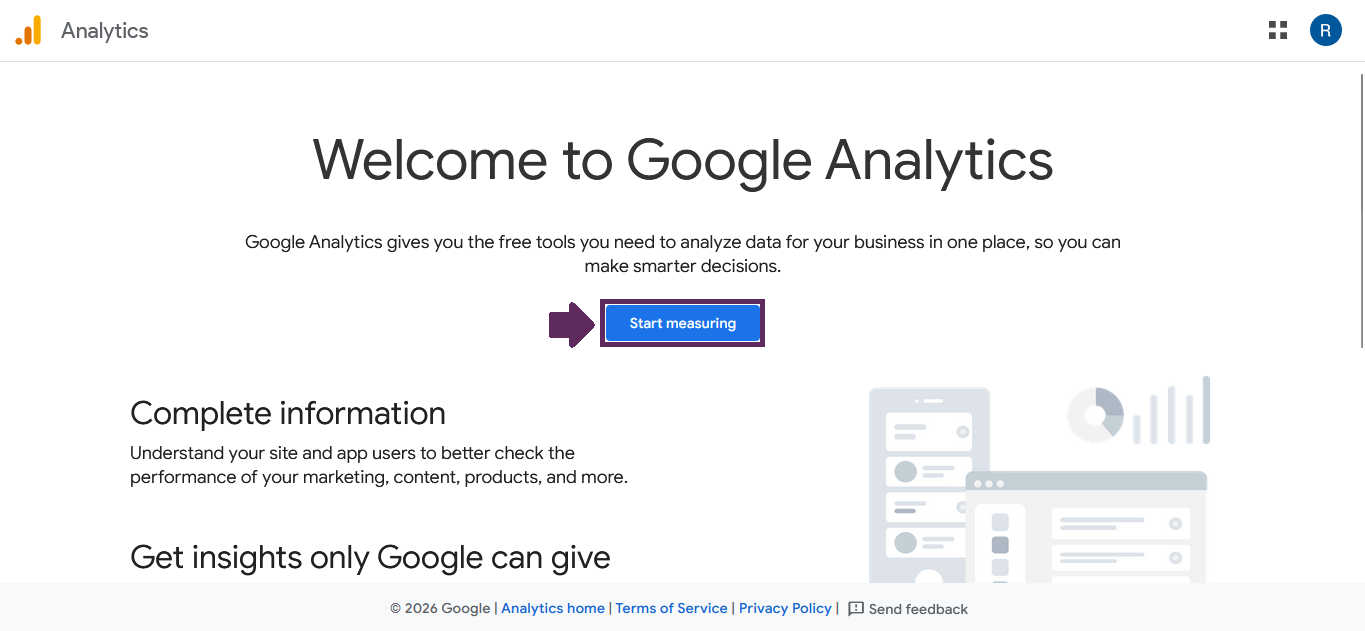
Once you successfully log in, you will be redirected to the Google Analytics homepage. If this Google account has never been used to create a Google Analytics account before, you’ll see the initial welcome screen. On that page, go ahead and click the “Start Measuring” button to begin the setup process.
1.1. Account Creation
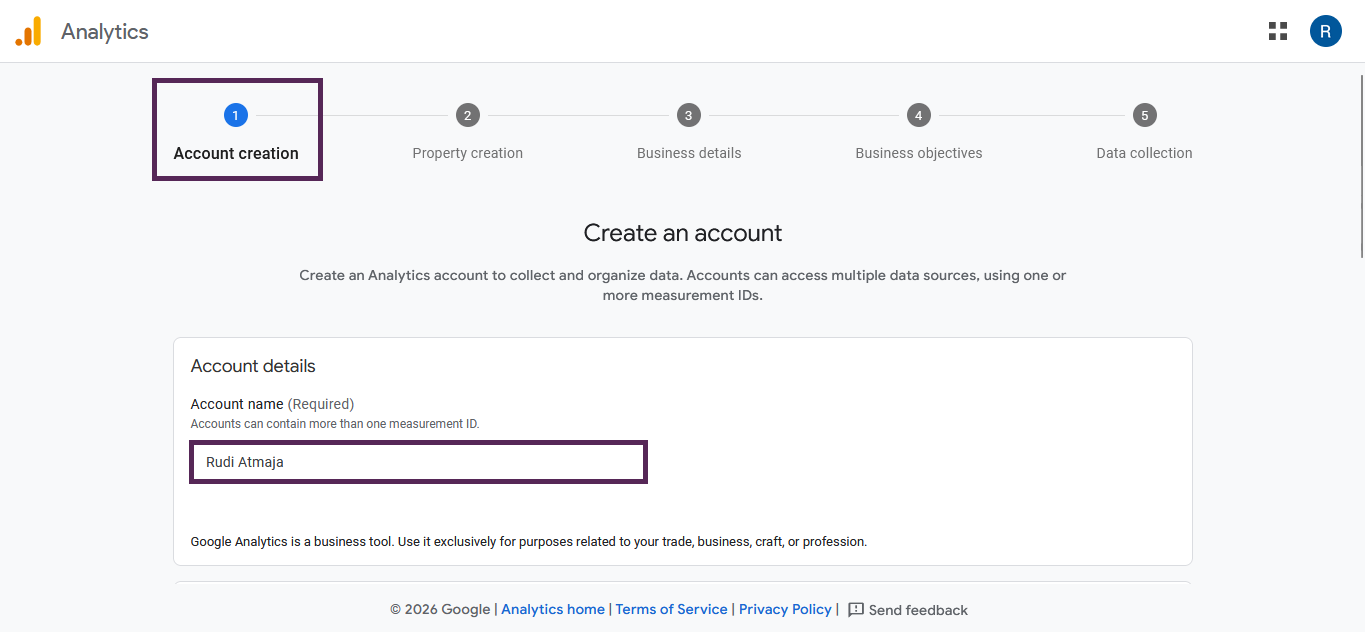
In the first step, you’ll be on the Account Creation section. Here, you need to fill in the Account Name field. You can use your personal name or your website name, depending on how you prefer to organize your analytics account. In my case, I simply used my own name to keep things straightforward.
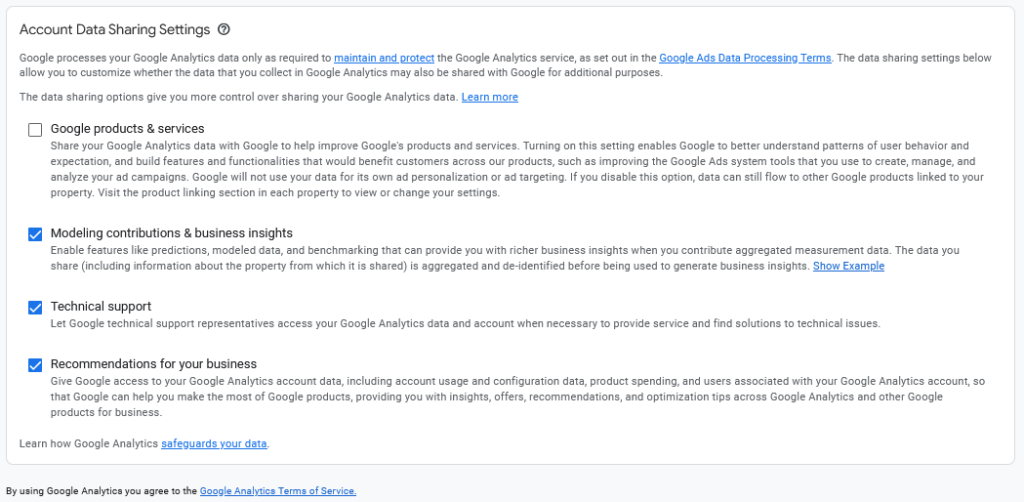
Below the Account Name field, you’ll see the Account Data Sharing Settings options. These checkboxes control how your data is shared with Google for support, benchmarking, and product improvement purposes. Take a moment to read each option carefully and check the boxes that match your preferences.
1.2. Property Creation
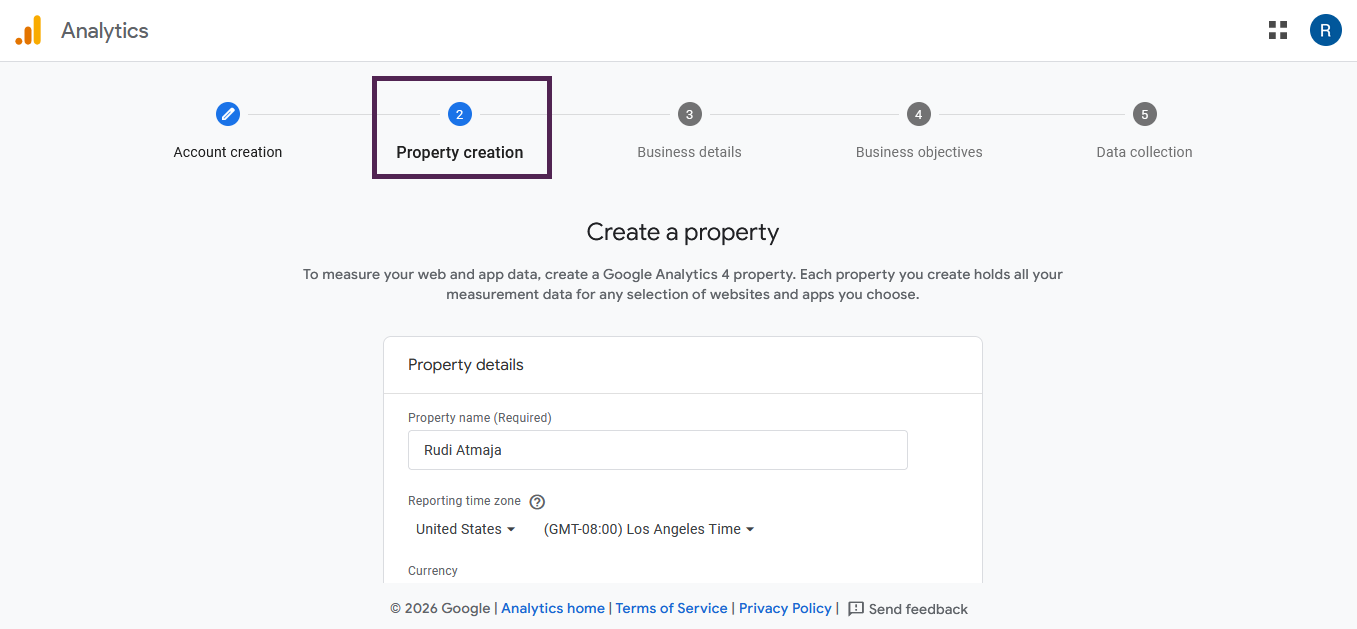
In the second step, you’ll enter the “Property Creation” section. As explained on the screen, to measure your web and app data, you need to create a Google Analytics 4 property. Each property stores all measurement data for the websites or apps you connect to it, so this is an important part of the setup process.
In the Property Name field, you can enter your website name or your personal name. The goal is to make it easily recognizable, especially if you plan to manage multiple websites in the future. In my case, I used my own name to keep it simple and consistent.
Next, you’ll need to configure the Reporting Time Zone and Currency. Make sure you choose the correct time zone based on your location, so your traffic data is reported accurately according to your local time. For the currency, select the one that matches your country or the primary market of your website.
Once everything is filled out correctly, click the “Next” button at the bottom of the page to continue to the next step of the setup process.
1.3. Business details
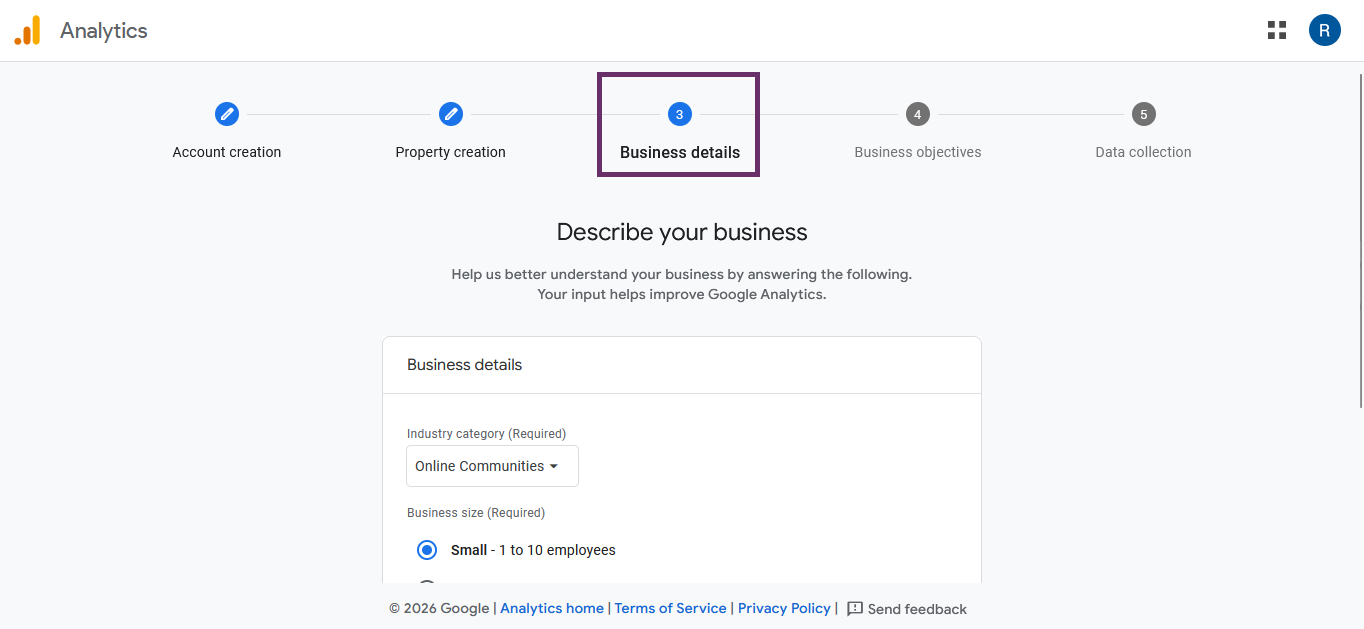
The third step is Business Details. In this section, choose your Industry Category from the available options, and if you don’t see one that exactly matches your niche, simply select the closest option. After that, choose your Business Size, then click the “Next” button to continue to the next step.
1.4. Business Objectives
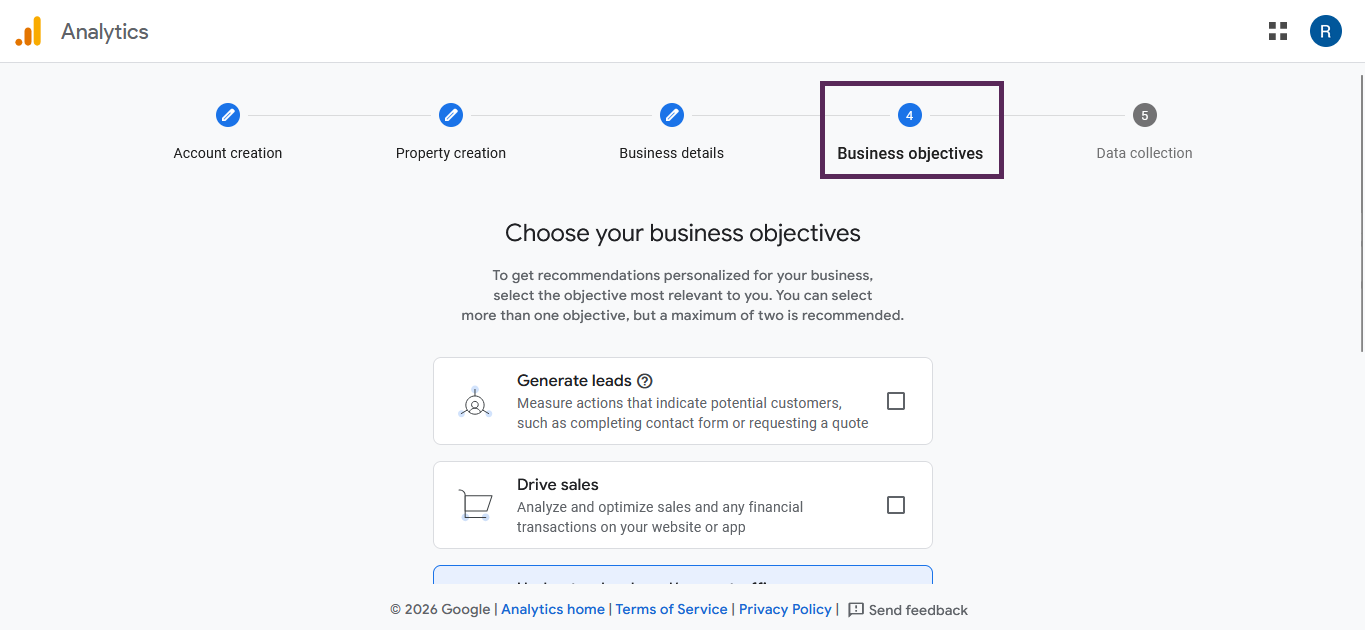
The fourth step is Business Objectives. In this section, you’ll choose what you want to track using Google Analytics. Google provides several options, including generating leads, driving sales, understanding web or app traffic, viewing user engagement and retention, and other business objectives if your goal doesn’t fit into the listed categories.
If you’re running a blog website, the most relevant options to check are “Understand web and/or app traffic” and “View user engagement & retention.” As a blogger, you typically want to know where your visitors come from, which articles they read, and how long they stay on your site. These two options will give you insights into traffic sources and how engaging your content is.
For an online store, the most important option is “Drive sales.” This allows you to track transactions, revenue, and shopping behavior. You should also consider selecting “Understand web and/or app traffic” to see which marketing channels bring in the most customers.
If you’re building a company profile website or service-based business site, “Generate leads” is usually the best choice. This helps you measure actions like contact form submissions or quote requests. You can also select “Understand web and/or app traffic” to monitor how potential clients find your website.
For other popular website types like portfolio sites, landing pages, membership sites, or educational platforms, the best choice depends on your main goal. If you want inquiries, choose Generate leads. If you sell digital products or courses, choose Drive sales. If your focus is content and audience growth, prioritize Understand web and/or app traffic and View user engagement & retention.
You can select more than one objective if they match your website goals. Once you’ve chosen the options that best reflect what you want to track, click the “Create” button to continue with the setup process.
1.5. Google Analytics Terms of Service
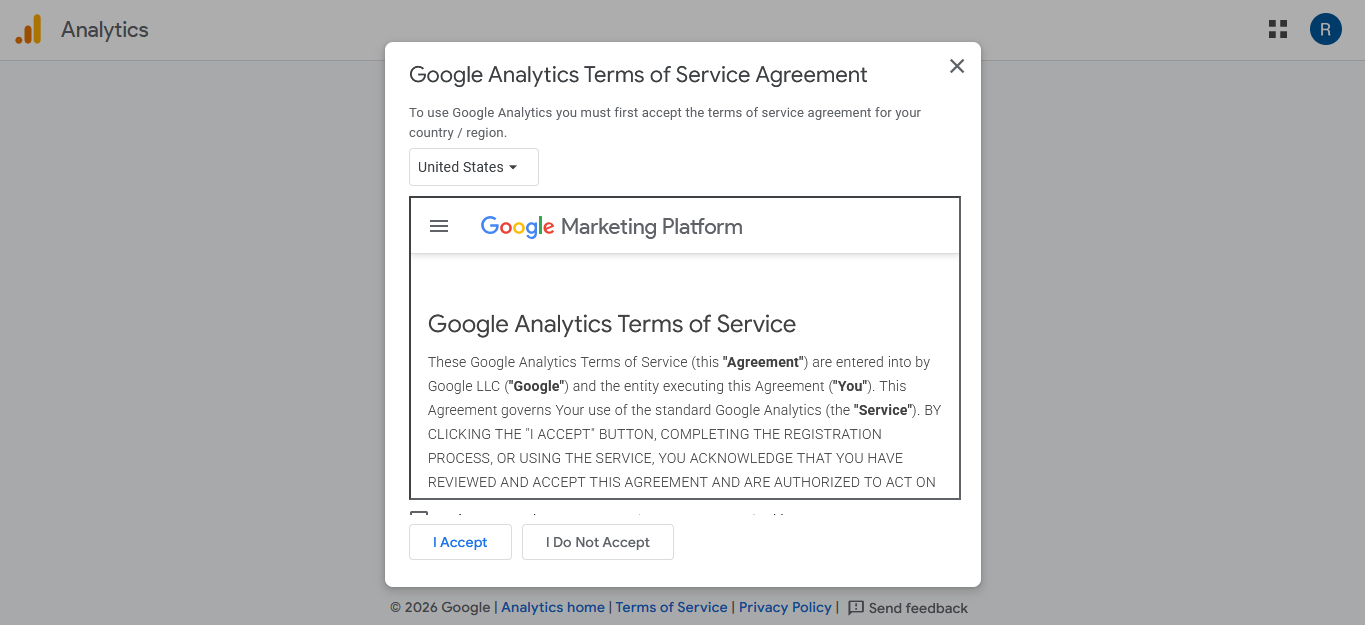
After selecting your Business Objectives, you will be presented with the Google Analytics Terms of Service. This is the agreement that outlines the rules, responsibilities, and data policies related to using Google Analytics. You need to review and accept these terms before your account and property can be fully created.
First, select your Country or Region from the dropdown menu at the top of the page. The terms may vary slightly depending on your location, so make sure you choose the correct country. After that, take a moment to scroll through the agreement and read the main points, especially regarding data collection and user privacy.
Once you’re ready, check the required boxes to confirm that you agree to the Terms of Service and the Data Processing Terms. Then click the “I Accept” button to proceed.
1.6. Data Collection
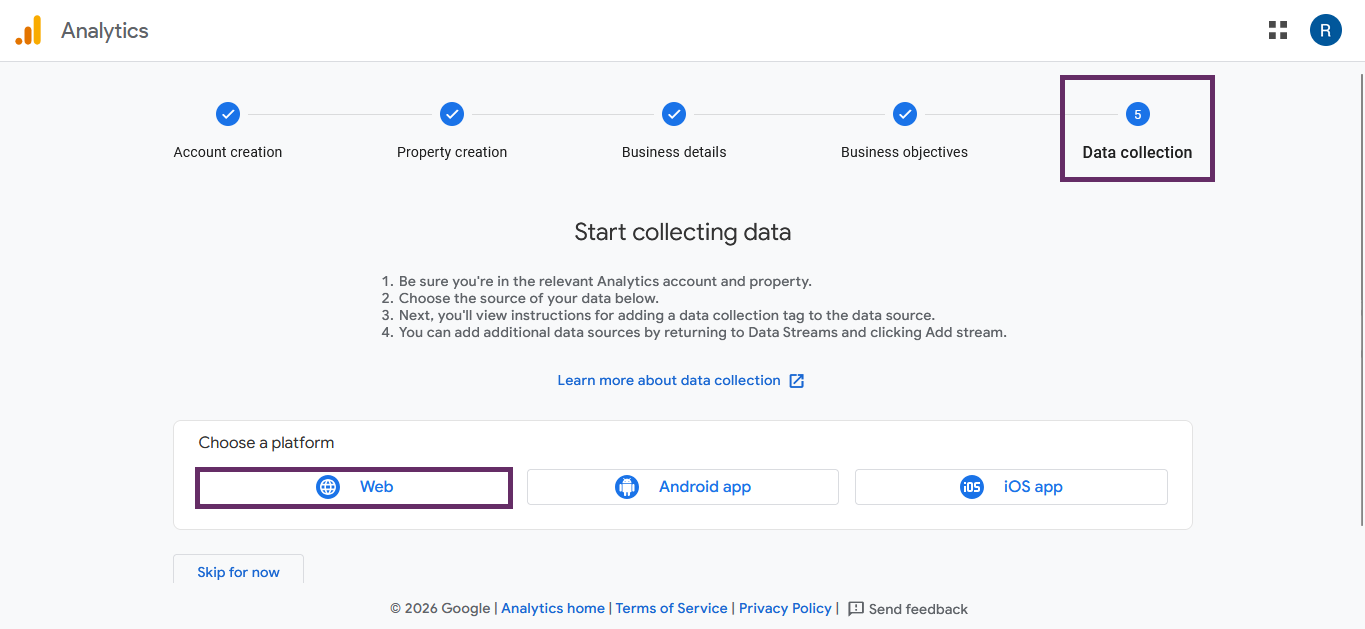
The next section is Data Collection. In this step, Google Analytics will ask you to choose a platform under “Choose a platform.” Since we are tracking a website (not a mobile app), select the “Web” option to continue.
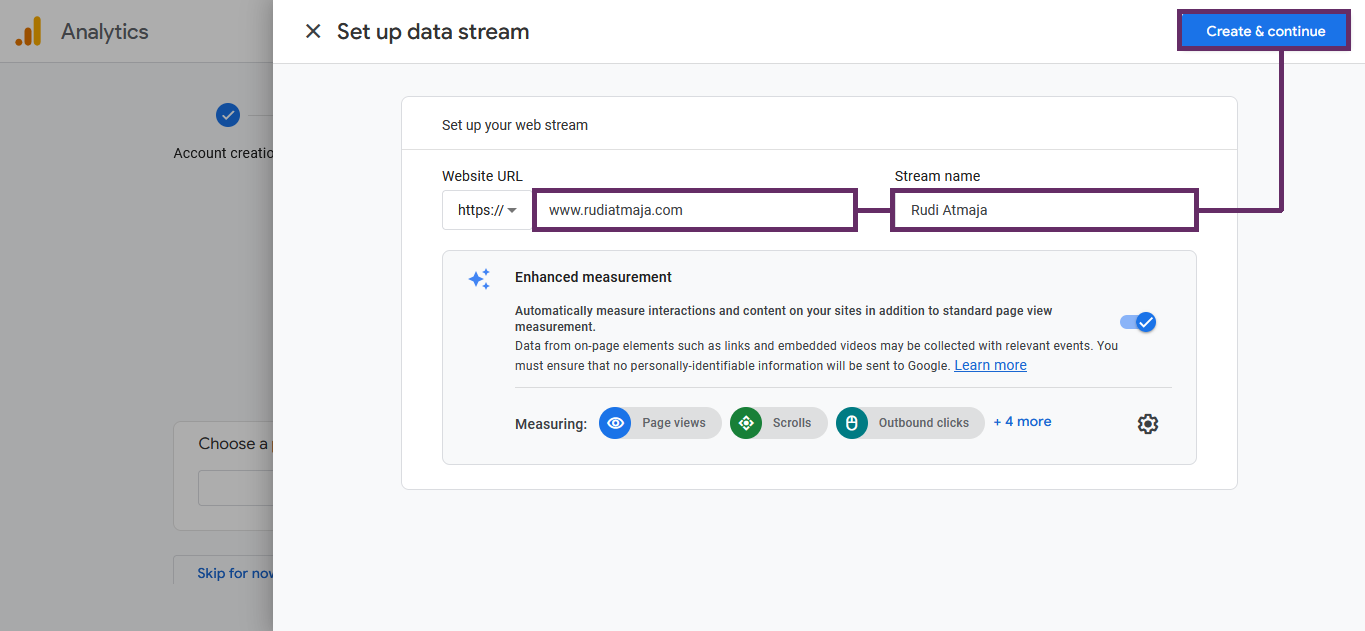
After clicking Web, you’ll be asked to enter your website details. This includes your website URL and a stream name, which is usually your website name. Make sure you enter your domain correctly, including whether it uses https://, to avoid tracking errors later.
Once you’ve filled in the required information, click the “Create stream” button. This will generate your web data stream and provide you with a Measurement ID, which will later be connected to your WordPress website through Rank Math.
2. Installing the Rank Math SEO Plugin
Now that your Google Analytics account is ready, the next step is installing Rank Math on your WordPress website. This plugin will help you connect Google services and optimize your SEO directly from your dashboard. The installation process is simple and only takes a few minutes.
First, log in to your WordPress admin dashboard. From the left sidebar, go to Plugins → Add Plugin. In the search bar at the top right, type “Rank Math SEO”. Look for the plugin named Rank Math SEO – AI SEO Tools to Dominate SEO Rankings developed by Rank Math. Once you find it, click the “Install Now” button.
After the installation is complete, click “Activate” to enable the plugin on your website.
3. Connecting the Plugin to Your Rank Math Account
After activating Rank Math, you will usually be redirected automatically to the setup page where you’re asked to connect the plugin to a Rank Math account. This step is required before you can fully use the plugin’s features. Without connecting an account, several important tools and modules will remain locked.
In some cases, however, you may not be redirected to the setup wizard automatically. Instead, you might be taken back to the Installed Plugins page inside your WordPress dashboard. If that happens, don’t worry – this is completely normal.
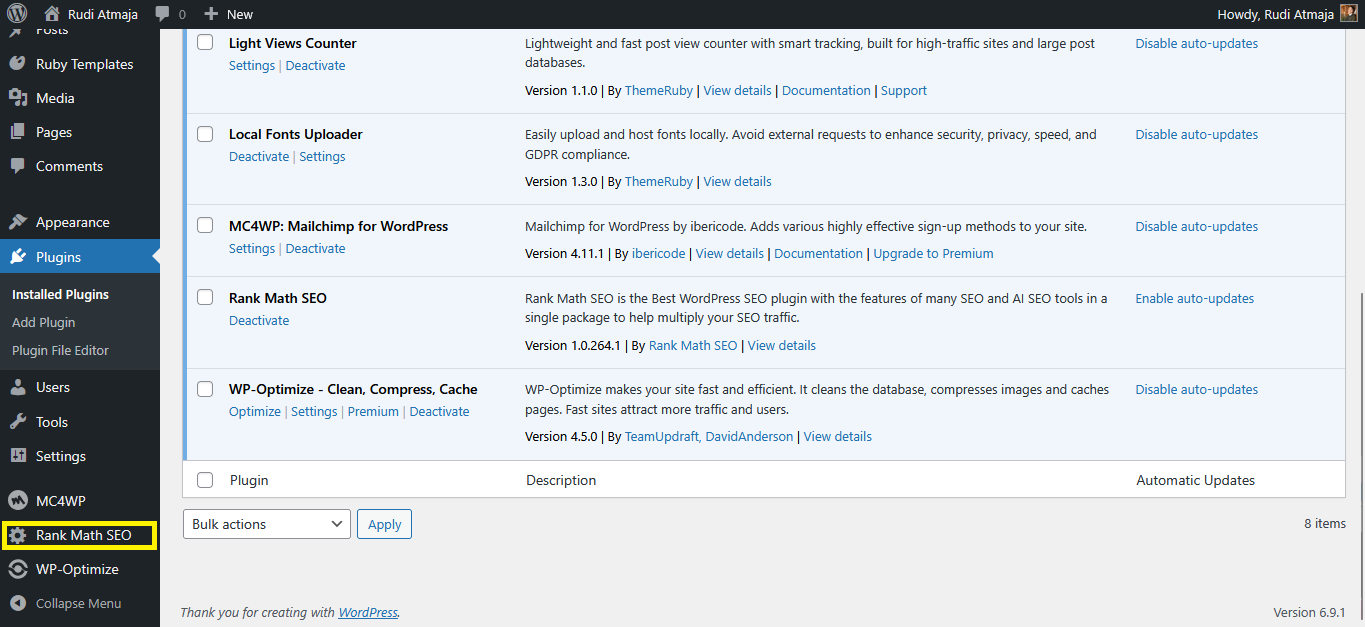
To manually access the setup page, look at the left sidebar of your WordPress dashboard and find the menu labeled “Rank Math SEO.” Click on it, and you will be taken to the setup and account connection page. From there, you can proceed with connecting your plugin to your Rank Math account and continue with the configuration steps.
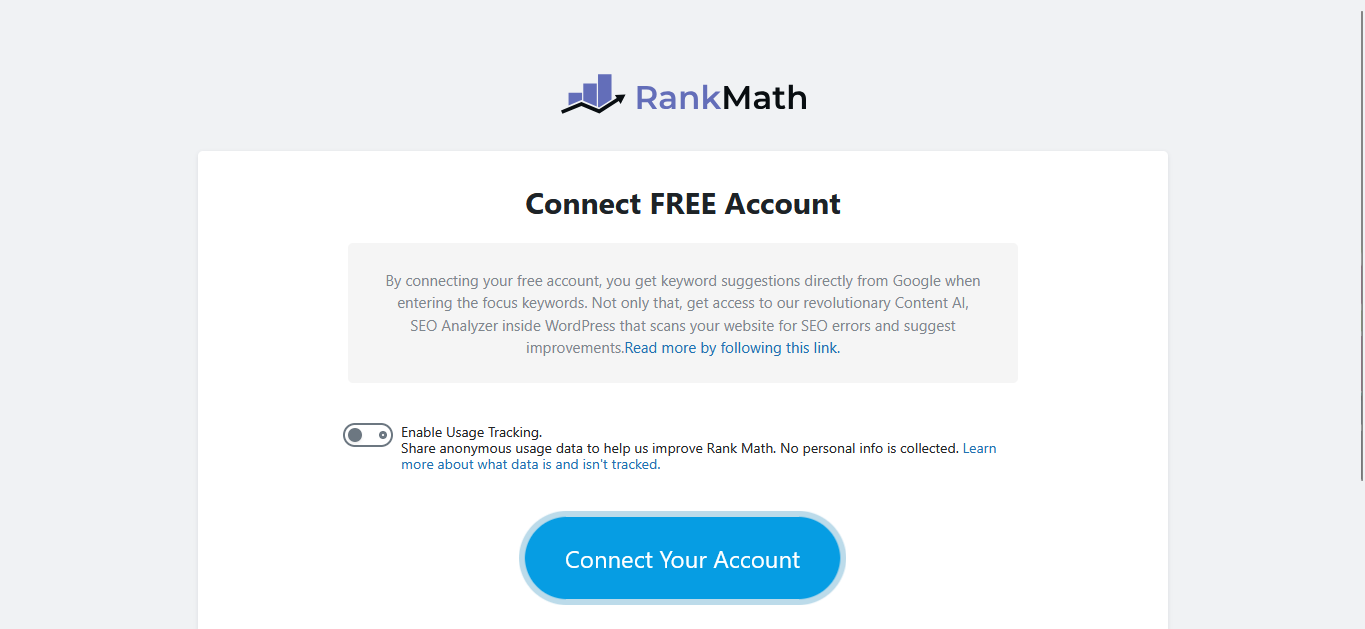
After clicking the “Connect Your Account” button, you will be redirected to the Rank Math login page. Here, you need to sign in to your existing Rank Math account to continue the setup process. If you don’t have a Rank Math account yet, you can click the “Register Now” option located at the bottom of the page. The registration process is quick and straightforward. You’ll be given several sign-up options to choose from.
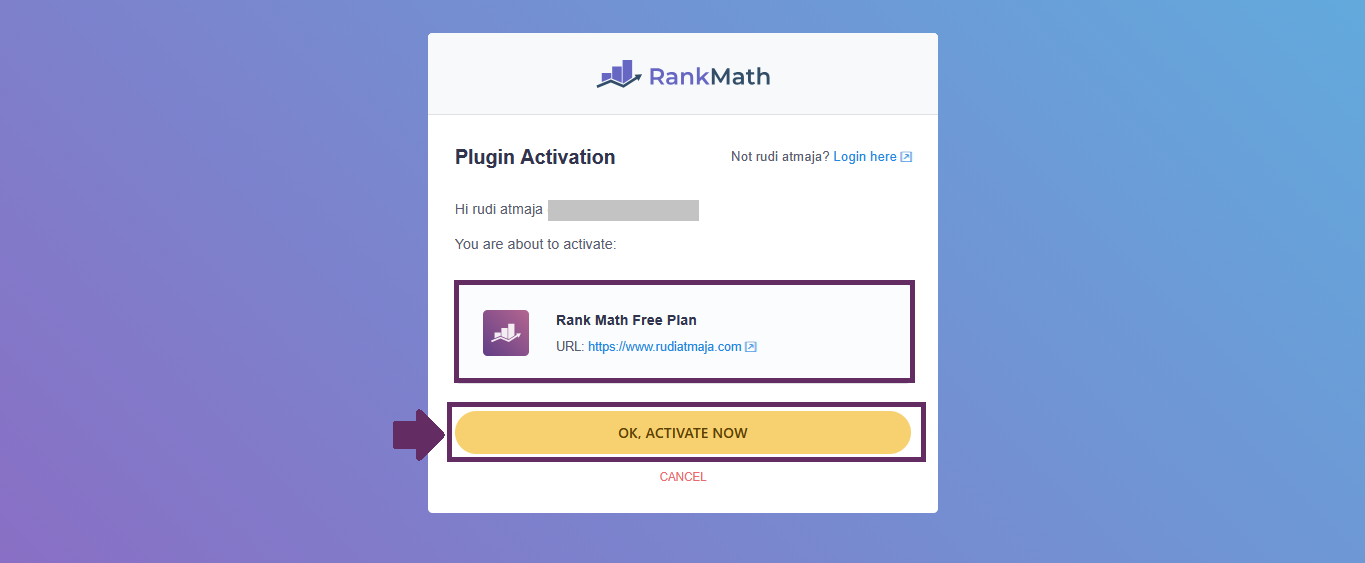
After successfully logging in or creating your account, you’ll see a confirmation screen showing that your website is ready to be connected to your Rank Math account. This means the plugin has detected your site and is prepared to activate the connection. You don’t need to configure anything manually at this stage.
On that page, simply click the “OK, Activate Now” button. This action will officially link your website to your Rank Math account and unlock the plugin’s core features. Once activated, you’ll be redirected back to your WordPress dashboard to continue with the setup wizard and configuration process.
4. Rank Math Setup Wizard
After successfully connecting your website to your Rank Math account, you’ll be guided to the Rank Math Setup Wizard. This wizard is designed to help you configure the most important SEO settings step by step. Instead of manually searching through dozens of options, Rank Math organizes everything into a structured and beginner-friendly flow.
After successfully connecting your website to your Rank Math account, you’ll be guided to the Rank Math Setup Wizard. This wizard is designed to help you configure the most important SEO settings step by step. Instead of manually searching through dozens of options, Rank Math organizes everything into a structured and beginner-friendly flow.
4.1. Getting Started
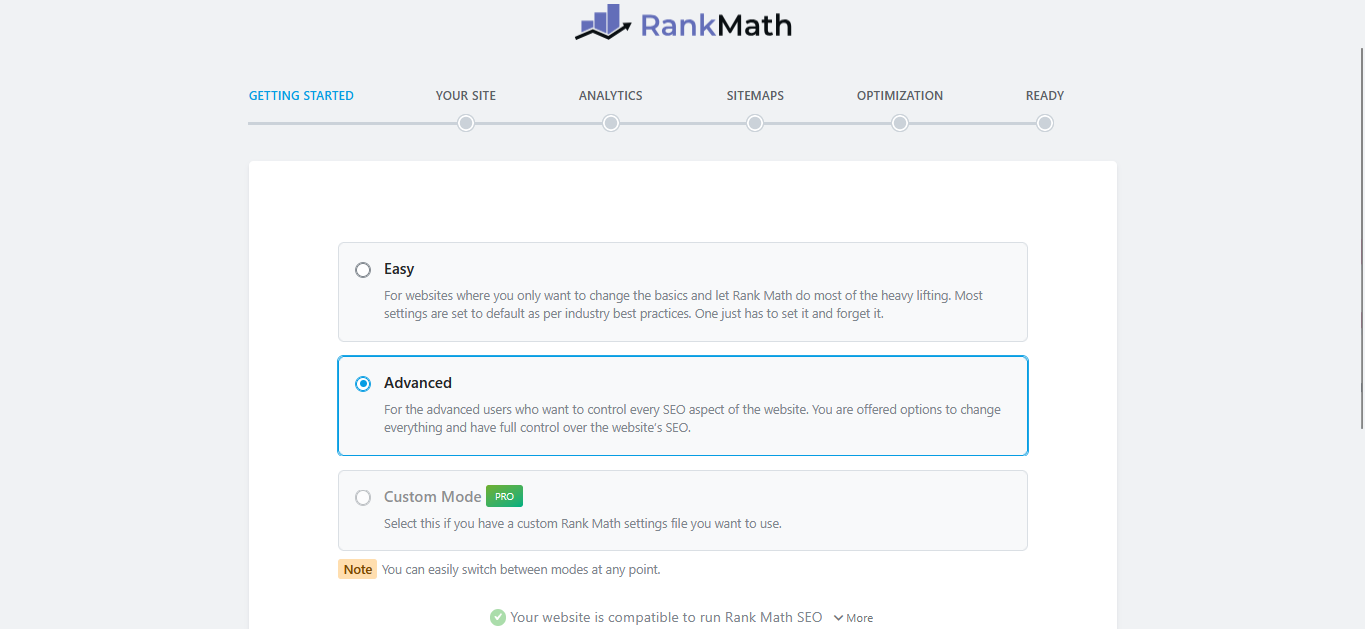
In the Getting Started step, Rank Math will ask you to choose a setup mode. This option determines how detailed the configuration process will be and how much control you want over your website’s SEO settings.
You’ll see three available options: Easy, Advanced, and Custom (the Custom option is available for Rank Math Pro users). Easy Mode is designed for beginners who only want to adjust the basics and let Rank Math handle most of the technical SEO settings automatically. Most configurations are set according to industry best practices, making it a simple “set it and forget it” solution.
Advanced Mode, on the other hand, is intended for users who want more control over their SEO configuration. It unlocks additional settings and gives you access to more detailed options, allowing you to fine-tune various aspects of your website’s SEO from the beginning. The Custom Mode (Pro only) allows you to import or apply customized configurations for more specific needs.
In this tutorial, I’m using Advanced Mode. The reason is simple: I prefer to configure most of the important settings upfront so I don’t have to revisit and adjust them later. Even though it may seem slightly more detailed at first, setting things up properly now will save you time and effort in the long run.
4.2. Your Site
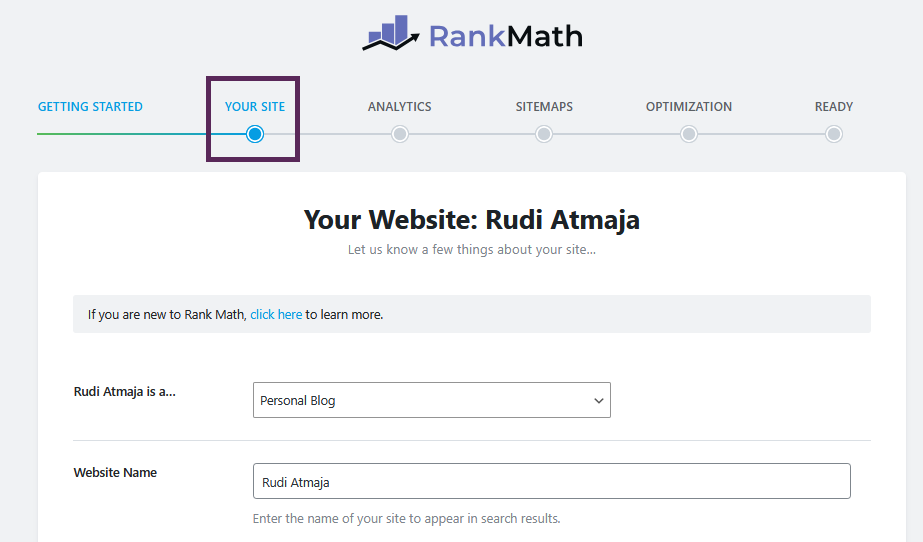
In the Your Site section, you’ll provide important information about your website. These details help search engines better understand your site’s identity and structure, especially for branding and schema markup purposes. Make sure you fill in each field carefully and accurately.
Here are the options you’ll see:
- <Website Name> is a…
Choose the category that best represents your website, such as blog, business site, personal portfolio, online store, or other types. Select the option that most closely matches your website’s main purpose. - Website Name
Enter the official name of your website. This will be used in SEO titles and structured data, so it should match your brand or site identity. - Website Alternate Name
You can enter a shorter version or alternative variation of your website name. This is optional, but it can be useful if your brand is commonly known by an abbreviation. - Person/Organization Name
If your website represents an individual, enter your full name. If it represents a company or brand, enter the organization’s name. This helps search engines correctly associate the website with a person or business entity. - Logo for Google
Upload your logo here. The minimum size is 112 x 112 pixels, and a square image is preferred by search engines. This logo may appear in search results and knowledge panels. - Default Social Share Image
Upload a default image that will be used when a post or page doesn’t have a featured image or Open Graph image set. This image will act as a fallback thumbnail when your content is shared on platforms like Facebook. The recommended size is 1200 x 630 pixels.
After you’ve filled in all the necessary fields, click the “Save and Continue” button to move to the next step.
4.3. Analytics

In the Analytics section, you’ll connect Rank Math to the Google Analytics account you created earlier. This integration allows Rank Math to pull important traffic and performance data directly into your WordPress dashboard. Instead of switching between multiple platforms, you’ll be able to monitor key metrics in one place.
In the Analytics section, you’ll connect Rank Math to the Google Analytics account you created earlier. This integration allows Rank Math to pull important traffic and performance data directly into your WordPress dashboard. Instead of switching between multiple platforms, you’ll be able to monitor key metrics in one place.
After logging in, Google will ask you to grant certain permissions. Go ahead and allow all the required access so Rank Math can retrieve your Analytics and Search Console data. There’s no need to worry – Rank Math only accesses basic profile information (such as your name and email address), along with your Google Analytics and Google Search Console data. It does not access sensitive personal information beyond what is necessary for integration.

After successfully logging in to your Google account and granting access, you’ll be redirected back to the Rank Math Setup Wizard. Give it a few seconds to sync your data. Once the connection is complete, your website URL should appear in the Site dropdown under the Search Console section.
After successfully logging in to your Google account and granting access, you’ll be redirected back to the Rank Math Setup Wizard. Give it a few seconds to sync your data. Once the connection is complete, your website URL should appear in the Site dropdown under the Search Console section.
Next, enable the “Install Analytics Code” option. This allows Rank Math to automatically add the Google Analytics tracking code to your website, so you don’t need to install any additional plugins or manually paste tracking scripts into your theme files. It simplifies the setup and keeps everything managed in one place.
Next, enable the “Install Analytics Code” option. This allows Rank Math to automatically add the Google Analytics tracking code to your website, so you don’t need to install any additional plugins or manually paste tracking scripts into your theme files. It simplifies the setup and keeps everything managed in one place.
If you are using Rank Math Pro, you’ll see a few additional options. You can enable Anonymize IP Addresses for better privacy compliance, Self-Hosted Analytics JS File to improve performance by serving the tracking script locally, and AdSense integration if you want to connect your Google AdSense data directly.
Once everything is configured properly, click “Save and Continue.”
4.4. Sitemaps
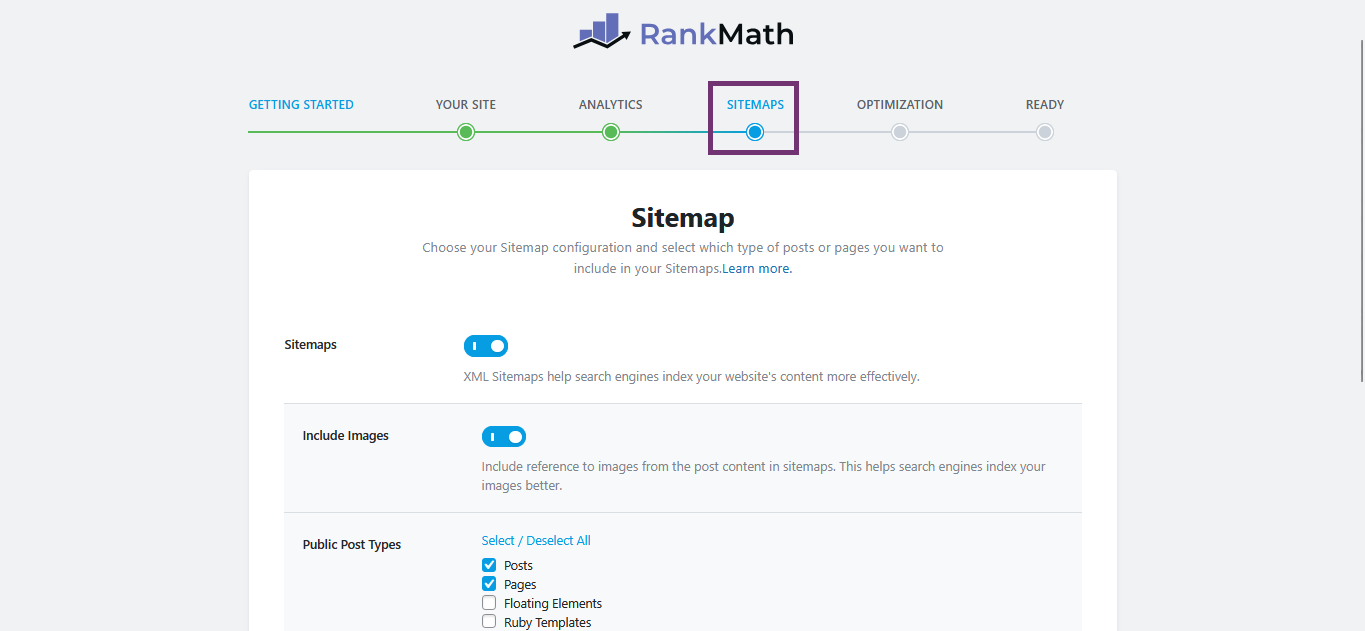
The next step is Sitemaps. Rank Math will automatically generate an XML sitemap for your website, which helps search engines like Google crawl and understand your content structure more efficiently. By default, several content types are included in the sitemap.
In this section, you can choose which parts of your website should be included. Simply uncheck any content types that you do not want to appear in your sitemap. For example, if you don’t want certain post types or categories indexed, you can remove them here.
Take a moment to review your selections carefully. Including only important and index-worthy content helps search engines focus on your most valuable pages. Once you’re done, click the “Save and Continue” button to proceed to the next step.
4.5. Optimization / SEO Tweaks
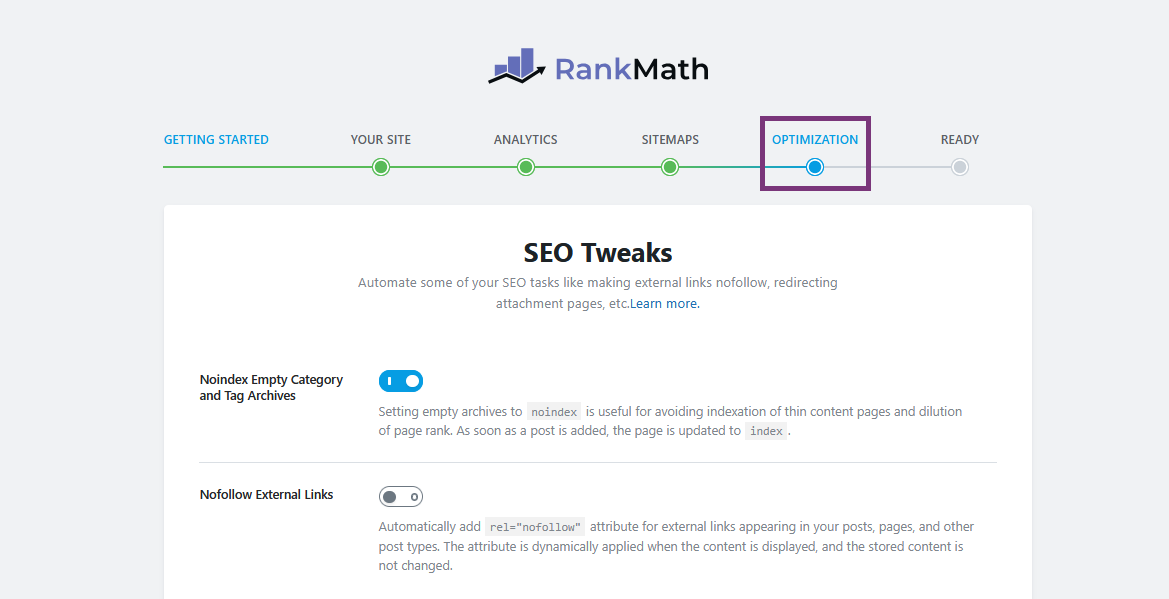
The next section is Optimization. In this step, Rank Math provides several technical SEO settings that help improve how search engines crawl and interpret your website. These options are generally pre-configured with recommended defaults based on SEO best practices.
If you’re unsure about the technical details, you can safely leave the settings as they are. The default configuration is already optimized for most websites and works well for blogs, business sites, and online stores. There’s no need to change anything unless you fully understand what each option does.
Once you’ve reviewed the settings and decided to keep the defaults, simply click the “Save and Continue” button to move forward to the next step of the setup process.
4.6. Ready
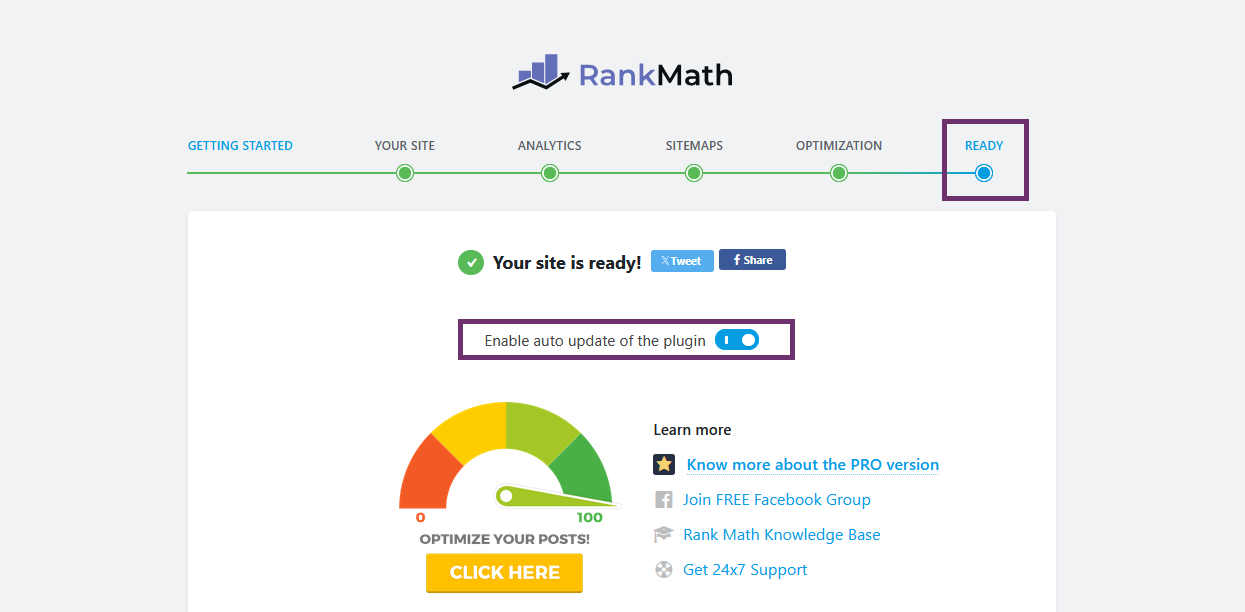
In the next section, you’ll see a simple option for Auto Update. Make sure to enable this setting so Rank Math can automatically update itself whenever a new version is released. Keeping the plugin updated is important for security, performance improvements, and access to the latest features.
After turning on Auto Update, you don’t need to change anything else on this screen. Simply click the “Setup Advanced Options” button to continue to the next stage of the configuration process.
4.7. Role Manager
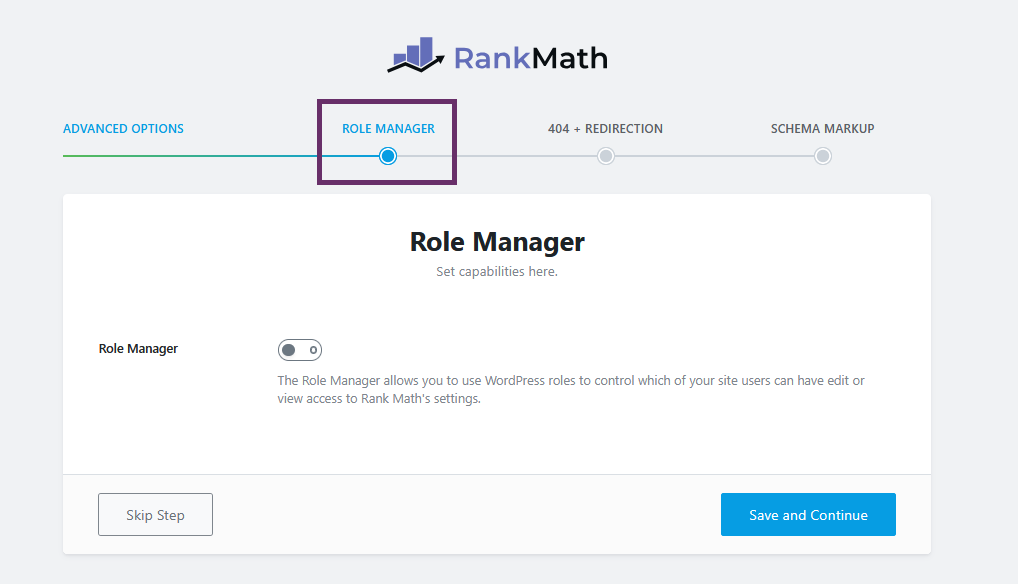
The next section is Role Manager. This feature allows you to control which WordPress user roles can access and manage SEO settings inside Rank Math. It’s especially useful if your website has multiple users, such as editors, authors, or contributors.
Here, you’ll see different user roles like Administrator, Editor, and Author. For each role, you can decide whether they are allowed to access Rank Math settings or modify SEO options for posts and pages. This helps you prevent accidental changes to important SEO configurations.
If you’re the only person managing your website, you can simply leave the default settings as they are. However, if you work with a team, it’s a good idea to carefully review these permissions before moving forward. Once you’re done, click “Save and Continue.”
4.8. 404 + Redirection

The next section is 404 Monitor + Redirection. Here, you can choose whether to enable these two features. Both are very useful for maintaining a healthy website structure, but you can activate them based on your specific needs.
- The 404 Monitor tracks pages on your website that return a 404 error. A 404 error happens when someone tries to access a URL that doesn’t exist – usually because the page was deleted, the URL was changed, or someone typed the address incorrectly. By monitoring these errors, you can identify broken links and fix them before they negatively impact user experience or SEO.
- The Redirection feature allows you to automatically redirect one URL to another. For example, if you delete an old post or change a URL slug, you can redirect visitors from the old URL to the new one. This prevents users from landing on error pages and helps preserve your SEO value by passing link equity to the correct page.
If you expect to update content regularly or restructure your URLs in the future, it’s a good idea to enable both features. Once you’ve made your selection, click “Save and Continue” to proceed to the next step.
4.9. Schema Markup
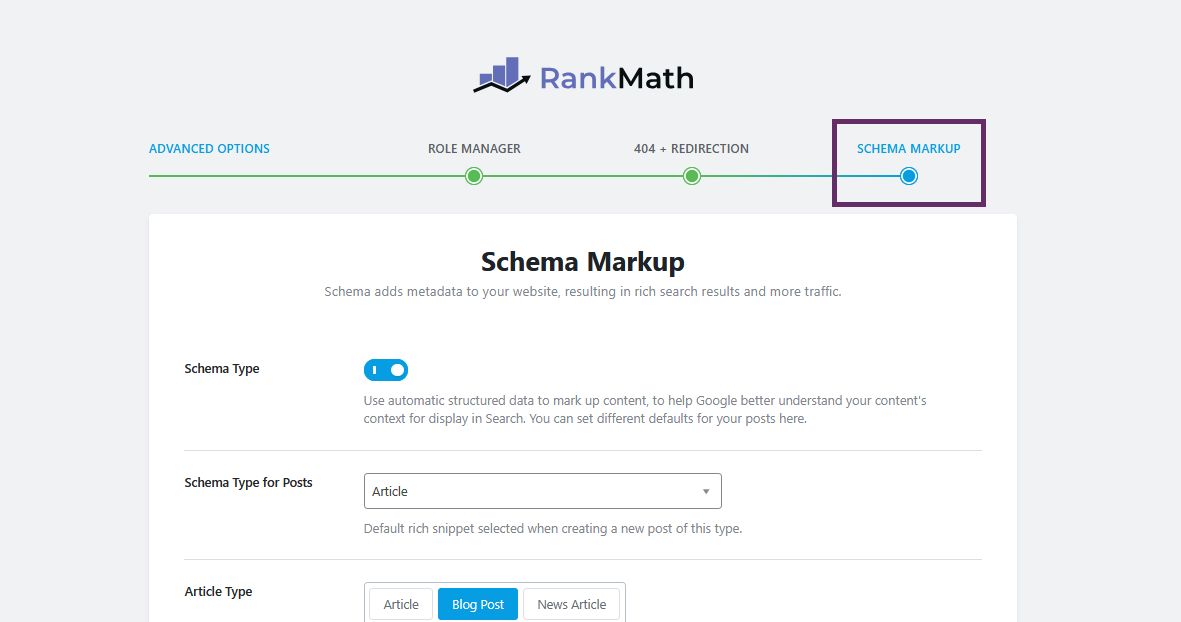
The last section in the Rank Math Setup Wizard is Schema Markup. This is where you can define the default schema type for different content types on your website. Schema markup helps search engines better understand your content and can improve how your pages appear in search results, including rich snippets.
In this section, you’ll see options to assign schema types for posts, pages, and other custom post types. For example, blog posts can use the Article schema or Blog Post or News Article, while product pages can use the Woocommerce Product schema. Choose the schema type that best matches the purpose of each content type on your website.
Take your time to configure this properly according to your content structure. Setting the correct schema from the beginning helps search engines interpret your website more accurately. Once you’ve finished adjusting the schema settings, click the “Save and Continue” button to complete the Rank Math Setup Wizard.
After completing the Setup Wizard, you’ll be redirected to the Rank Math SEO Dashboard. This page displays various modules that control different SEO features within the plugin. Each module represents a specific function, such as analytics, schema, redirection, image SEO, and more.
On this dashboard, you have full control over which modules are active. If there are features you don’t plan to use, you can simply toggle them off to keep your website lightweight and organized. Disabling unused modules can also help reduce unnecessary background processes.
On this dashboard, you have full control over which modules are active. If there are features you don’t plan to use, you can simply toggle them off to keep your website lightweight and organized. Disabling unused modules can also help reduce unnecessary background processes.
Optimize Your Website
Now that Rank Math is properly installed and configured, it’s time to move beyond the basic setup and start optimizing your website. In this section, we’ll focus on several essential features that are important for almost every type of WordPress website – whether you’re running a blog, an online store, a company profile site, or a portfolio. These are the tools that help turn a properly configured plugin into real SEO results.
Now that Rank Math is properly installed and configured, it’s time to move beyond the basic setup and start optimizing your website. In this section, we’ll focus on several essential features that are important for almost every type of WordPress website – whether you’re running a blog, an online store, a company profile site, or a portfolio. These are the tools that help turn a properly configured plugin into real SEO results.
In addition to site-wide optimization, this section will also guide you on how to optimize individual pieces of content. You’ll learn how to use Rank Math to improve your blog posts, product pages, and other content types directly from the editor. By the end, you’ll know how to apply practical on-page SEO techniques that can improve your rankings over time.
1. Instant Indexing
One of the most powerful features inside Rank Math is Instant Indexing. This feature allows you to notify search engines (especially Bing) immediately whenever you publish, update, or delete content. Instead of waiting days or weeks for search engines to discover your new pages, you can speed up the indexing process significantly.
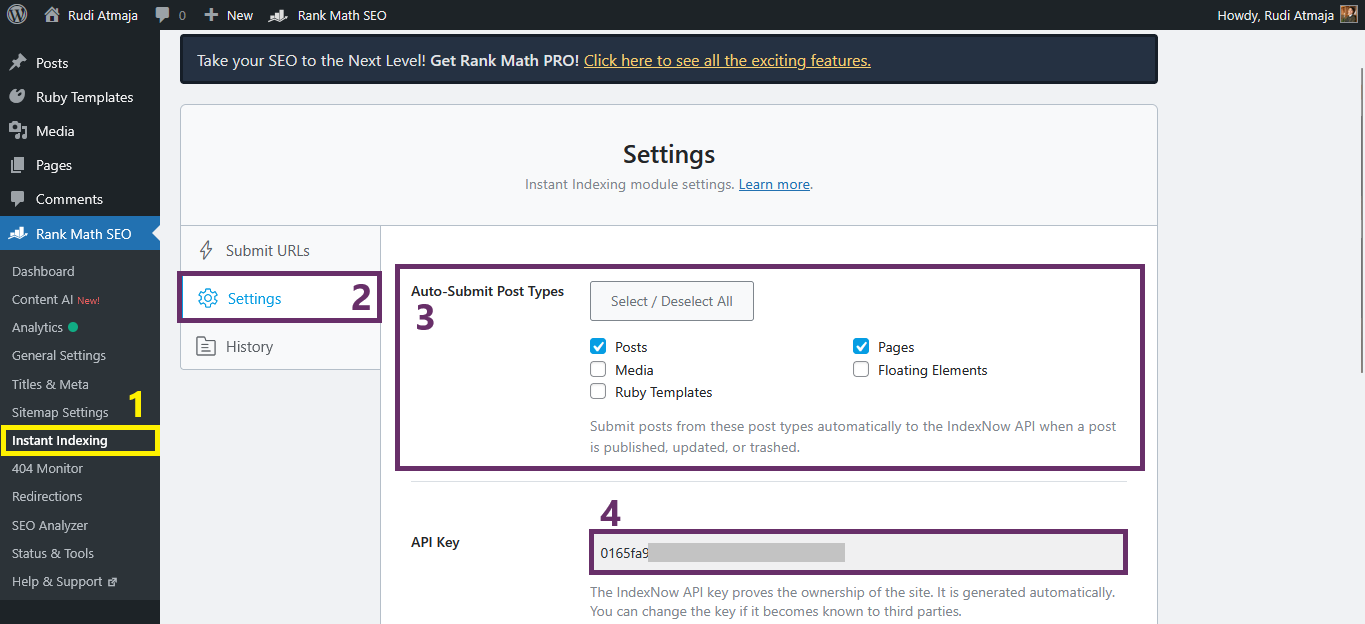
To get started, go to your WordPress dashboard and navigate to Rank Math SEO → Instant Indexing. Once you’re on that page, click the “Settings” tab. Here, enable the “Auto-Submit Post Types” option so your selected content types (such as posts or pages) are automatically submitted for indexing whenever you publish or update them.
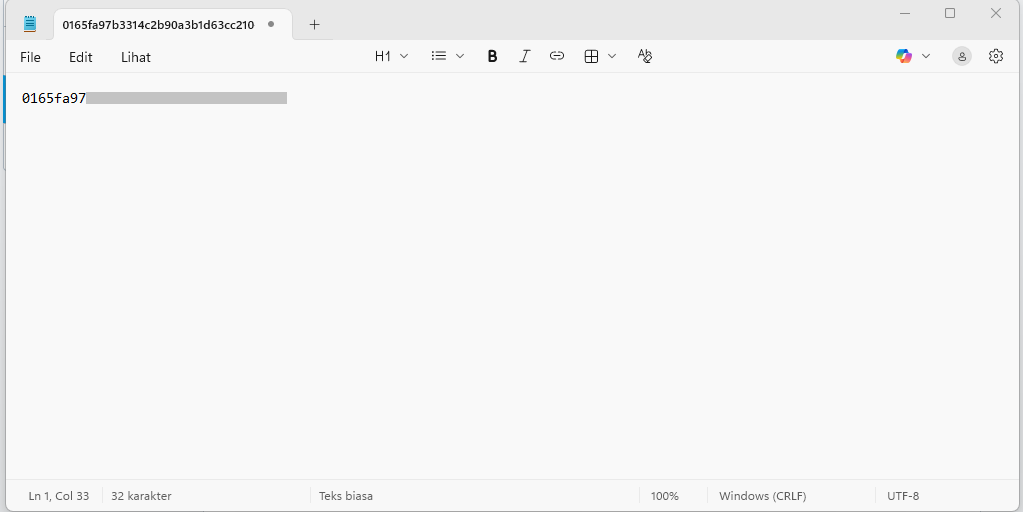
Below that section, you’ll see your API Key. Copy the API Key carefully. Then open a simple text editor application, such as Notepad on Windows or TextEdit on Mac (in plain text mode), paste the API Key inside the file, and save it as a .txt file using the API Key itself as the filename. For example, if your API Key is 11223344, then save the file as 11223344.txt.
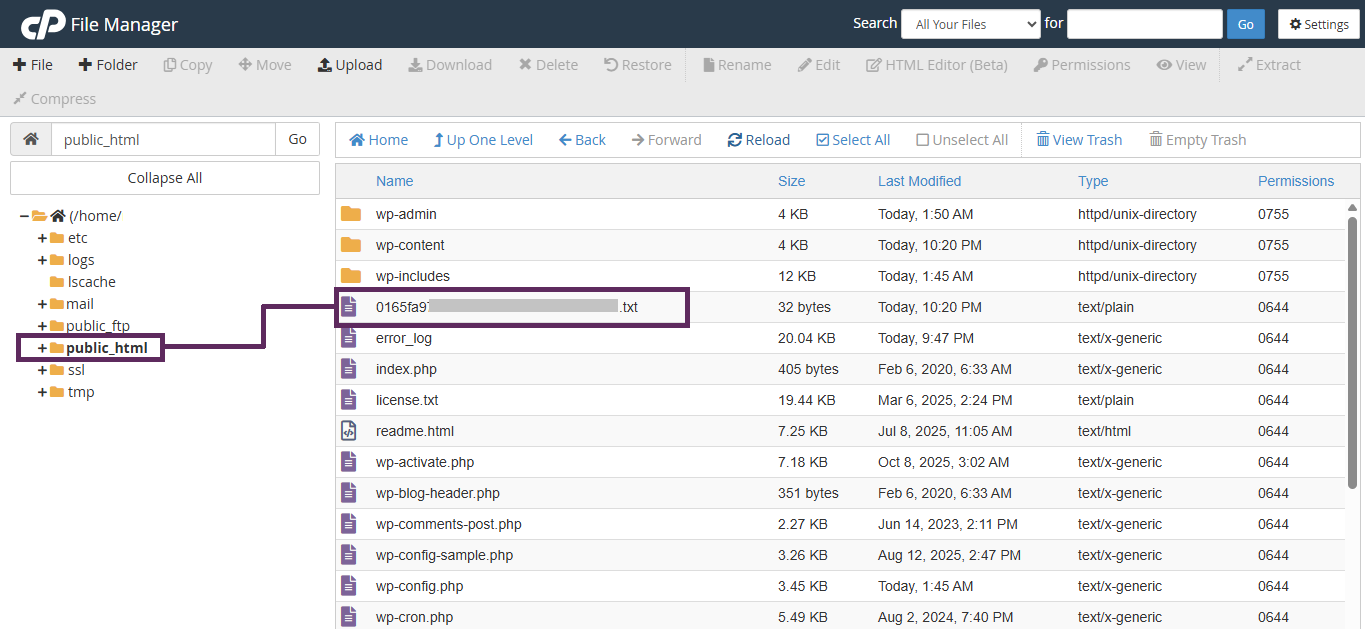
.txt file to the root directoryNext, you need to upload this .txt file to the root directory of your WordPress website. The root directory is usually called public_html or named after your domain inside your hosting control panel. You can upload the file using your hosting File Manager (commonly available in cPanel or similar dashboards) or via an FTP client like FileZilla.
To upload using File Manager, log in to your hosting account, open File Manager, go to the public_html folder (or the main folder where WordPress is installed), and upload the .txt file directly there – not inside any subfolder. Make sure the file is placed in the top-level directory of your site.
If you’re not familiar with accessing your hosting panel or managing files, don’t hesitate to contact your hosting provider’s support team. Simply tell them you need to upload a verification .txt file to your website’s root directory for Rank Math Instant Indexing. Most hosting support teams will gladly assist you.
2. Redirections
Next is Redirections. Redirections are used to automatically forward old URLs to new ones. This is especially important when you change permalinks, delete pages, or move content. Proper redirection prevents visitors from landing on 404 error pages and helps preserve your SEO value.

To configure it, go to Rank Math SEO > General Settings, then click on the Redirections tab.
In the Fallback Behavior section, you will see several options: Default 404, which displays the standard 404 error page when a URL is not found; Redirect to 404, which redirects users to a custom 404 page if you have created one; and Custom Redirection, which redirects all unmatched URLs to a specific URL such as your homepage. The most appropriate option to choose is Default 404, as this follows SEO best practices by clearly informing search engines that the page does not exist instead of redirecting them to unrelated content.

You will also find the Auto Post Redirection option. It is recommended to enable this feature because Rank Math will automatically create a redirection whenever you change a post’s URL. This helps prevent broken links, protects your search rankings, and ensures a smooth user experience without requiring manual setup.
After finishing the configuration, click the “Save Changes” button located at the bottom right to apply the settings.
3. Setting Global Meta Titles and Meta Descriptions
Now let’s configure your global meta titles and meta descriptions for taxonomies such as post categories, post tags, product categories, and similar archive pages. These templates automatically generate SEO titles and descriptions, so you don’t need to edit them one by one. This ensures consistency across your website and saves a lot of time.
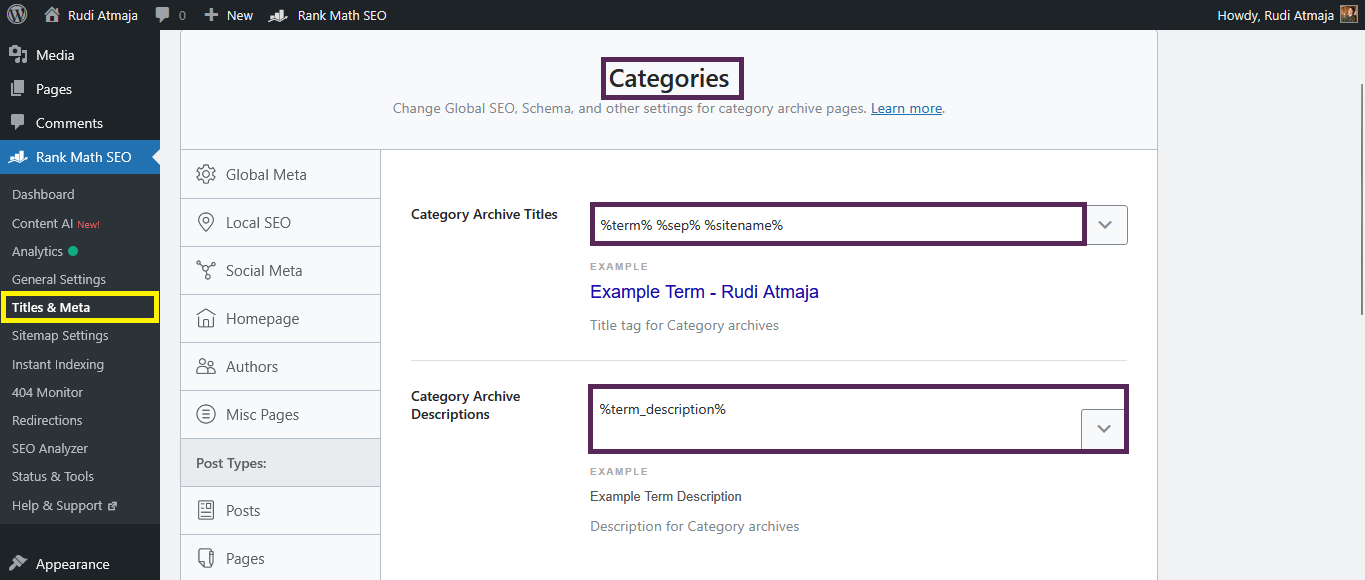
To begin, go to Rank Math SEO → Titles & Meta in your WordPress dashboard. Then click on the taxonomy you want to configure, for example Categories. Inside this section, you’ll see fields for Title and Meta Description templates.
Here’s an example template you can use for Post Categories:
Title Template Example:Best %term% Tips, Guides & Strategies %sep% %sitename%
So if your category is “SEO,” and your website is called “Digital Growth Lab,” the final title would look like: Best SEO Tips, Guides & Strategies | Digital Growth Lab
For the Meta Description, you could use something like:Explore in-depth %term% tutorials, actionable tips, and expert insights to help you grow faster with %sitename%.
This creates a dynamic description that still feels intentional and persuasive, instead of generic.
You can apply a similar concept to Tags and Product Categories, adjusting the wording to match the type of content you publish. For example, product categories might include phrases like “Shop,” “Discover,” or “Find the Best.”
However, do not apply global templates for Posts and Single Products. The reason is that individual posts and product pages should be optimized manually with specific primary keywords. Each article or product targets a different search intent, so using a generic template would reduce your ability to fine-tune rankings and maximize click-through rates.
After creating your templates for categories and other archive pages, click “Save Changes.” This ensures your taxonomy pages look professional, optimized, and conversion-focused – without sounding robotic or generic.
4. Adjusting Robots Meta Settings
The next important section is related to Robots Meta settings. This controls whether certain types of content on your website should be indexed by search engines or not. In simple terms, you can decide which content is allowed to appear in Google and which content should stay hidden from search results.
To configure this, go to Rank Math SEO → Titles & Meta, then open the content type you want to adjust. Inside each section, you’ll find an option related to Robots Meta, including settings like Index and Noindex. If you enable “Noindex,” search engines will not include that content type in their search results.
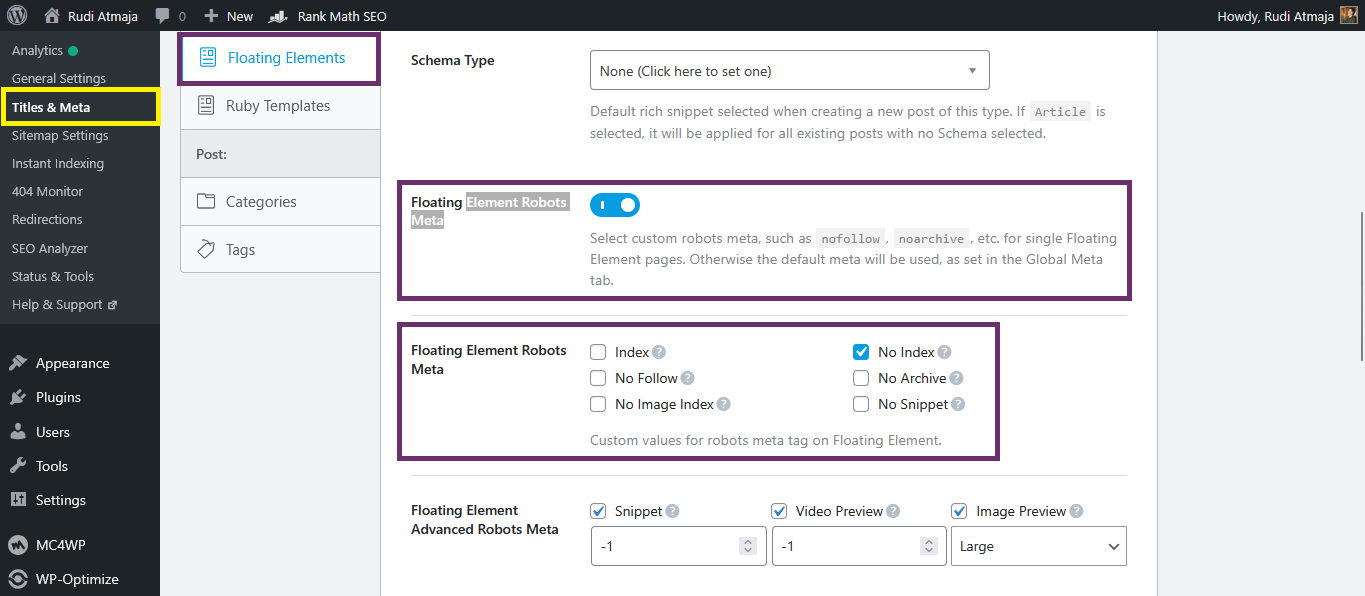
This feature is very useful because not all content on your website deserves to be indexed. For example, on my own website, I choose not to index the Floating Elements content type. These elements are not core content and don’t provide standalone value in search results, so indexing them would only create unnecessary pages in Google’s index.
In general, you should consider setting Noindex for content types that are not valuable as standalone pages. This could include design elements, system-generated pages, or thin content that doesn’t serve a clear SEO purpose. The goal is to keep your indexed pages focused on high-quality, meaningful content.
5. Optimizing Your Content (Posts, Pages, and Products)
Now let’s talk about the most important part: optimizing your actual content. This applies to blog posts, pages, and even individual product pages. Proper on-page optimization is what helps your content rank for specific keywords in search engines.
First, open the Rank Math panel inside your editor. If you’re using Gutenberg, click the Rank Math icon in the top right corner of the screen. If you’re using the Classic Editor (commonly used for product pages), scroll down until you find the Rank Math meta box below the content editor. If you’re using Elementor, open your page and click on the SEO tab in the Elementor panel to access Rank Math settings.
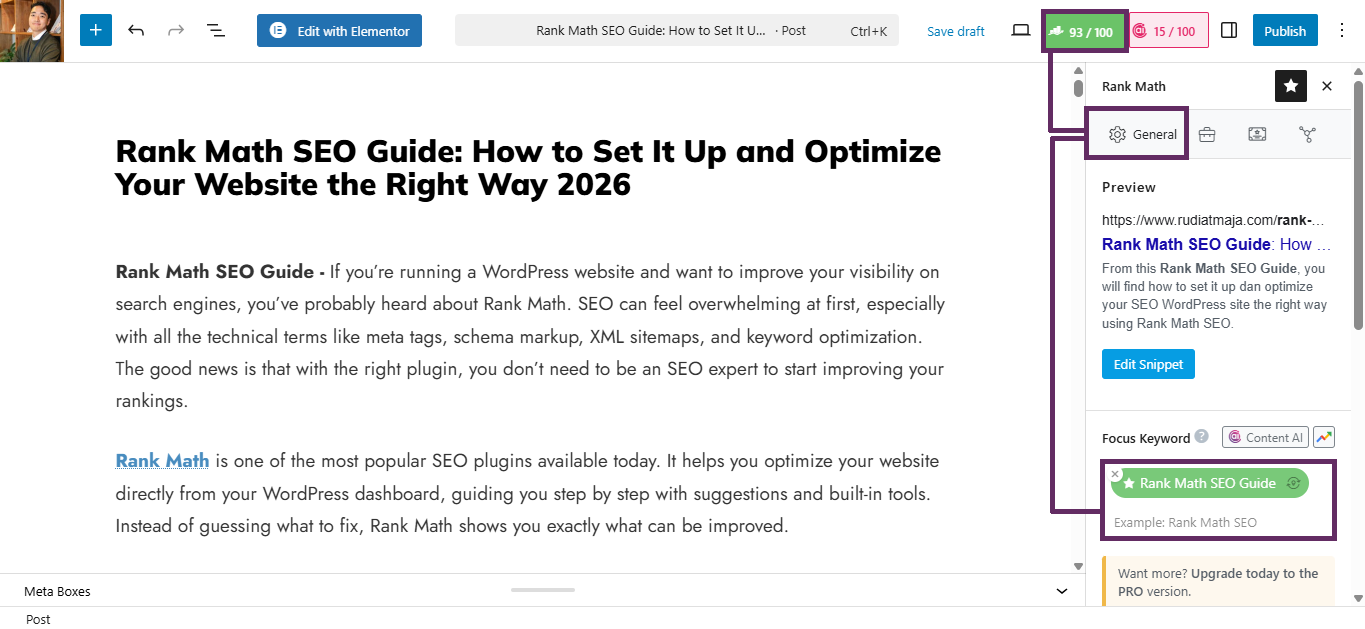
The first step is determining your Focus Keyword. In the Focus Keyword field, you can enter up to 5 keywords in the free version. It’s best to start with one main keyword that clearly represents your content, then add a few closely related variations if needed.
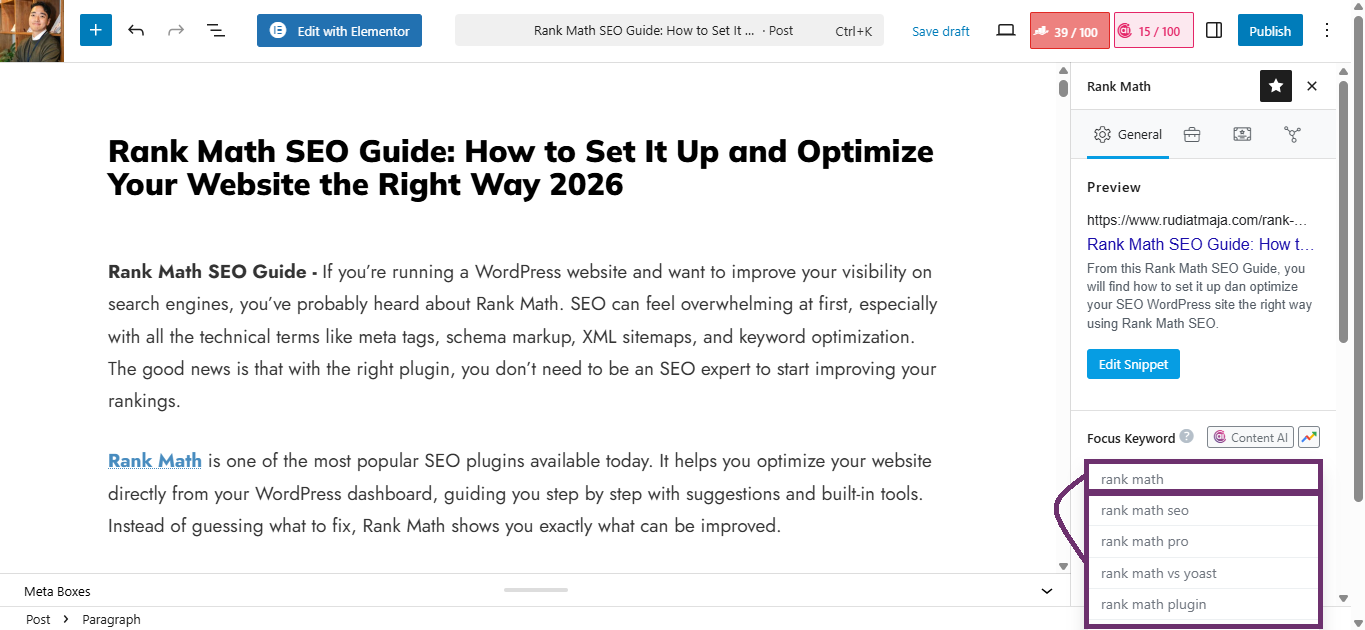
You can also type two or more words into the Focus Keyword field, and Rank Math will automatically display keyword suggestions that may be relevant to your topic. This can help you discover better keyword variations that match search intent. Choose keywords that are truly aligned with your content, not just high-volume terms that don’t fit naturally.
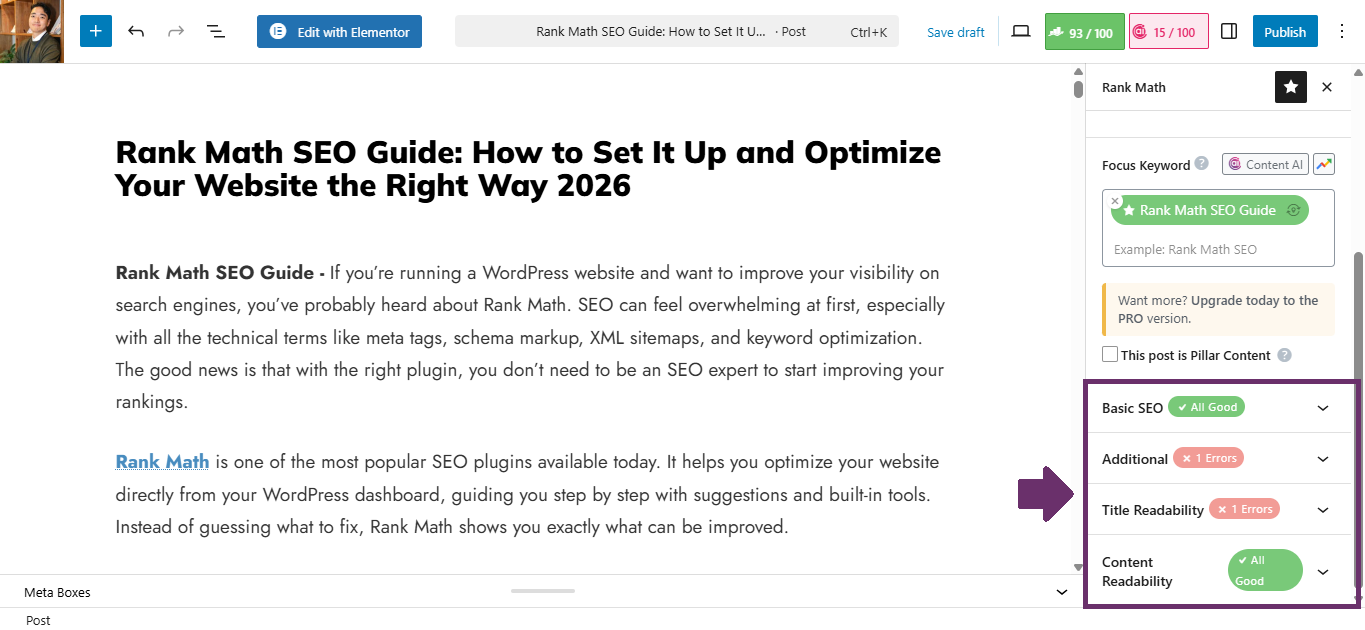
Once your keywords are set, Rank Math will analyze your content and provide recommendations divided into four sections: Basic SEO, Additional, Title Readability, and Content Readability.
- Basic SEO ensures your keyword appears in critical areas like the title, URL, meta description, and first paragraph.
- Additional focuses on improvements like internal linking, external linking, and keyword density.
- Title Readability checks whether your title is compelling and properly structured.
- Content Readability evaluates paragraph length, sentence structure, and overall clarity.
Your goal is not to force a perfect 100 score, but to improve your content naturally. Follow the recommendations that enhance clarity and SEO without making your writing sound robotic or keyword-stuffed.
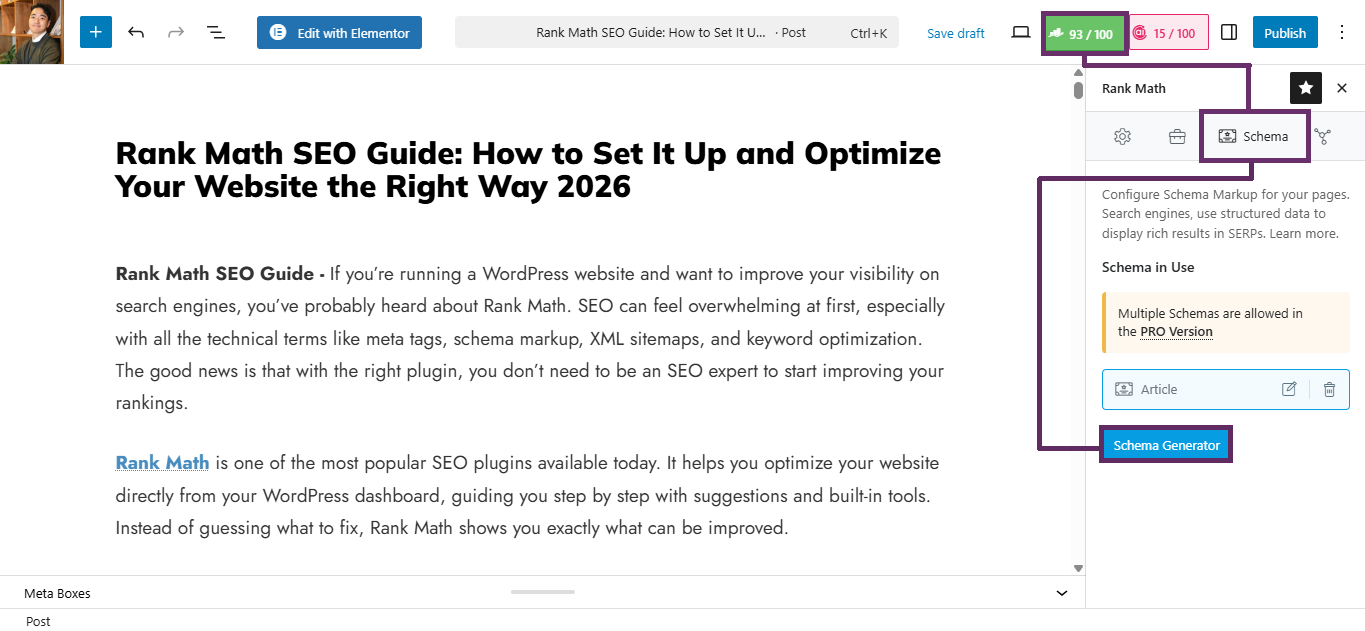
After optimizing the content, switch to the Schema tab in the Rank Math panel. Schema is structured data that helps search engines understand what your content actually represents. Instead of just reading text, search engines can recognize whether your page is an article, product, event, service, or something else.
Using the correct schema increases your chances of getting rich results in search engines, such as star ratings, product prices, FAQs, or event details. Inside the Schema tab, you can remove the default schema if it doesn’t match your content type. Then click “Schema Generator” to create a new one and choose from available templates like Article, Book, Course, Event, Job Posting, Music, Person, Product, Recipe, Restaurant, Service, or Software.
Select the schema that best matches your content type. For example, use Article for blog posts, Product for product pages, and Service for service-based pages. Choosing the right schema ensures search engines interpret your content correctly and display it more effectively in search results.
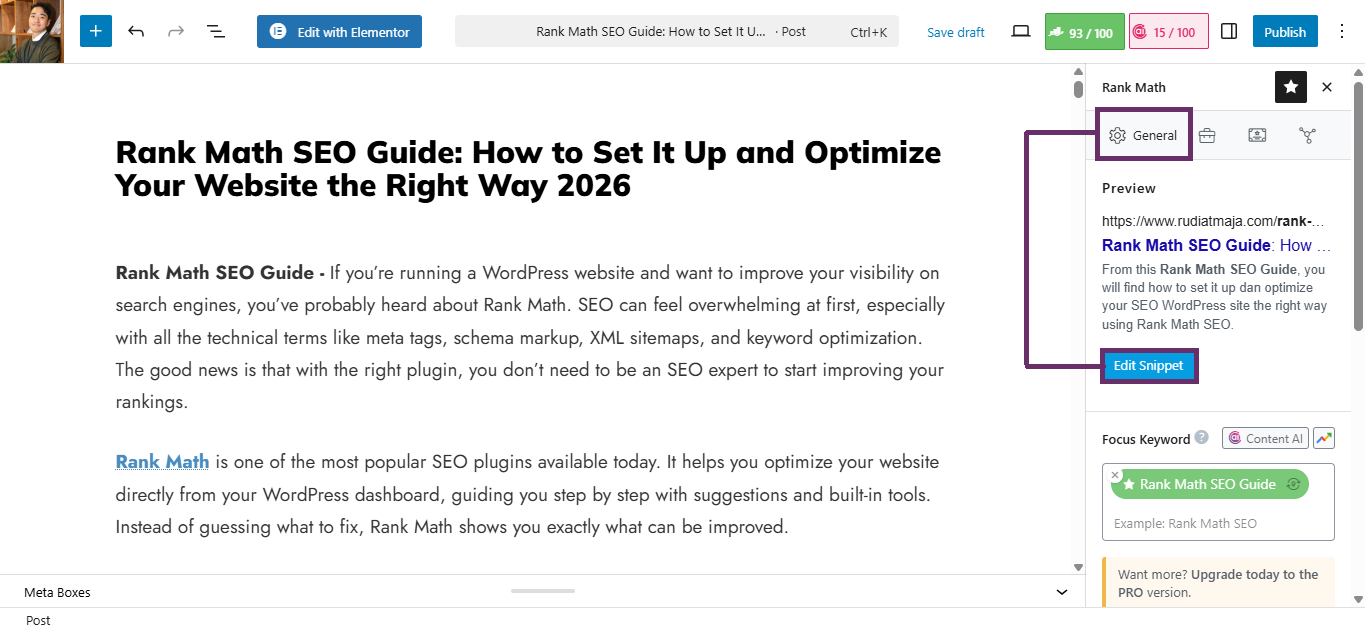
Next, go to the General tab and click the “Edit Snippet” button. This is where you customize your Meta Title, Permalink (URL), and Meta Description. Write a compelling title that includes your primary keyword naturally, and craft a meta description that encourages users to click while clearly summarizing your content.
Rank Math Pro Features
If you’ve followed this guide using the free version, you already know that Rank Math is powerful even without upgrading. However, Rank Math Pro unlocks a range of advanced features designed for website owners who want deeper insights, broader scalability, and more aggressive SEO strategies.
Rank Math Pro is especially useful for agencies, e-commerce businesses, content publishers, and website owners managing multiple projects. The Pro version expands both analytical capabilities and optimization flexibility, giving you more control over how your website performs in search engines.
Below are some of the key features available in Rank Math Pro, along with a short explanation of what each one does:
- Unlimited Websites
You can use a single Rank Math Pro license on unlimited websites (depending on your plan tier). This is ideal for agencies or developers managing multiple client sites. - Unlimited Keywords
Unlike the free version, which limits the number of focus keywords per post, Pro allows you to optimize for unlimited keywords. This is useful for targeting long-tail variations and semantically related phrases more effectively. - Google Trends Integration
You can view Google Trends data directly inside your WordPress dashboard. This helps you analyze keyword popularity trends over time before deciding which keywords to prioritize. - Advanced Analytics (Index Status & More)
Rank Math Pro provides deeper analytics insights, including index status reports, crawl data, impressions, clicks, and other advanced Search Console metrics. This helps you identify indexing issues and SEO performance gaps more clearly. - AI Search Traffic Tracker
This feature helps you monitor search traffic patterns using AI-based analysis. It gives smarter insights into keyword performance and traffic trends beyond basic reporting. - Free Content AI Trial (5,000 Credits)
Rank Math Pro includes a trial of Content AI with 5,000 credits. This AI-powered tool helps you generate optimization suggestions, keyword insights, and content recommendations directly within your editor. - Advanced Schema Features
Pro unlocks Multi-Schema support, more comprehensive Schema Templates, and greater flexibility in structured data configuration. This allows you to apply multiple schema types to a single page and create reusable schema templates. - Track 500 Keywords
Rank Math Pro allows you to track up to 500 keywords (depending on your plan). You can monitor ranking positions, performance trends, and keyword movements directly from your dashboard.
With these features, Rank Math Pro becomes more than just an SEO plugin – it transforms into a comprehensive SEO management system inside WordPress. Whether it’s worth upgrading depends on your website’s scale, competition level, and long-term SEO goals.
If you’re serious about growing your website, investing in Rank Math Pro can significantly accelerate your SEO progress. You don’t need to hesitate either – Rank Math offers a 30-day money-back guarantee. If within 30 days of purchase you feel that it’s not the right fit for your needs, you can request a refund without complicated procedures. This makes upgrading a low-risk decision with high potential upside for your website’s growth.
Conclusion
In this guide, we’ve covered everything you need to properly set up and use Rank Math from the ground up. Starting from connecting Google Analytics, configuring the Setup Wizard, managing sitemaps, adjusting robots meta settings, and enabling important modules, you now have a strong technical SEO foundation for your WordPress website.
We also walked through how to optimize your actual content—whether it’s blog posts, pages, or product listings. From choosing the right focus keywords and improving readability, to customizing meta titles, meta descriptions, and schema markup, these on-page SEO steps are what truly help your content compete in search results. When applied consistently, these optimizations can significantly improve how search engines understand and rank your website.
Beyond the basics, we explored the advanced capabilities available in Rank Math Pro. While the free version is powerful enough for most beginners, the Pro version offers deeper analytics, expanded schema support, keyword tracking, and AI-driven insights for those who want to take their SEO strategy further.
At the end of the day, SEO is not about quick tricks or shortcuts. It’s about building a technically sound website, publishing high-quality content, and optimizing each page with clear intent. With Rank Math properly configured and used strategically, you now have the tools needed to grow your organic traffic in a structured and sustainable way.