Managing WordPress hosting is not always difficult, but it can be annoyingly repetitive. You log in to check one small thing, then suddenly you are jumping between dashboards, logs, settings, PHP versions, staging sites, and support docs. It is not hard work every time, but it does take attention.
That is why Pressable MCP caught my attention. Not because it magically “replaces” the way you manage hosting, but because it gives ChatGPT a more useful role than just explaining things from the outside. Instead of asking AI what to click next, you can start using it as a helper that understands your Pressable hosting setup and can assist with real tasks.
I think this is where AI starts to feel less like a gimmick for WordPress users. Most of us do not need another shiny tool that promises to change everything overnight. We need something that saves a few minutes here, removes a bit of friction there, and makes daily site management feel less scattered.
Of course, I would not treat this as something you turn on blindly and let loose on every site you own. Hosting is still hosting, and one careless change can cause real problems. But with the right setup and a bit of common sense, Pressable MCP can make ChatGPT much more practical for checking sites, reviewing details, and handling routine WordPress hosting work.
So in this guide, I want to walk through Pressable MCP from a practical angle. We will look at what it is, how it connects with ChatGPT, and how you can use it to manage your WordPress hosting without making the process feel overly technical.
What Is Pressable MCP?
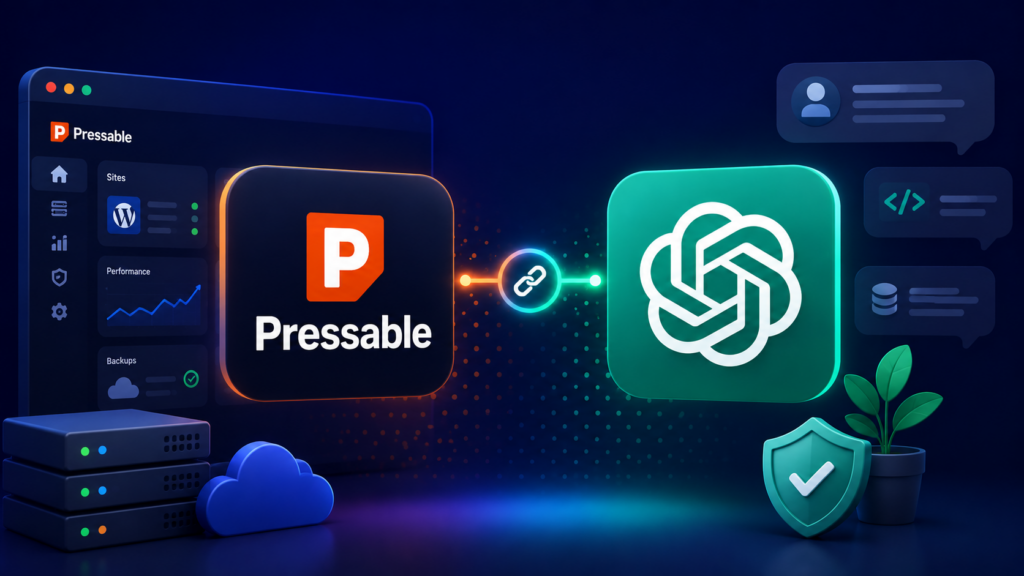
Pressable MCP is basically a way to connect your Pressable hosting account with an AI assistant like ChatGPT, so the assistant can do more than just give you generic WordPress advice. MCP stands for Model Context Protocol, an open standard that lets AI tools communicate with outside systems in a more structured way. In this case, that outside system is your WordPress hosting environment on Pressable.
Without MCP, ChatGPT can explain what a hosting setting means, but it cannot actually see your Pressable sites or interact with them. You still have to open the dashboard, find the right menu, check the logs, change the setting, or copy information back and forth yourself. Pressable MCP changes that by giving ChatGPT a controlled bridge into your hosting setup.
The easiest way to think about it is this: Pressable MCP turns ChatGPT from a “WordPress explainer” into something closer to a hosting assistant. You can ask about your sites in normal language, and the AI can use the available Pressable tools to help check details or perform supported actions. Pressable describes MCP as a way for AI tools to take action in external systems instead of only answering questions about them.
This is useful because hosting tasks are often small but scattered. Maybe you want to check a site’s status, review logs, look at PHP information, or handle something across more than one site. Instead of clicking around the dashboard for every little thing, you can start with a plain-language request and let ChatGPT help you move through the task faster.
It is important to separate Pressable MCP from the broader WordPress MCP idea. WordPress MCP is more about exposing WordPress site functionality through a standardized interface, while Pressable MCP is focused on the hosting side of the workflow. Pressable also has documentation around the WordPress MCP Adapter, but that adapter is described as a community-developed plugin and not the same thing as Pressable’s own hosting-level MCP product.
That difference matters because managing hosting is not the same as writing a blog post or editing a plugin setting. Hosting involves things like environments, logs, backups, PHP versions, and site-level operations. Pressable MCP is interesting because it brings AI closer to those practical maintenance jobs that usually live inside the hosting dashboard.
Still, Pressable MCP should not be treated like an autopilot button for your entire WordPress business. It is better to see it as a faster control layer, where ChatGPT helps you understand and manage things while you stay responsible for the final decisions. Used that way, it can make WordPress hosting feel less like dashboard-hopping and more like having a smart assistant beside you.
How to Connect Pressable MCP to ChatGPT
Before you can use Pressable MCP inside ChatGPT, you need to connect your Pressable account in a way that gives ChatGPT access to the right hosting tools. This is not the same as simply asking ChatGPT a question about Pressable or WordPress. You are setting up a connection between ChatGPT and Pressable’s MCP server, so ChatGPT can work with real information from your hosting account instead of only giving general answers.
Step 1: Start with a Pressable Hosting Plan
Before you can use Pressable MCP with ChatGPT, you need to have an active Pressable hosting plan. That is the real starting point, because MCP is built to work with your Pressable hosting environment, not with a random WordPress site hosted somewhere else. So if you want ChatGPT to help manage your WordPress hosting through Pressable MCP, your site needs to live on Pressable first.
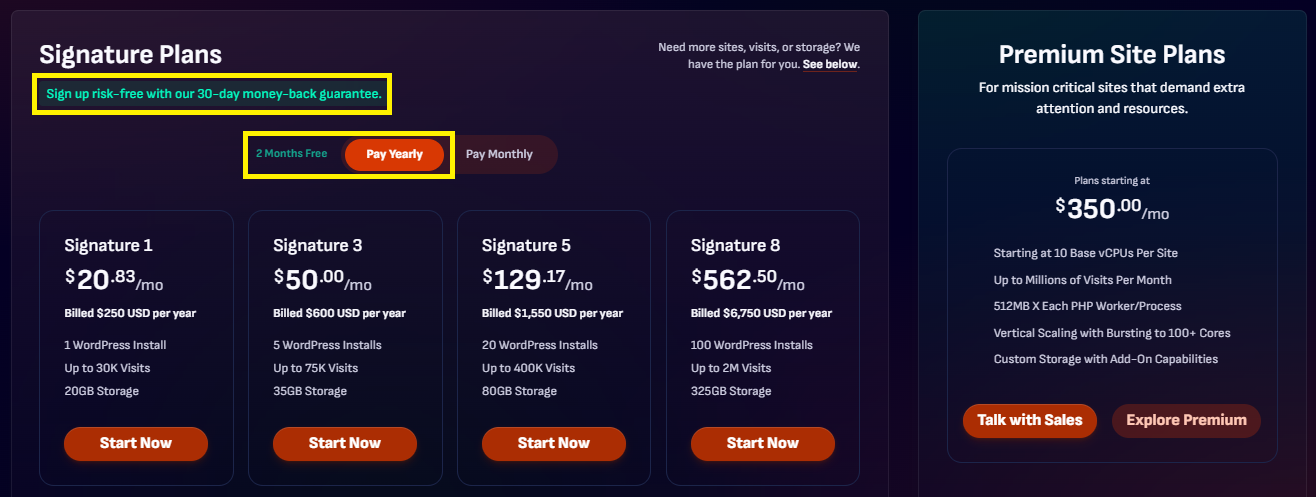
The nice part is that Pressable makes the first step feel less risky. If you choose annual billing, Pressable currently promotes 2 months free, which basically means you pay for 10 months and get a full year of hosting. They also offer a 30-day money-back guarantee, described by Pressable as a no-strings-attached guarantee on managed hosting plans, so you have room to try the platform without feeling locked in from day one.
If you are serious about using AI to manage WordPress hosting, this is where I would start: get your Pressable plan, set up your site, and make sure your dashboard is ready before touching the MCP setup. You can place a button right after this paragraph with copy like Start Hosting with Pressable, Try Pressable Risk-Free, or Get 2 Months Free on Pressable. Once your Pressable account is active, the next step is to find the MCP connection details and prepare ChatGPT to connect with it.
>>> Get Pressable <<< | >>> Pressable MCP <<<
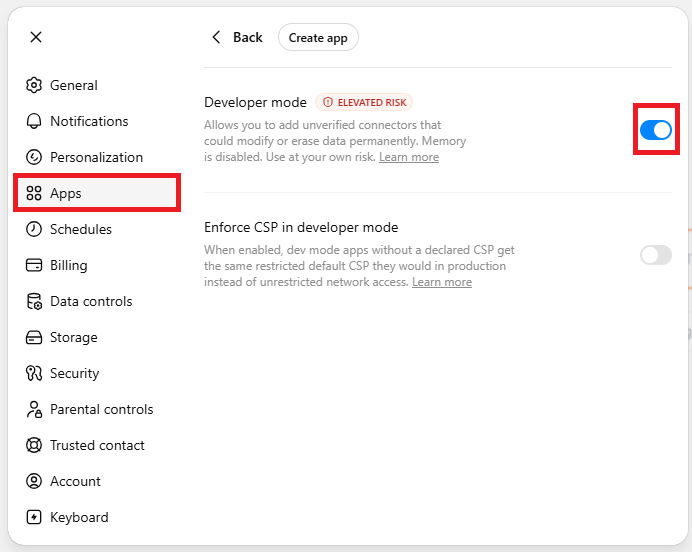
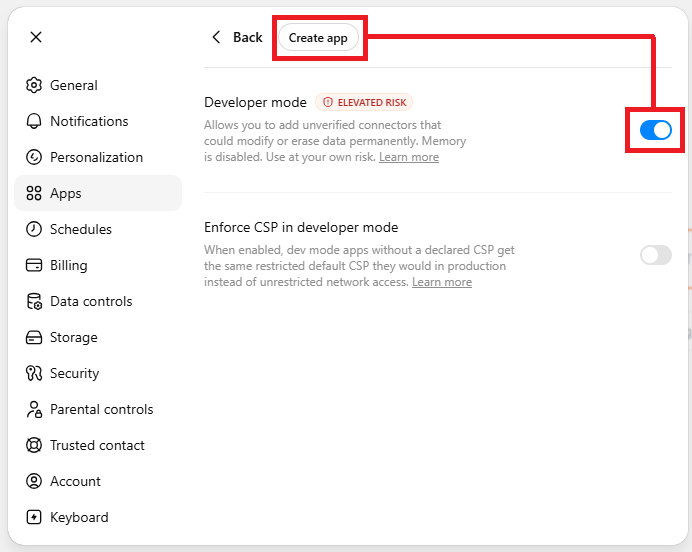
Step 2: Enable Developer Mode in ChatGPT
Once your Pressable hosting account is ready, the next thing you need to check is whether your ChatGPT account can use Developer Mode. This matters because connecting Pressable MCP is not the same as opening a normal chat and typing a question. You need Developer Mode so ChatGPT can create or test a custom MCP connection instead of just talking about Pressable from the outside.
At the time of writing, OpenAI says full MCP support and Developer Mode are available for ChatGPT Business, Enterprise, and Edu customers on ChatGPT web. For Business workspaces, admins or owners can enable Developer Mode from Workspace Settings → Permissions & Roles → Connected Data → Developer mode / Create custom MCP connectors. Each admin or owner may need to enable it for their own account, so do not assume it is automatically turned on for everyone in the workspace.
If you are on Enterprise or Edu, the process can be a little more controlled depending on your workspace settings. OpenAI says admins can grant Developer Mode access through role-based controls, and approved users can then enable it from Settings → Apps → Advanced Settings. Once Developer Mode is active, you are ready to move to the next part: creating the custom MCP app connection for Pressable inside ChatGPT.
Step 3: Create the Pressable MCP App in ChatGPT
After Developer Mode is enabled, click the Create App button to start setting up your Pressable MCP connection. ChatGPT will open a popup where you can add the basic details for the app. This is where you turn Pressable MCP into a recognizable custom app inside your ChatGPT workspace.
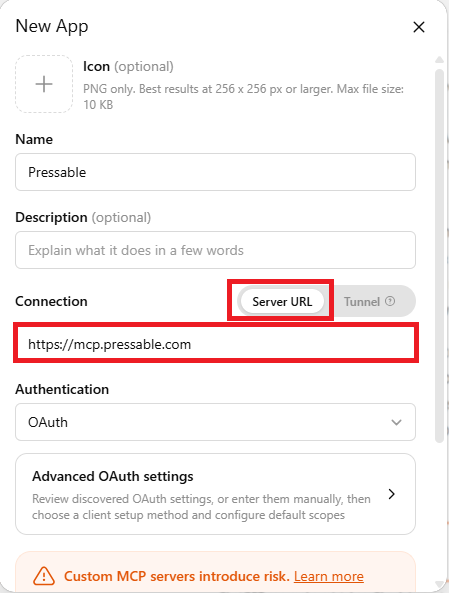
For the icon, you can upload the Pressable logo if you want the app to be easier to identify later. Then fill in the Name field with something simple like Pressable MCP or Pressable Hosting Assistant. In the Description field, you can write a short note such as Manage Pressable WordPress hosting with ChatGPT using MCP.
Next, go to the Connection section and choose Server URL. In the URL field, enter https://mcp.pressable.com exactly as written. For authentication, select OAuth, because Pressable MCP uses an authorization flow to connect your Pressable account securely.
Before creating the app, check the box that says I understand and want to continue. This step confirms that you understand you are creating a custom connection between ChatGPT and an external MCP server. After that, click the Create button to finish creating the app.
Once the app is created, you should see it listed in ChatGPT as a custom app. At this stage, the connection profile is ready, but you may still need to authorize it with your Pressable account before ChatGPT can actually access your hosting tools. That authorization step is what we will handle next.
Step 4: Authorize ChatGPT to Access Pressable
After you click the Create button in ChatGPT, you will be redirected to a Pressable authorization page. This page is where Pressable asks whether you want to allow ChatGPT to access your Pressable account through the MCP connection. In other words, this is the approval step that connects the custom app you just created with your real Pressable hosting environment.
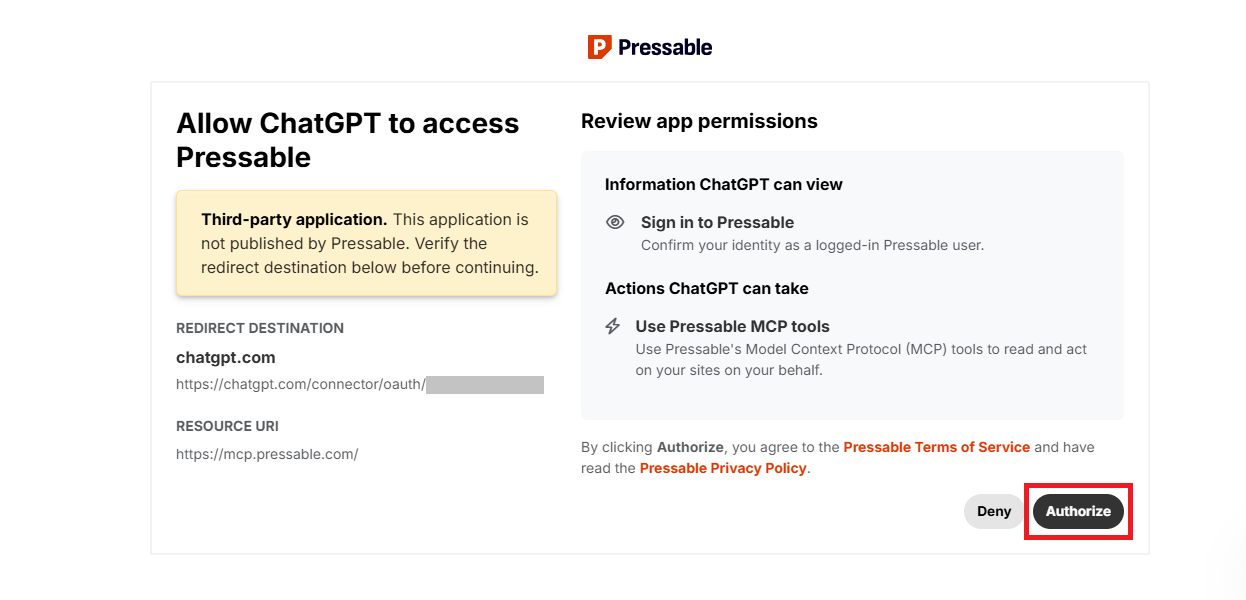
If you are already logged in to your Pressable account, the process should be pretty quick. You only need to review the authorization screen, make sure it is asking to connect the correct Pressable account, and then click the Authorize button. Once you approve it, Pressable can complete the OAuth connection and send you back to ChatGPT.
If you are not logged in yet, Pressable will ask you to sign in first. Use the same Pressable account that contains the WordPress sites you want to manage with ChatGPT. After logging in, continue to the authorization page and click Authorize to approve the connection.
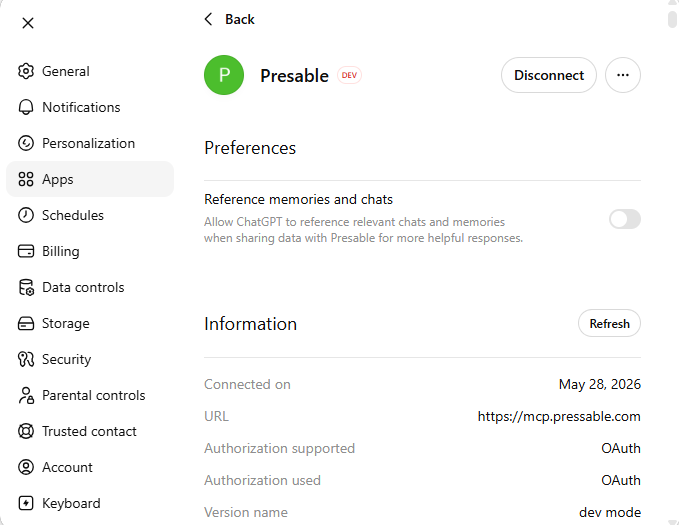
After clicking Authorize, you should be taken back to ChatGPT and see the Pressable app listed as connected. On the app details page, you can confirm the connection by checking that the status shows Disconnect, the URL is https://mcp.pressable.com, and the authorization method is listed as OAuth. If you see those details, it means the Pressable MCP connection has been added successfully and ChatGPT is now ready to start working with your Pressable hosting tools.
Step 5: Test the Pressable MCP Connection in ChatGPT
Now that the Pressable app is connected, the next step is to test whether ChatGPT can actually communicate with your Pressable account. The easiest way to do this is to open a new chat and ask a simple question related to your Pressable hosting. Do not start with anything risky like changing settings or modifying a live site; begin with a harmless request that only checks information.
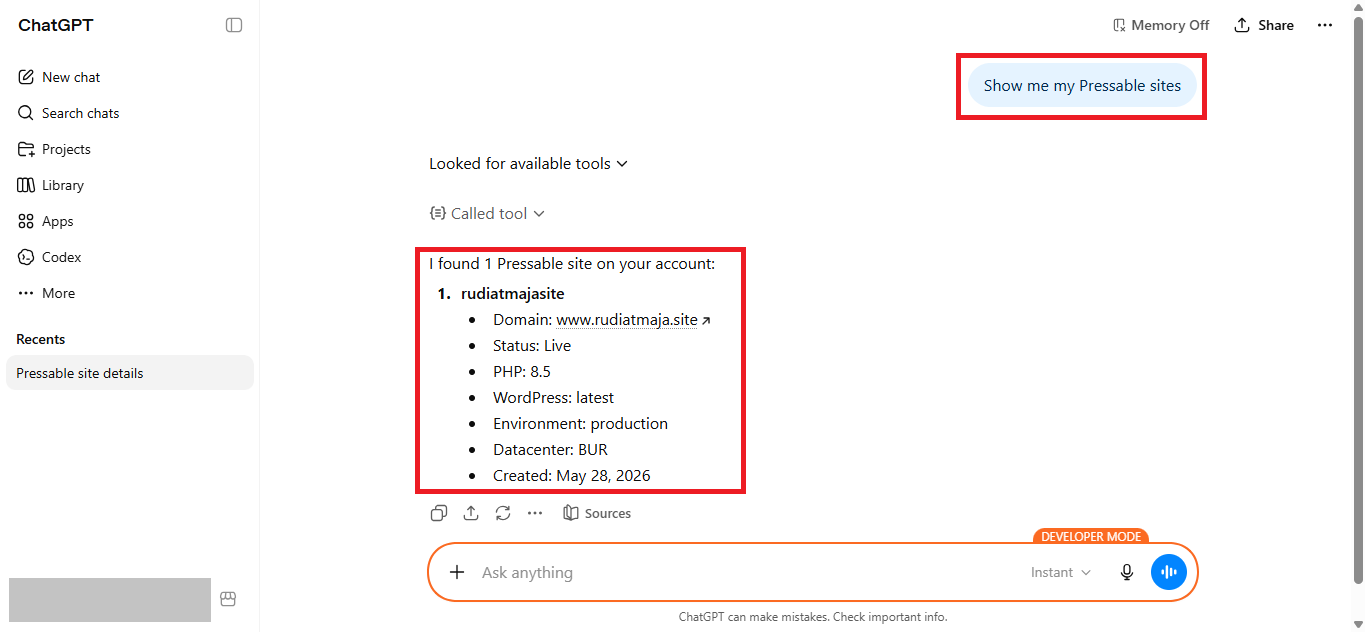
For example, you can ask ChatGPT something like, “Show me my Pressable sites,” or “Can you check which WordPress sites are available in my Pressable account?” If the connection is working, ChatGPT should be able to use the Pressable MCP app to retrieve information from your account. Depending on your ChatGPT interface, you may also see a small notice that ChatGPT is using the Pressable app or asking for permission before continuing.
If ChatGPT can list your Pressable sites or return basic account-related information, that is a good sign that the MCP connection is active. You can then try another safe command, such as asking it to check the status of one site or show available hosting details. The point of this step is not to do advanced management yet, but to confirm that ChatGPT and Pressable are talking to each other properly.
If nothing happens, or ChatGPT responds like it does not know anything about your Pressable account, go back to the app settings and check the connection details. Make sure the URL is https://mcp.pressable.com, the authentication method is OAuth, and the app still appears as connected. You may also need to refresh the app information or reconnect it if the authorization did not complete correctly.
Once the test works, you are ready to start using Pressable MCP for real hosting tasks. From here, you can ask ChatGPT to help check site details, review hosting information, inspect logs, or guide you through supported actions inside your Pressable environment. Start small, confirm the results, and only move to bigger tasks when you are comfortable with how the connection behaves.
What Can You Do with Pressable MCP?
Once Pressable MCP is connected to ChatGPT, it becomes much more than a simple “ask questions about hosting” tool. Based on the available Pressable MCP tools in the Pressable dashboard, you can use it to manage sites, check performance, review logs, handle backups, work with domains, manage plugins, and even run more advanced WordPress maintenance tasks from a chat-style workflow.
>>> Find Prompts <<<
Final Thoughts
Pressable MCP makes ChatGPT feel a lot more useful for WordPress hosting, especially if you already spend time managing sites, checking logs, adjusting settings, or repeating the same dashboard tasks. It does not remove the need to understand what you are doing, but it can make the process faster and less messy.
The best way to start is simple: connect Pressable MCP, test it with safe read-only requests, and slowly try more practical tasks once you feel comfortable. For anything sensitive, like backups, restores, users, plugins, PHP versions, or commands, always review what ChatGPT is about to do before approving the action.
If you manage WordPress sites often, Pressable MCP is worth trying because it brings hosting management closer to the way people actually think and ask questions. Instead of digging through menus every time, you can work from a conversation and let ChatGPT help you move through the task with more context.