Starting a blog is one of the easiest ways to share your ideas, build a personal brand, publish helpful content, or even create an online business. The good news is, you no longer need to understand complicated technical things just to get your first blog online.
In this guide, you’ll learn how to start a blog using WordPress.com. This platform gives you a simpler way to create a blog because you don’t need to buy separate hosting, install WordPress manually, or manage server settings by yourself.
However, this tutorial is not based on the free WordPress.com plan. To follow every step properly, you’ll need a paid WordPress.com plan because we’ll use features such as a custom domain, theme installation, plugin access, and other tools that make your blog more flexible.
>>> 👉 Pricing Plans <<<
We’ll also use the free Kadence theme from the WordPress.org repository so your blog has better design flexibility, especially if you’re using a personal or premium WordPress.com plan with limited theme options. With Kadence, you can customize the look of your blog more freely and create a layout that matches your style.
👉 My Affiliate Link
Why Use WordPress.com?
Starting a blog should feel exciting, not overwhelming. That’s why this tutorial uses WordPress.com as the foundation. Instead of asking you to buy hosting separately, connect it manually, install WordPress by yourself, and handle technical setup from scratch, WordPress.com gives you a simpler path to launch your blog with fewer moving parts.
But there’s one important thing you need to know before we begin: this tutorial requires a paid WordPress.com plan. The free plan can be useful for experimenting, but it has limitations. For this tutorial, you’ll need a paid plan because we want to build a blog that has a stronger foundation from the start, including the ability to use a custom domain, install plugins, and access more themes.
One of the biggest advantages of using WordPress.com is that you don’t have to worry about managing hosting yourself. WordPress.com handles the hosting side for you, so you can focus more on building your blog, writing content, and growing your audience. For a new blogger, this makes the process much easier because you don’t need to deal with server settings, manual installations, or technical maintenance just to get started.
A paid WordPress.com plan also gives you a free domain name for the first year, which helps your blog look more professional from day one. Instead of using a basic free WordPress.com address, you can have your own domain name that matches your brand, niche, or personal identity. This matters because a clear domain name makes your blog easier to remember and more trustworthy for readers.
Another major reason we’re using a paid WordPress.com plan is plugin access. With the right plan, you can install plugins and themes, including many free plugins and themes available from the WordPress.org repository. This gives you more control over how your blog looks, works, and grows over time.
How to Start a Blog
Starting a blog is much easier when you have the right tools from the beginning. In this tutorial, you’ll build your blog using WordPress.com, so you do not need to handle hosting manually or deal with complicated technical setup. You can focus on creating your blog, choosing the right design, and preparing it for future growth.
After your blog is created, we’ll also optimize it with Rank Math SEO plugin. This will help you prepare your blog for search engines from the start, including setting up important SEO features and improving your content so it has a better chance of ranking on Google. So, by the end of this tutorial, you’ll not only have a working blog, but also a stronger foundation for growing your traffic.
1. Get WordPress.com
To start your blog, visit the WordPress.com site.
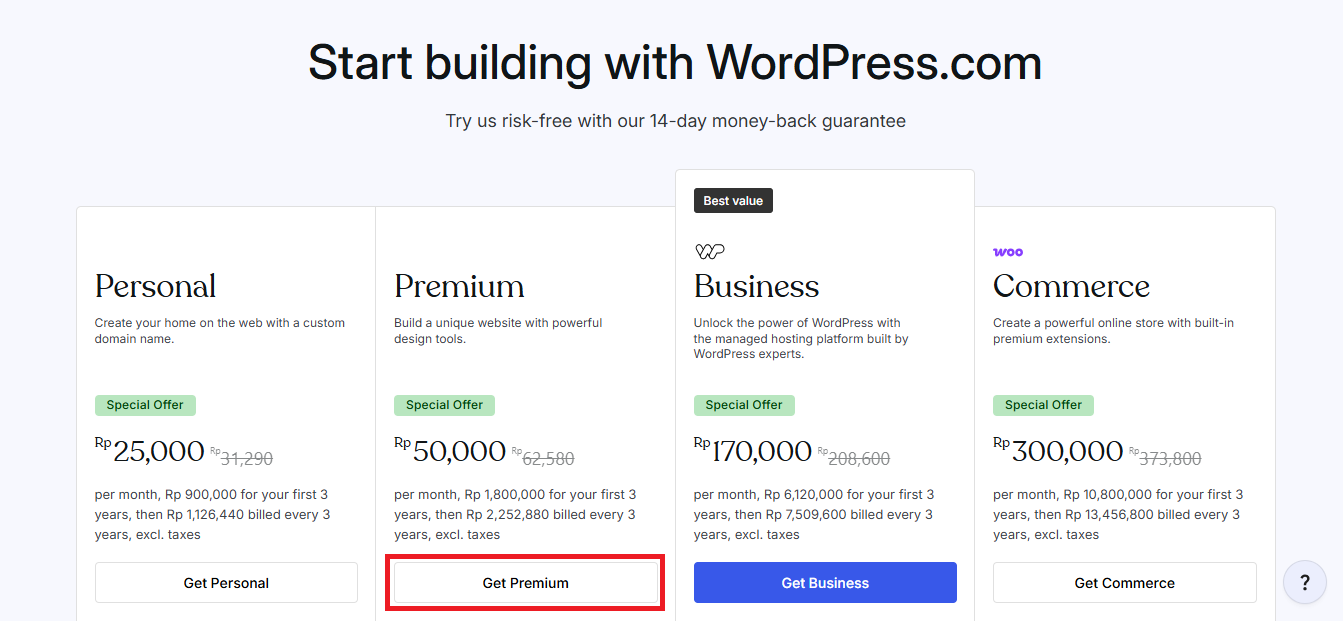
Once you’re on the site, scroll down until you find the pricing section. This is where you can compare the available plans and choose the one that fits your goals, budget, and how serious you are about growing your blog.
You’ll see the pricing plans converted into your country’s currency, or most likely USD.
I recommend starting with the Premium plan because it gives you the ability to monetize your blog with WordAds. This means you can start building your blog with monetization in mind from day one. Even though your blog may not earn much in the beginning, having monetization access early can be useful as your traffic grows.
Another option is to start with the Personal annual plan. This can be a good choice when you want a more affordable entry point while still getting important features like a custom domain for your blog. It may not give you the same monetization flexibility as the Premium plan, but it can still be enough to help you launch your blog properly.
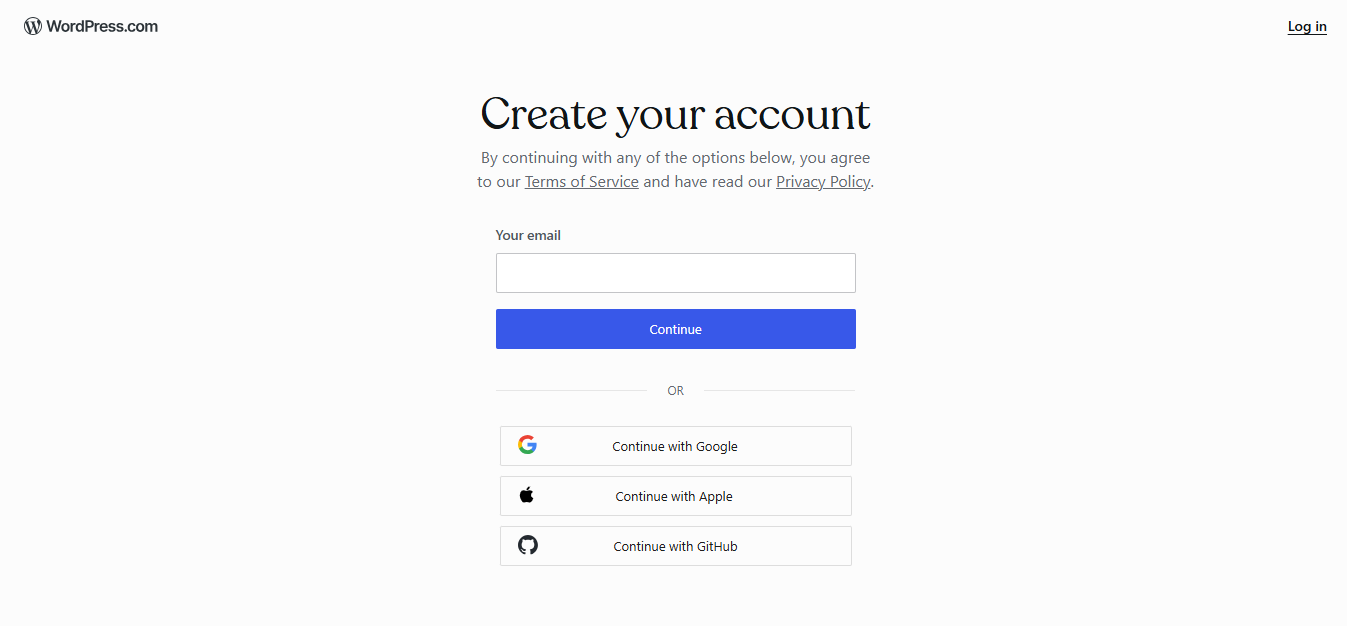
After choosing a plan, you will be taken to the WordPress.com account creation page. There, you can create an account in several ways, such as using your email, your Google account, your Apple account, or your GitHub account. So, please choose the option that best suits your preference.
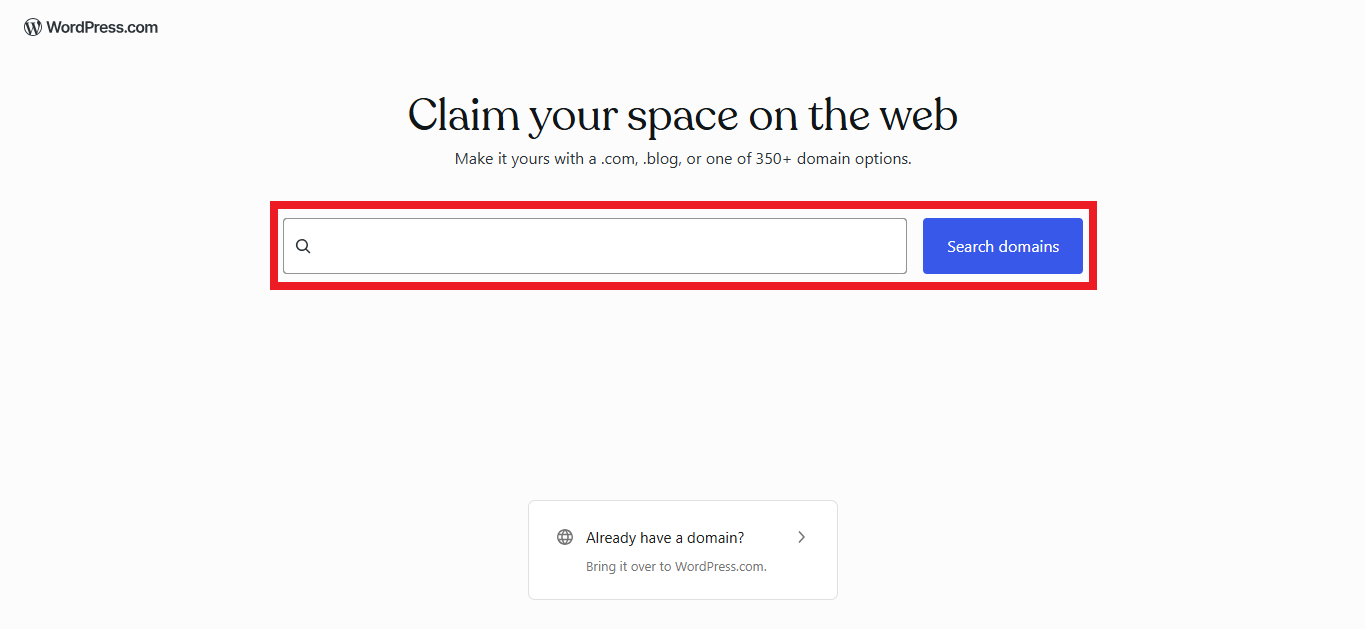
After creating an account, you will be taken to the domain name search page. There, you can type in your domain name along with the extension you want, for example, mytravelblog.com or dailyrecipes.net, then click the Search Domains button.
If the domain is available, you can select that domain name right away. If it is not available, you will see several alternative domain name options with different extensions. You can also use the domain search field again to look for another domain name and extension that you prefer.
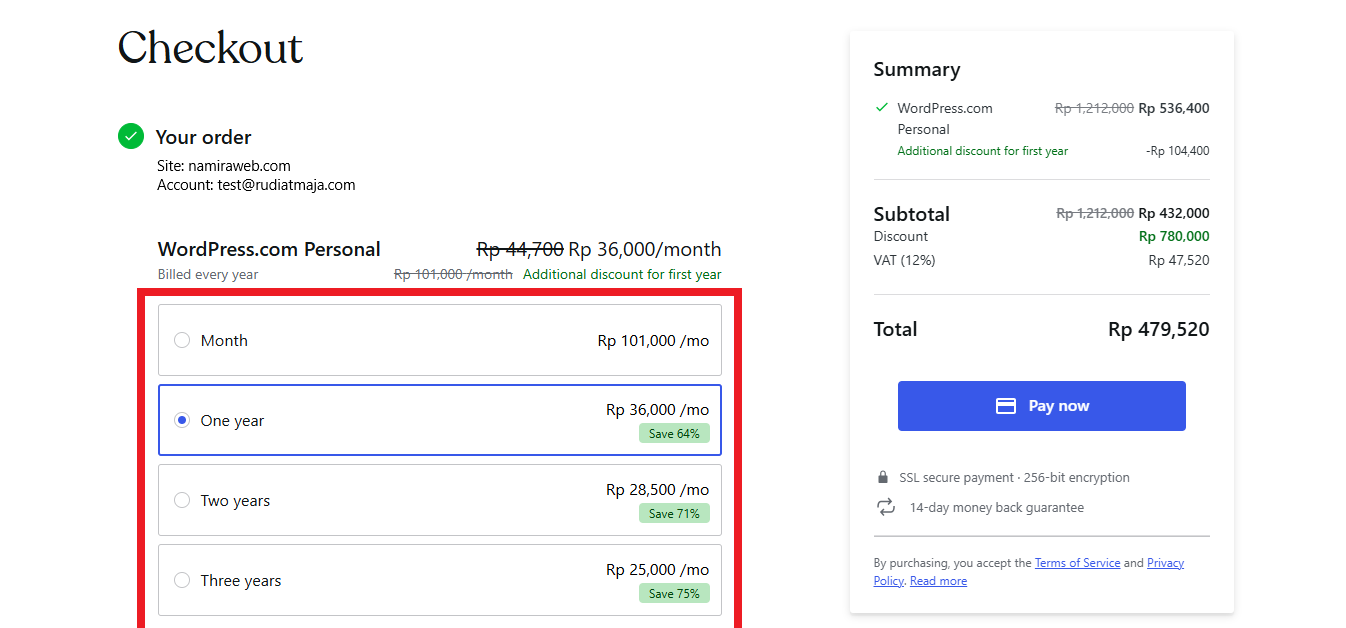
After choosing a domain name, you will be taken to the checkout page. There, you can choose your subscription duration, such as monthly, yearly, every two years, or every three years. Please select the subscription period you prefer.
Then, choose your payment method and complete your purchase.
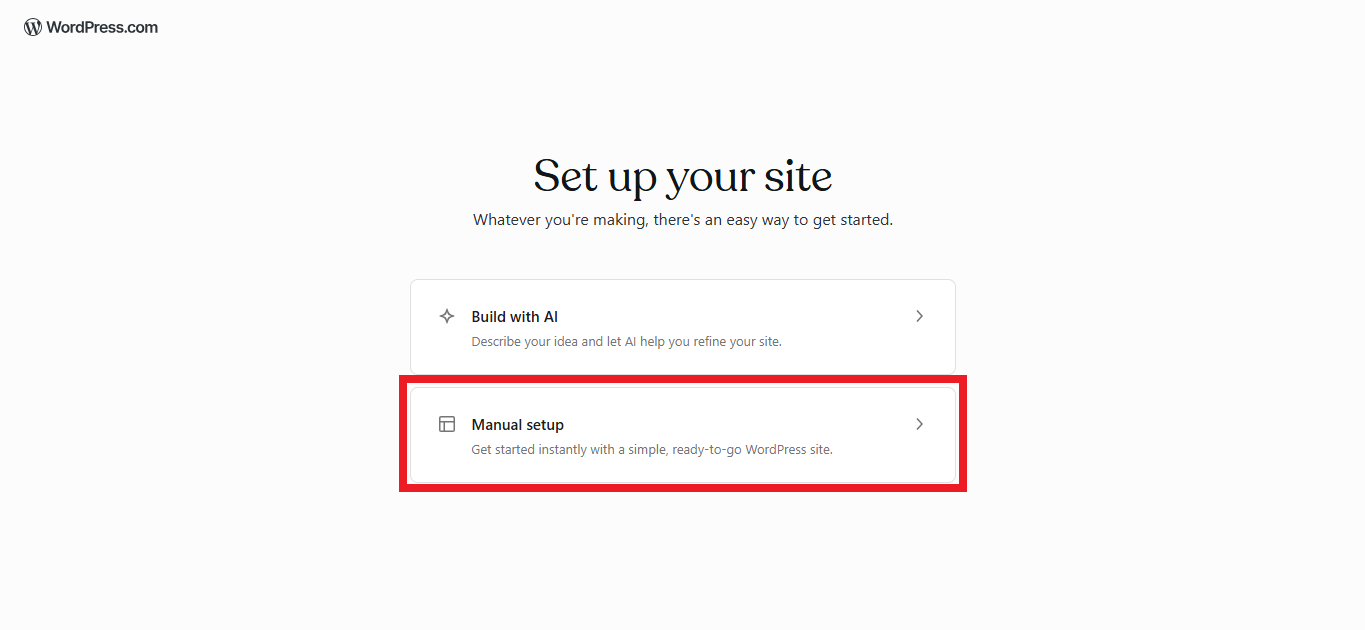
Next, you will be taken to the Set up your site page. Here, you can choose the Build with AI option if you want to create your blog using AI. Or, you can choose the Manual Setup option if you want to build the blog yourself. However, in this tutorial, we will use the Manual Setup option. This is because we will use a free theme from the WordPress.org repository and add plugins to your WordPress.com blog site.
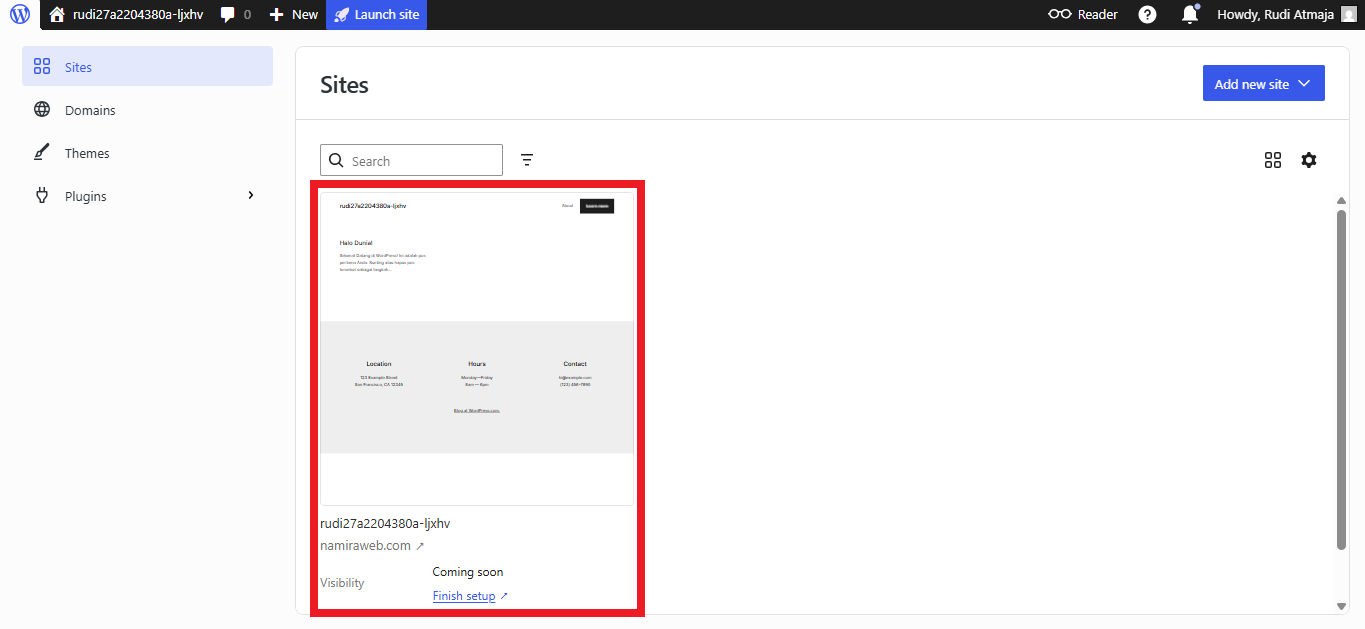
Next, you’ll be taken to the Sites page. This is where you can see all the websites you have on WordPress.com. If this is your first time using WordPress.com, this page may only show the new site you just created. But later, when you create more websites or manage multiple blogs, you’ll be able to find them all from this page.
2. Setting Up General Settings
Now, let’s set up the general settings for your WordPress.com site. This section is important because it allows you to define your site’s basic identity and display preferences, such as the site title, tagline, language, timezone, and date format.
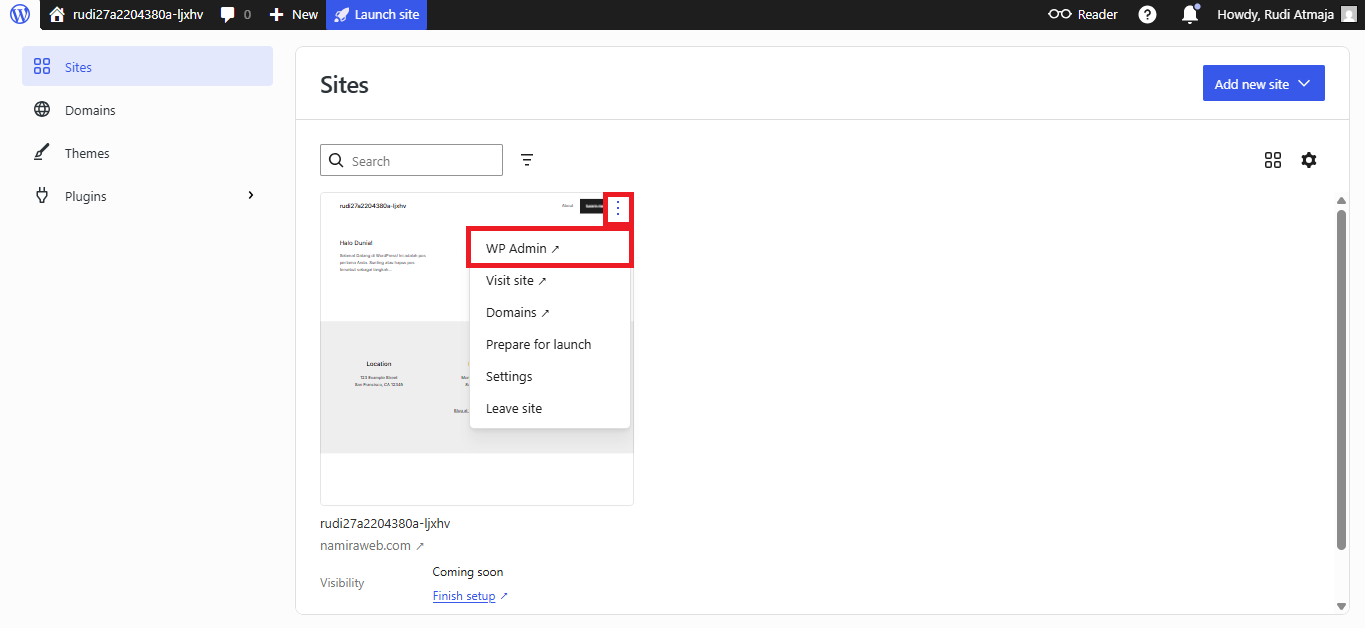
From your WordPress.com Sites page, click the three-dot menu, then click WP Admin. This will take you to your WordPress.com site dashboard.
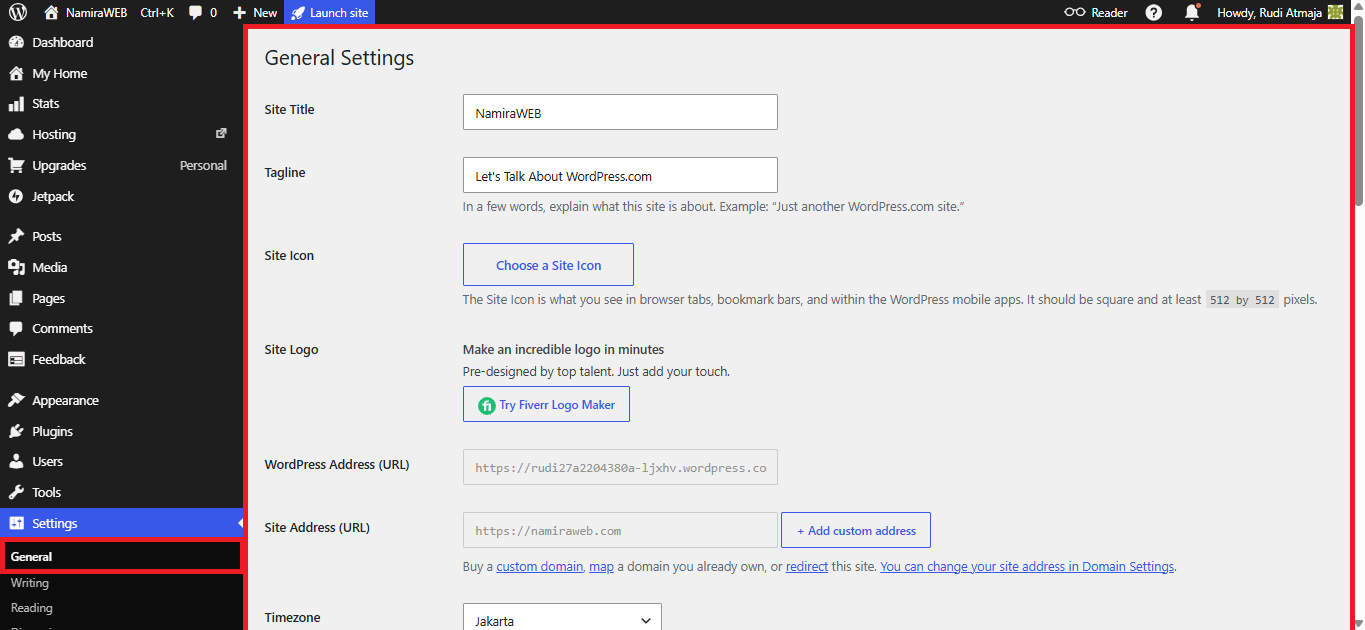
In your WordPress.com dashboard, go to Settings > General. Then, set up the Site Title, Tagline, Site Icon, Timezone, Date Format, Time Format, and Site Language. You can leave the other settings as default.
Once you are done, click the Save Changes button.
Note:
Please keep in mind that if you want to log in to your WordPress.com site dashboard in the future, there is a much easier way to access it. Simply type your domain name followed by /wp-admin, such as yourdomain.com/wp-admin. You will then be prompted to log in to your WordPress.com account. Once you have successfully signed in, you will be taken directly to your WordPress.com website or blog dashboard.
3. Configure Your Permalinks
Permalinks are the permanent URLs for your blog posts and pages. They determine how your website addresses appear in a browser and search engine results. A clean and descriptive permalink structure can make your URLs easier to read and understand for both visitors and search engines.
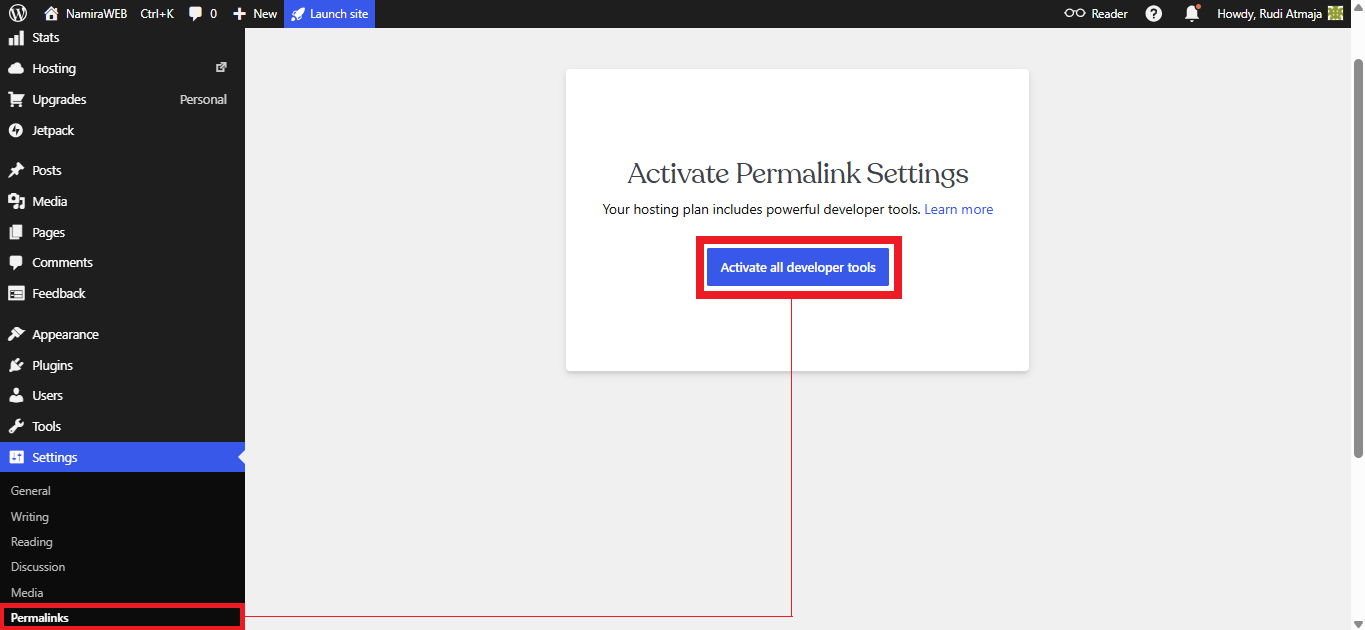
To configure your permalinks, click Settings > Permalinks. On the Permalinks page, you won’t be able to configure your permalink settings right away. Instead, you’ll see a message that says “Activate Permalink Settings – Your hosting plan includes powerful developer tools.” Simply click the “Activate all Developer Tools” button.
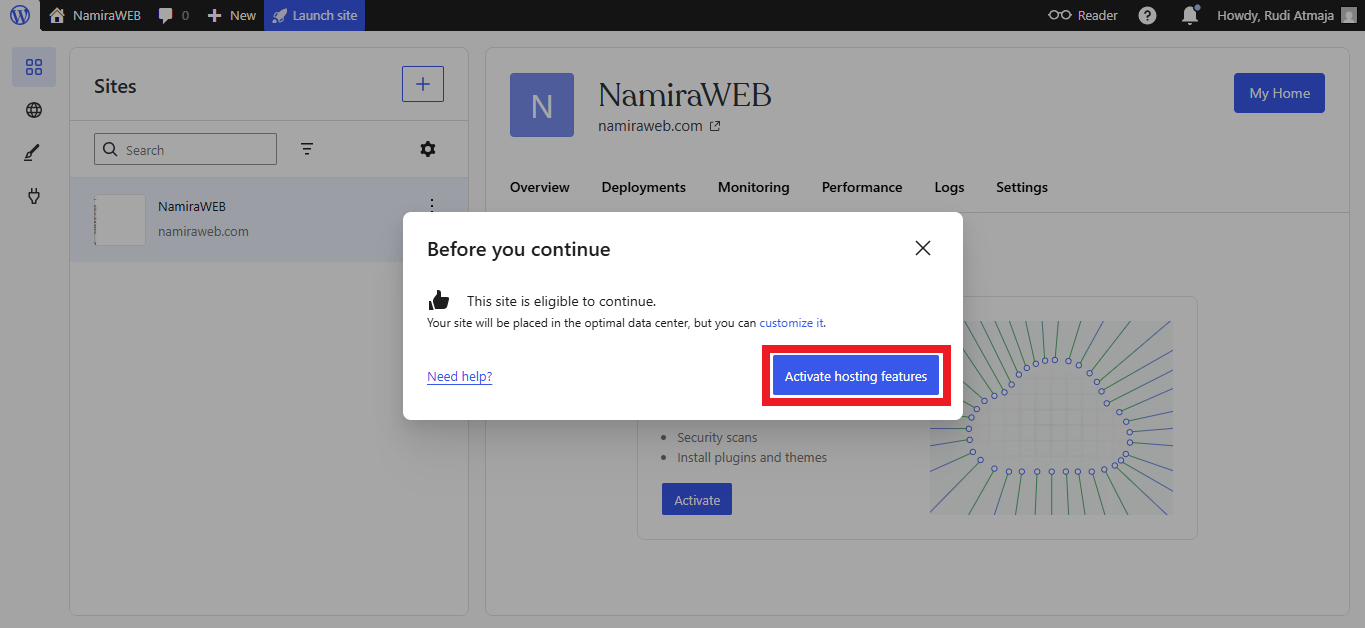
After that, you’ll be taken to a page displaying a “Before You Continue” box. Here, simply click the “Activate Hosting Features” button. This will not only enable the permalink feature, but also allow you to install themes and plugins from external sources, including free themes and free plugins from the WordPress.org repository.
After the hosting features have been activated, you’ll be taken back to your WordPress.com website/blog dashboard. If the hosting feature activation process takes longer than 3 minutes, you can press F5 to refresh the page.
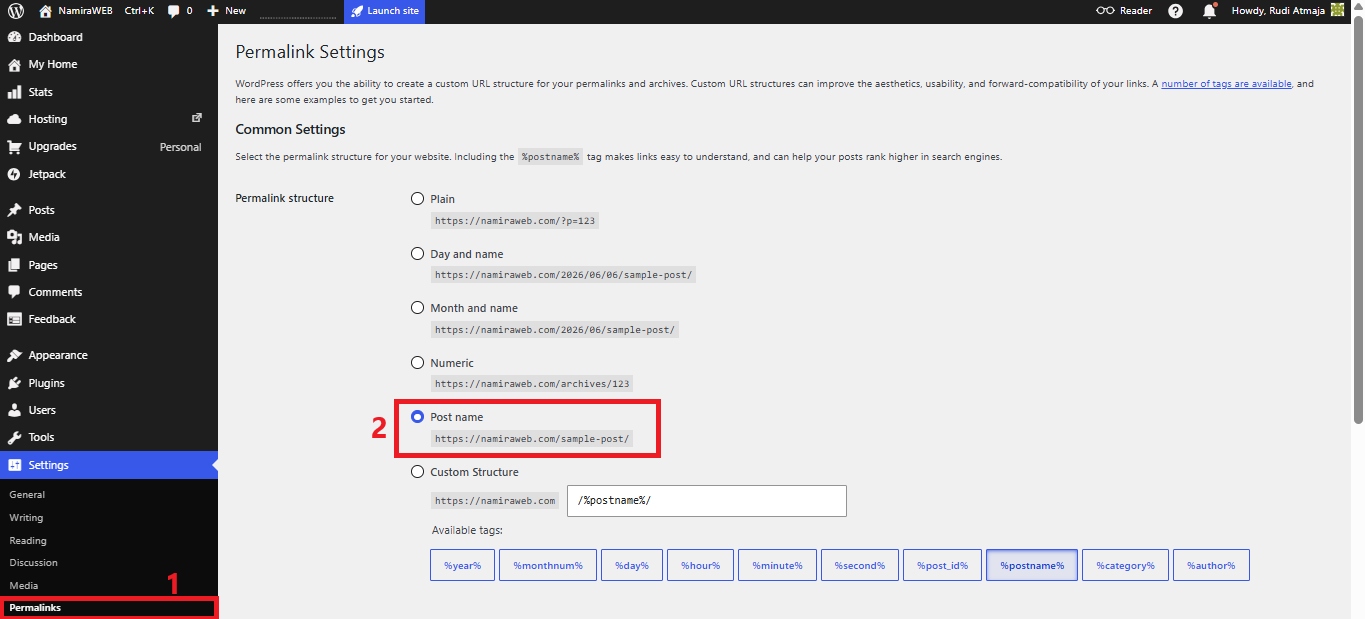
Once you’re back in your WordPress.com website/blog dashboard, click Settings and select Permalinks again. On the Permalinks page, choose Post name under the Permalink structure section.
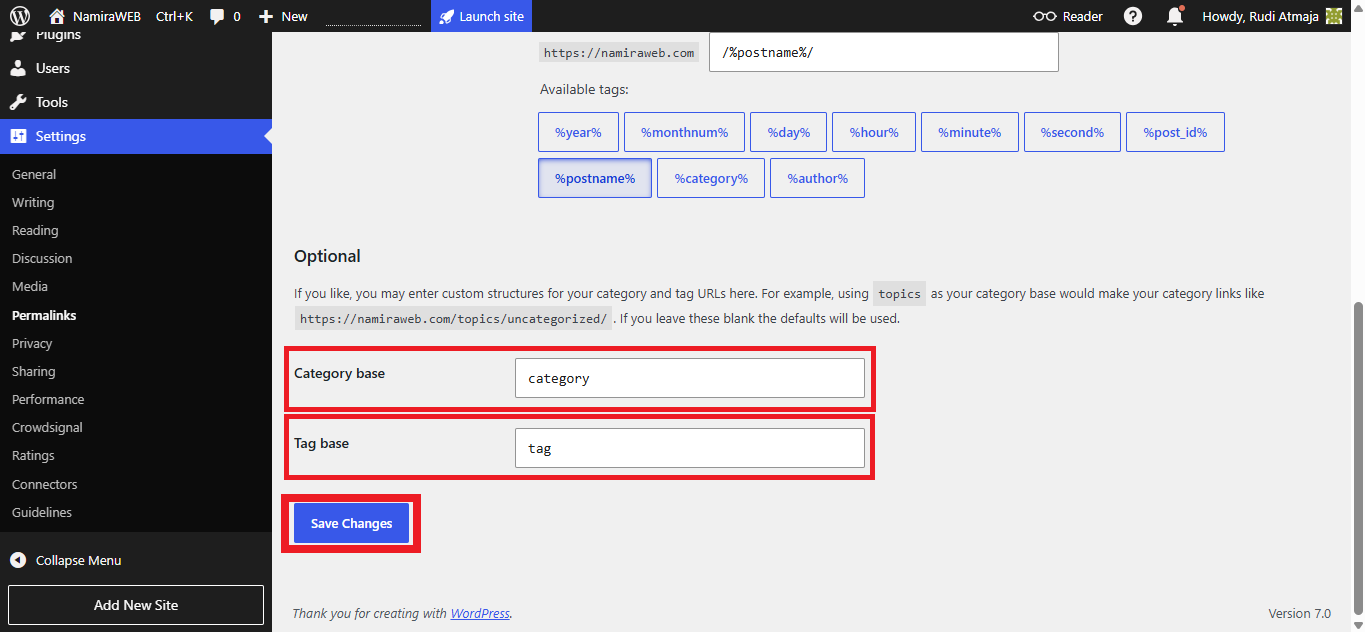
You can also define a Category base, which adds a prefix to your category URLs. For example, if you set the Category base to category, a category URL might look like yourdomain.com/category/travel/. If you set it to topics, the URL would become yourdomain.com/topics/travel/.
Likewise, you can define a Tag base, which adds a prefix to your tag URLs. For example, if you set the Tag base to tag, a tag URL might look like yourdomain.com/tag/blogging/. If you set it to topics, the URL would become yourdomain.com/topics/blogging/.
Once you’re done, click the Save Changes button to save your settings.
4. Download the Kadence Theme
Now you’re ready to install a WordPress theme. Don’t worry – the theme we’ll be using here is a free theme from the WordPress.org theme repository. If you’re wondering why we’re using a free theme from WordPress.org, it’s because the selection of blog themes on WordPress.com, in my opinion, offer sufficiently comprehensive customization options is quite limited, especially if you’re using the Personal plan.
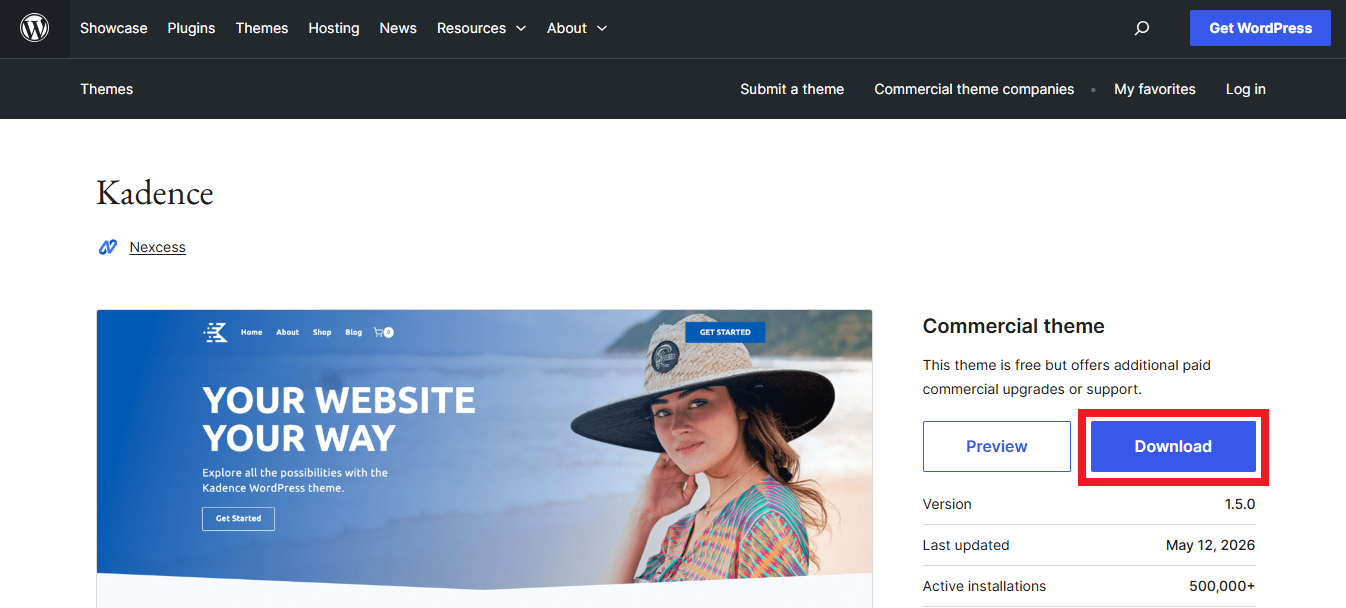
To download the Kadence theme, visit this link. Once you’re there, simply click the “Download” button.
5. Install & Activate The Kadence Theme
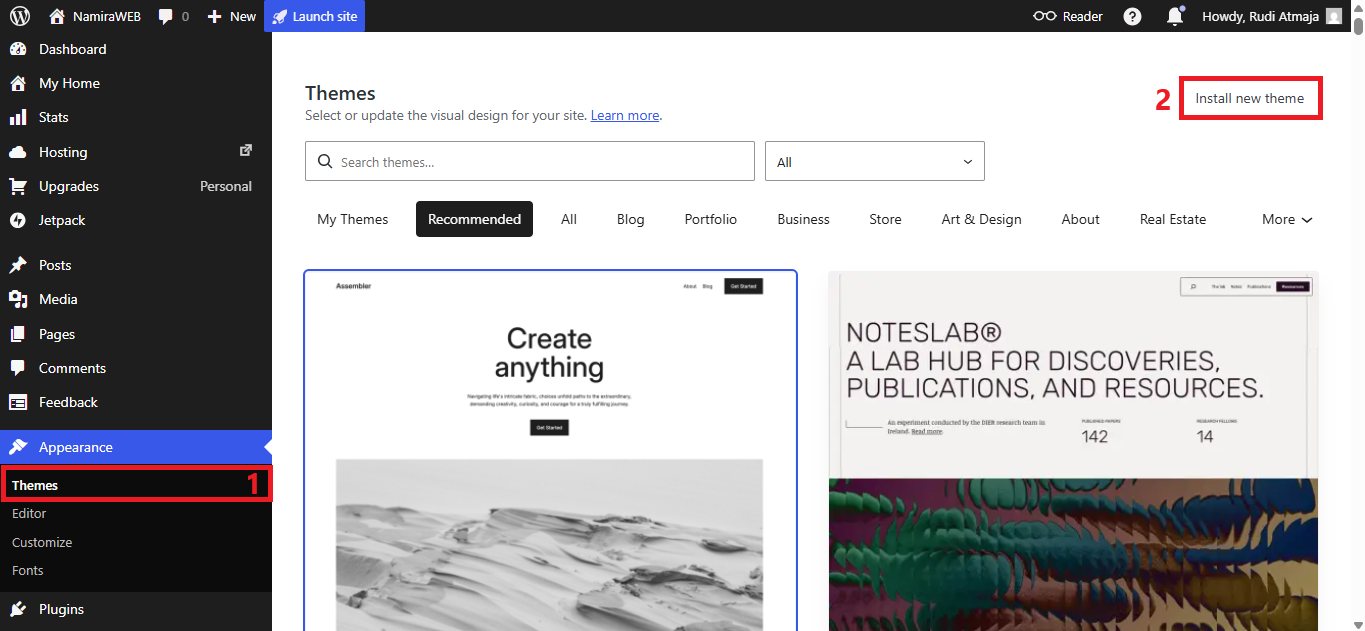
After the Kadence theme has finished downloading, it’s time to install the theme before you can customize it to match your preferences. Return to your WordPress website/blog dashboard and click Appearance > Themes. On the Themes page, click the “Install New Theme” button.
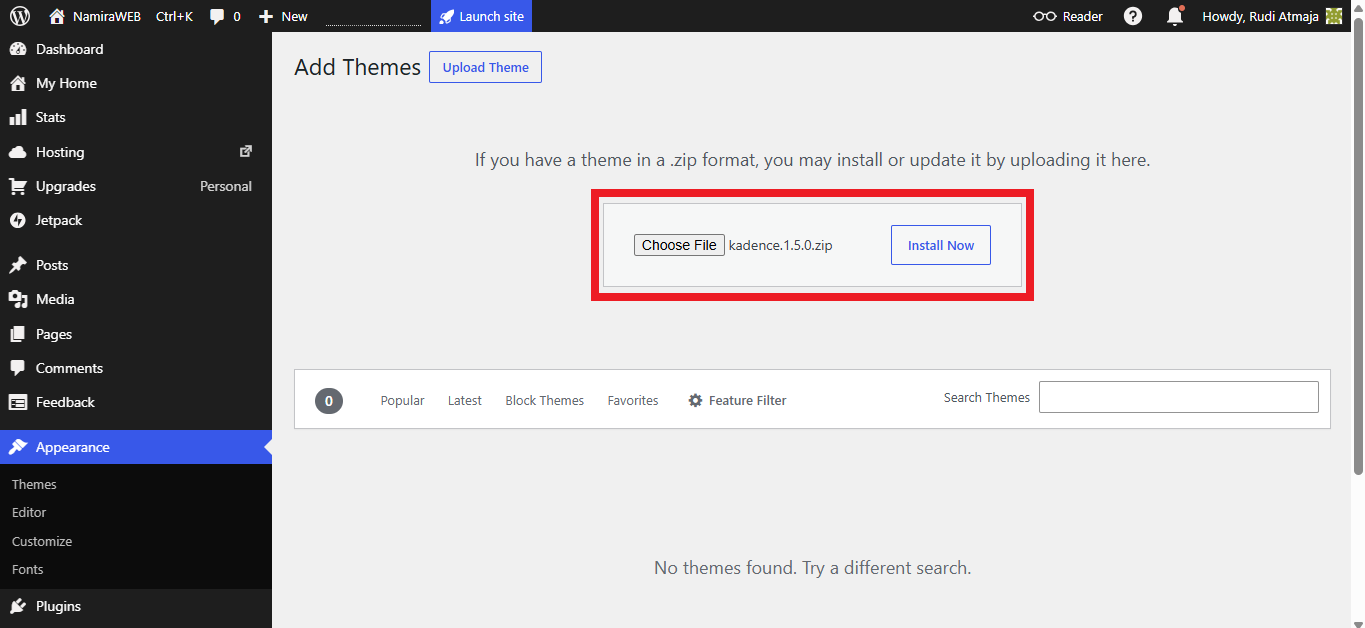
Next, you’ll be taken to the “Add Themes” page. There, click the “Choose File” button and select the Kadence theme ZIP file that you just downloaded. Then, click the “Install Now” button.

After WordPress has uploaded and installed the Kadence theme, click the “Activate” option to activate the theme. Your WordPress blog is now using the new Kadence theme.
6. Delete Unused Themes
Once the Kadence theme is active, it’s time to delete any unused themes. Keeping themes that you no longer use can unnecessarily clutter your WordPress installation. Removing unused themes helps keep your site cleaner and easier to manage, while also reducing the number of components that need to be maintained and updated.
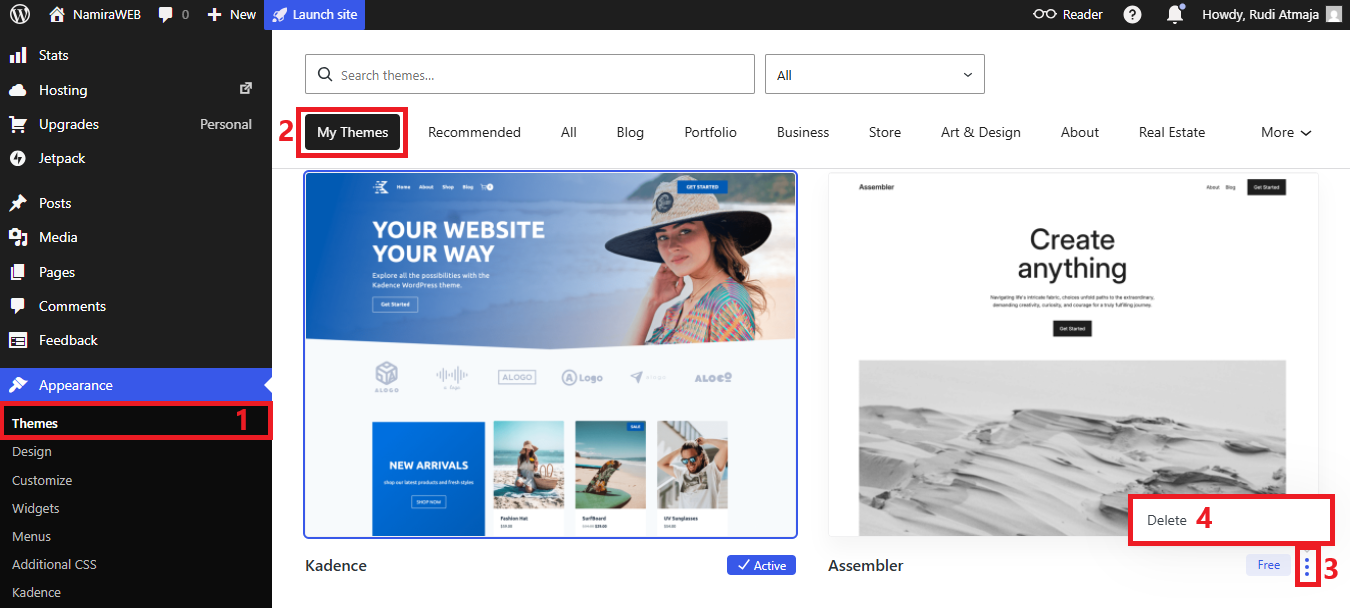
To do this, click Appearance > Themes. Then, click the My Themes tab. There, you’ll find all the themes installed on your WordPress blog (the active theme will be marked with an Active label). Then, click the three dots on any inactive theme and select “Delete” to remove it. Repeat the same process for the other inactive themes.
7. Create Post Categories
Now that everything is set up, it’s time to create your post categories. These categories will later be used as the main navigation menu that appears in your WordPress blog’s header.
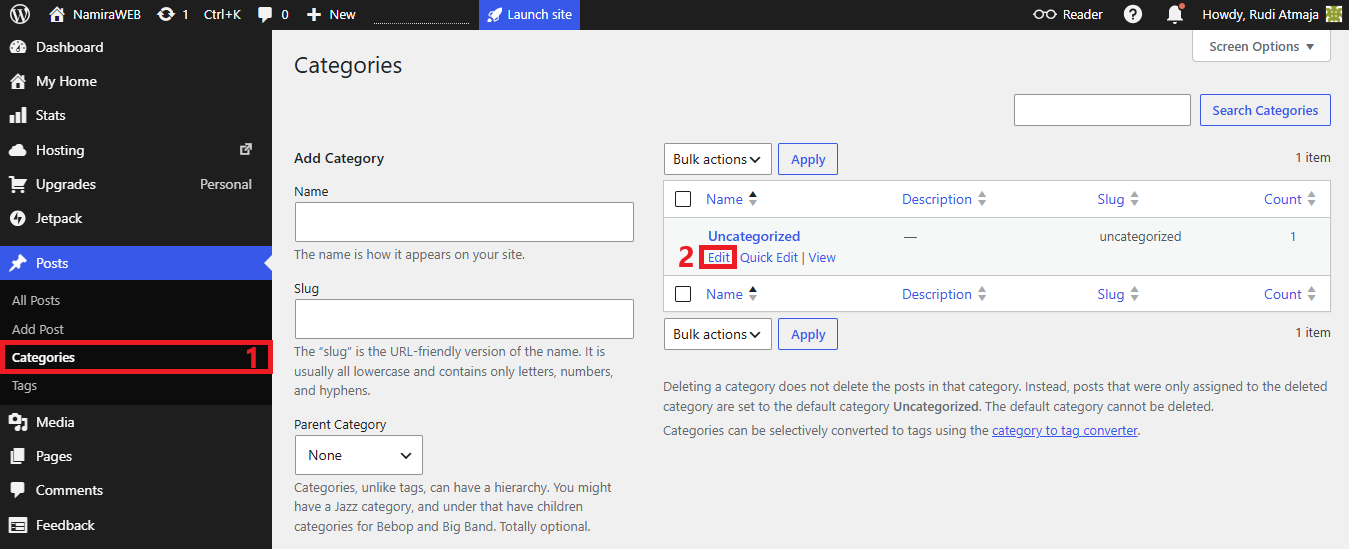
To do this, click Posts > Categories. On the Categories page, you’ll find the default category called Uncategorized. Since this category cannot be deleted, you can modify it by hovering your cursor over it and clicking the “Edit” option.
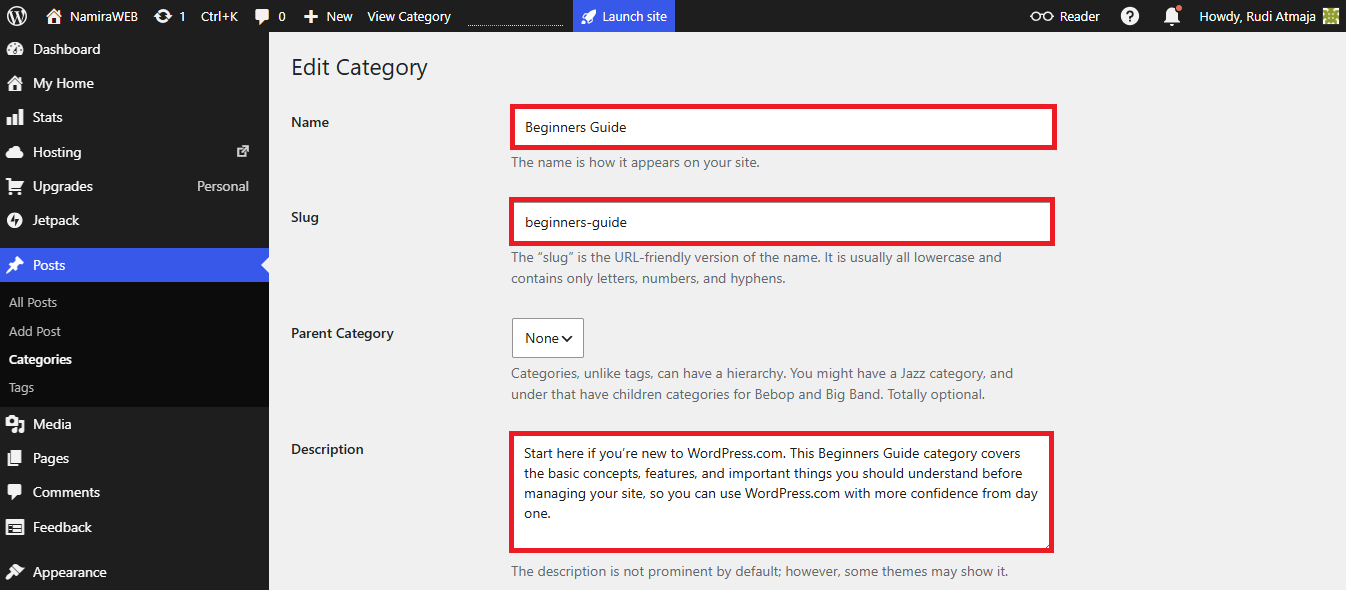
Next, in the Name field, enter the category name you want to use. In the Slug field, enter the same category name. However, the slug should be written entirely in lowercase letters, and if it contains two or more words, spaces must be replaced with hyphens (-). Below that, you can add a description for the category in the Description field. We’ll display this description when visitors click the category link that we’ll place in your blog’s header.
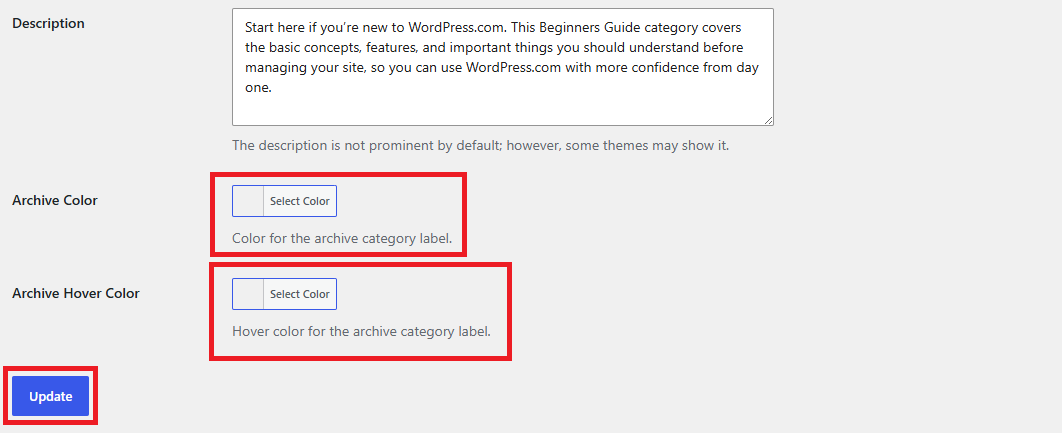
You can also configure the Archive Color and Archive Hover Color according to your preferences. Finally, click the Update button.
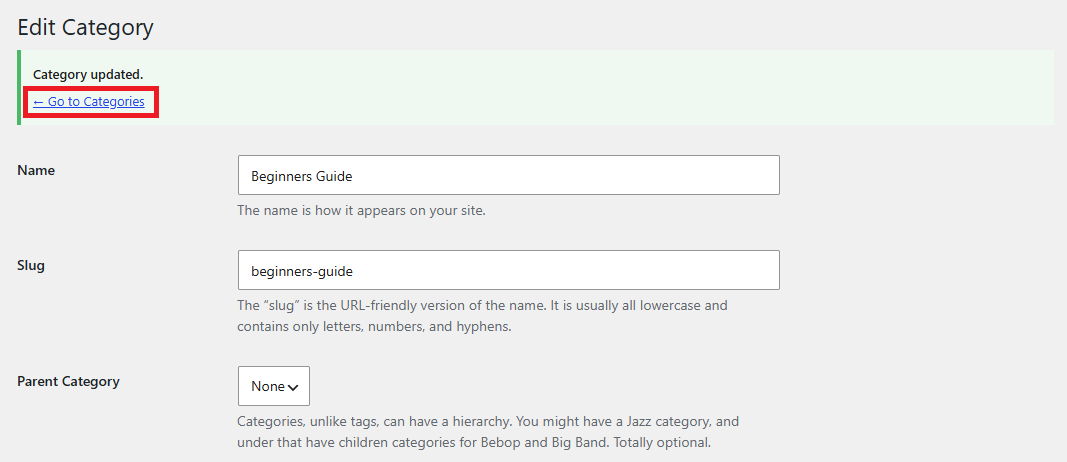
After updating the category, click the Go to Categories option to display all of your blog post categories. Next, we’ll add additional categories based on your blog’s needs.
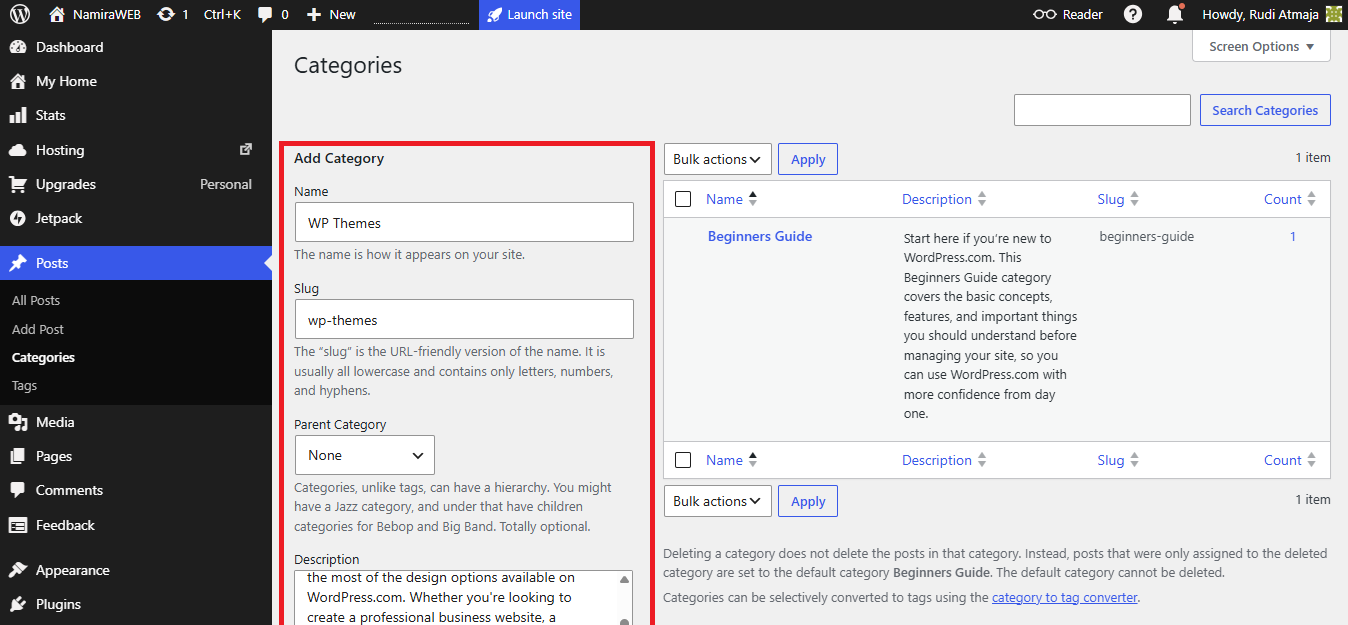
You can now create additional categories for your blog. In the Add Category section, enter the category name in the Name field, set the Slug, choose a Parent Category if the category you’re creating is a child category, add a category description, and configure any other available settings. Then, click the Add Category button at the bottom.
A child category is a subcategory that belongs to a broader category. For example, if you have a parent category called Travel, you could create child categories such as Europe, Asia, or United States. This helps organize your content more effectively, especially when your blog covers a wide range of topics.
Repeat this process to create the other categories you want to use on your blog.
8. Create a Menu
The next step is to create a menu and add those categories to it. The menu containing those categories will be added to both the header menu and the mobile menu.
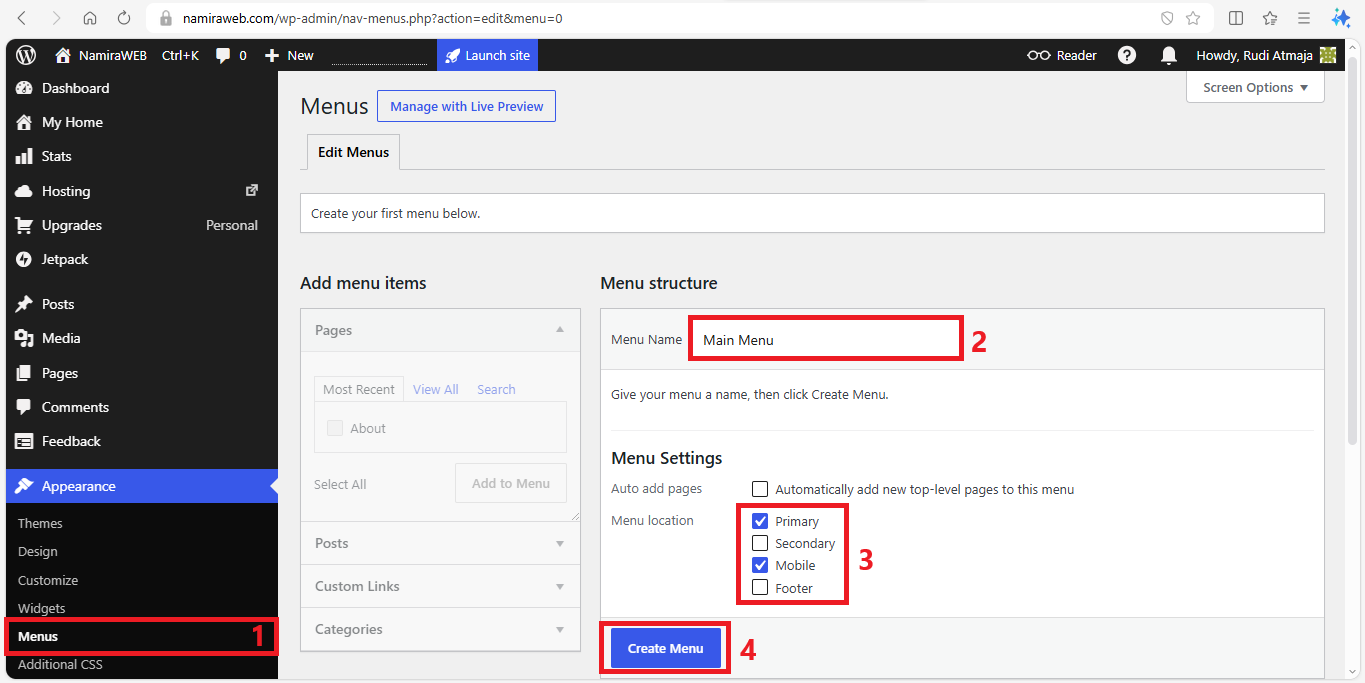
To do this, click Appearance > Menus. On the Menus page, enter a menu name such as Main Menu or something else in the Menu Name field. Then, go to the Menu Settings section and check the Primary and Mobile boxes. By checking both of them, the menu you create will appear in the header section (when accessed via desktop) and also on mobile devices. Then click the “Create Menu” button.
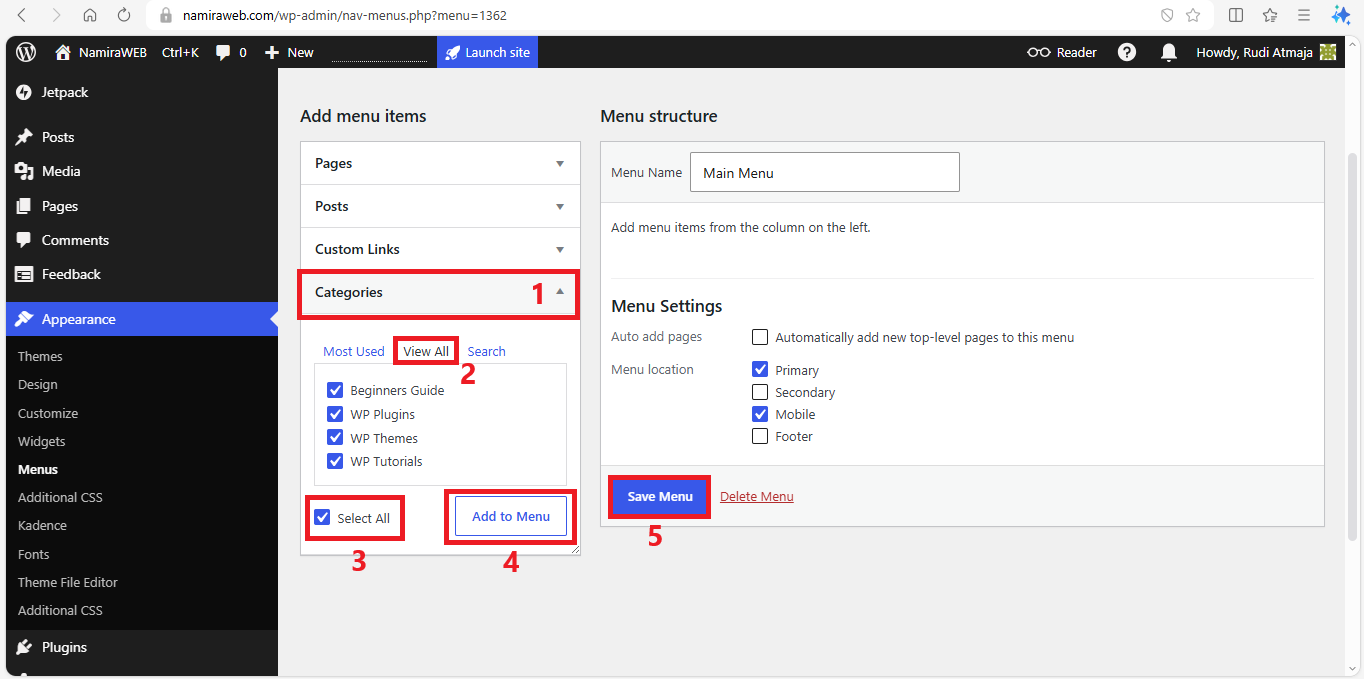
Then, under Menu Items, click the Categories tab and then click View All. Check the “Select All” box, click the “Add to Menu” button, and finally click the “Save Menu” button. By doing this, the post categories you created earlier will appear in the header and in the menu on mobile devices.
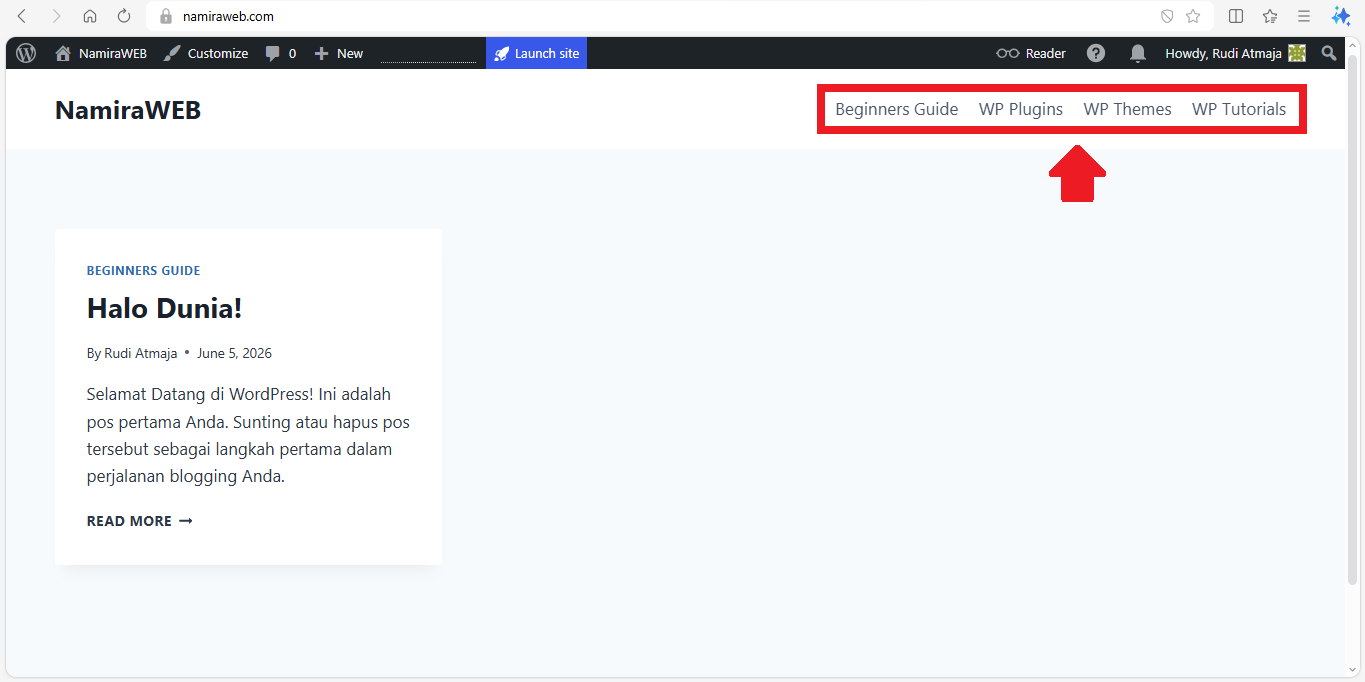
You can open a new browser tab and visit your WordPress blog by typing your domain name into the browser’s address bar. Your site should now display the menu. You can also check it on a mobile device by clicking the three-line icon (hamburger menu), and the menu should appear there as well.
9. Customize the Theme
Now it’s time to customize your theme. This allows you to control the appearance of your blog, including its layout, colors, typography, header, footer, and other design elements. Properly configuring your theme helps create a blog that looks more professional, is easier to navigate, and provides a better experience for your visitors.
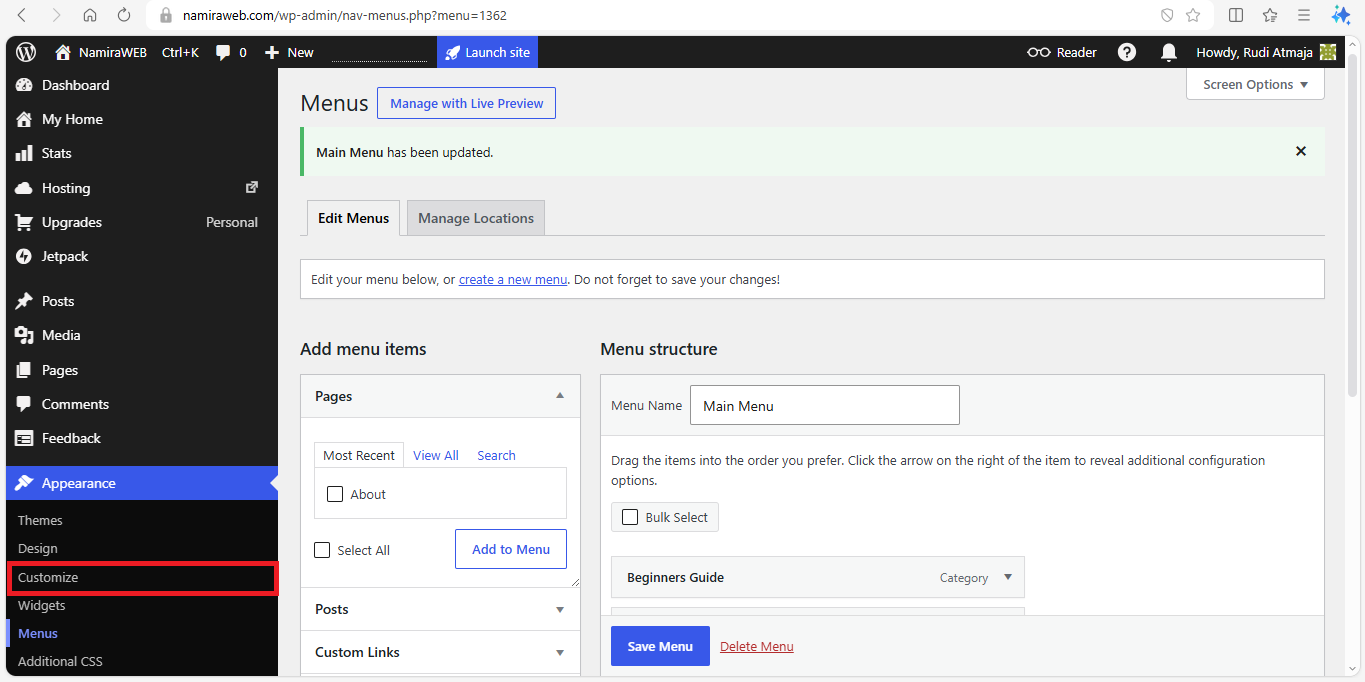
To customize the theme, click Appearance > Customize. This will open the customization panel for your currently active theme – in this tutorial, the Kadence Theme.
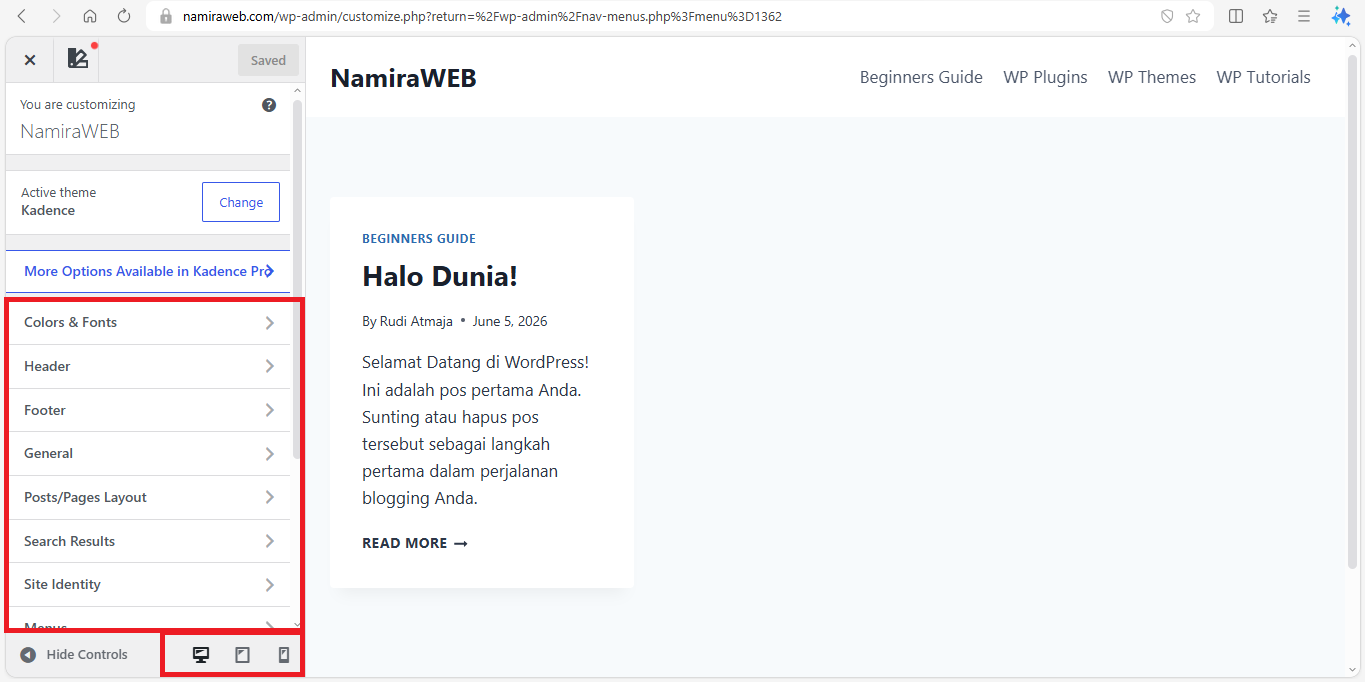
Next, customize the theme according to your preferences. You can also click the tablet or mobile icon at the bottom of the customization panel to preview how your blog will appear on tablet and mobile devices. This allows you to check whether your blog’s layout, menus, and other elements display properly across different screen sizes.
I’m not providing a theme customization tutorial because everyone has different preferences when it comes to design and layout. So, feel free to explore the theme customization options and configure them however you like. Don’t be afraid of making mistakes, because any settings you change there won’t damage your WordPress blog.
10. Create Pages
Now that you’ve customized your theme, let’s create some pages. A blog should have several important pages, such as About Me, Privacy Policy, Terms & Conditions, FTC Disclosure, Disclaimer, and Contact.
These pages help visitors learn more about you and your blog, provide transparency about how your blog operates, explain your policies, and offer a way for readers, potential partners, or advertisers to get in touch with you. They can also help make your blog appear more professional and trustworthy.
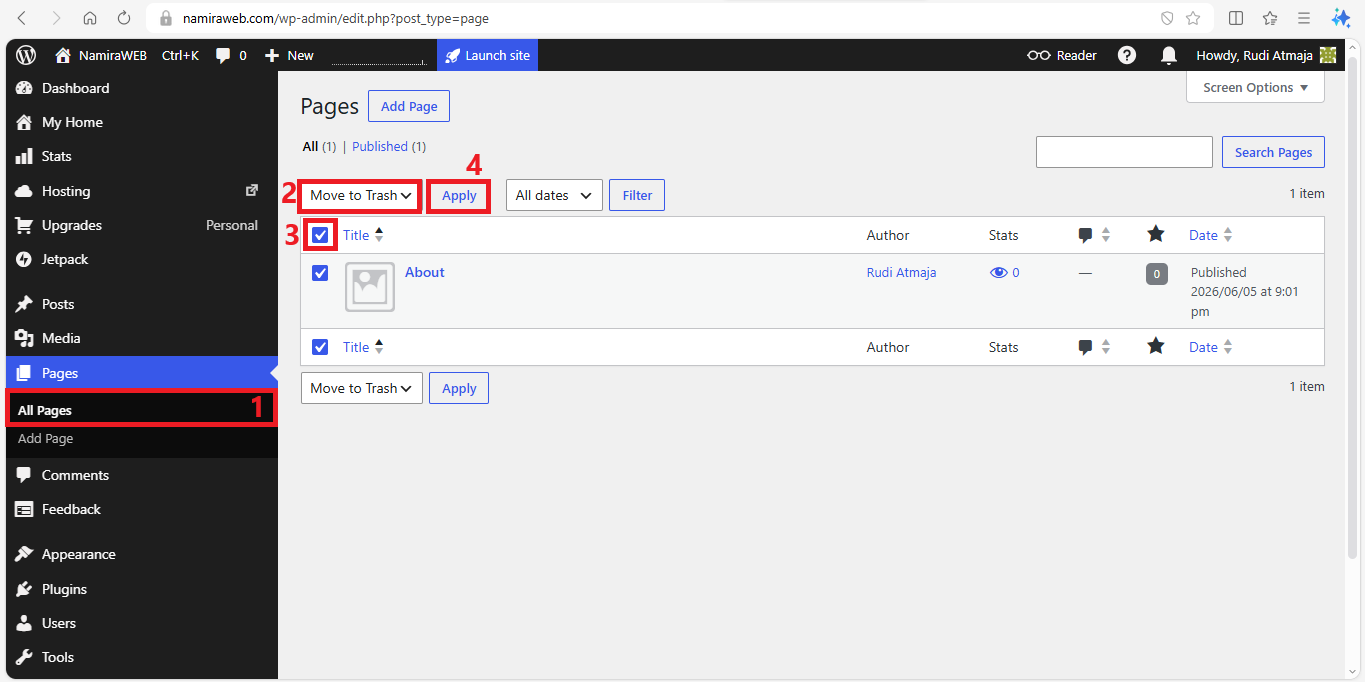
To create pages, click Pages > All Pages. There, you’ll find a default page created by WordPress. We’ll delete it first before creating new pages by selecting the “Move to Trash” option, checking the box to select all pages, and clicking the “Apply” button to delete them.
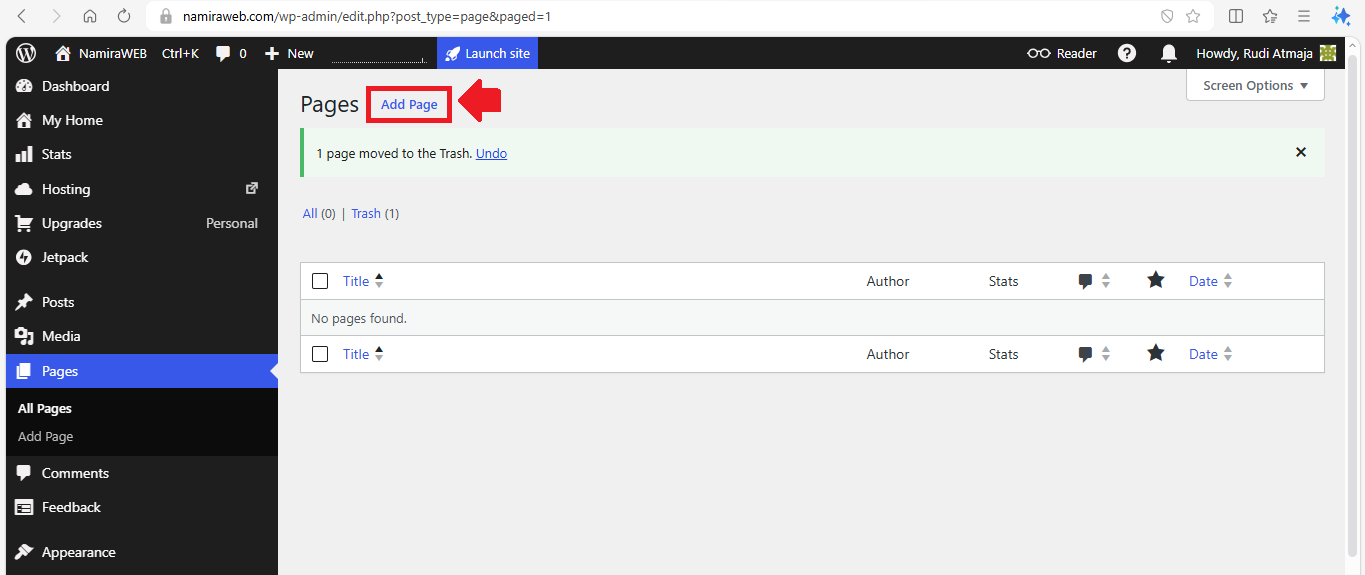
After the page has been moved to the Trash, click the “Add Page” button to create a new page.
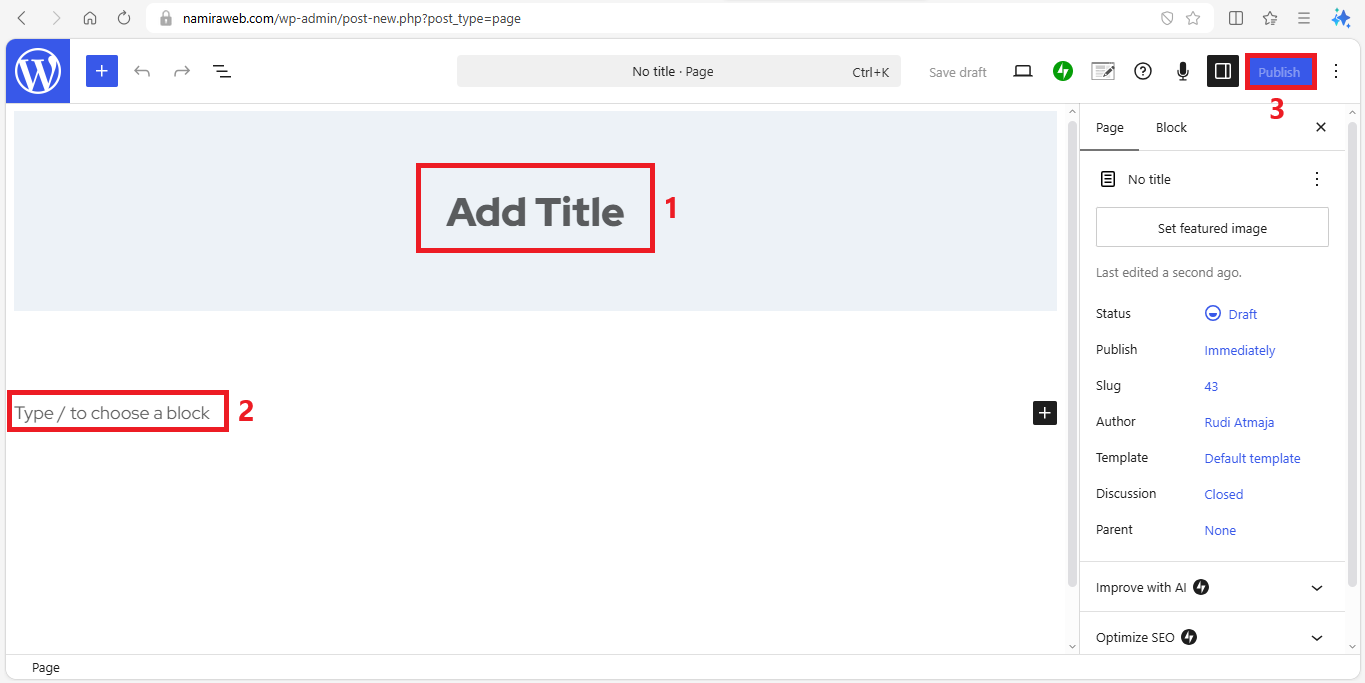
To start, you can begin by creating a Privacy Policy page. In the “Add Title” field, enter Privacy Policy as the page title. You can also start with another page instead of the home page, since we’ll create that later.

Below the title, you can type the content of the page. You can also add elements such as columns, paragraphs, headings, lists, quotes, and more. To add different elements, simply click the “+” icon or the Block Inserter in the upper-left corner of the screen to view the various block elements you can add to the page.
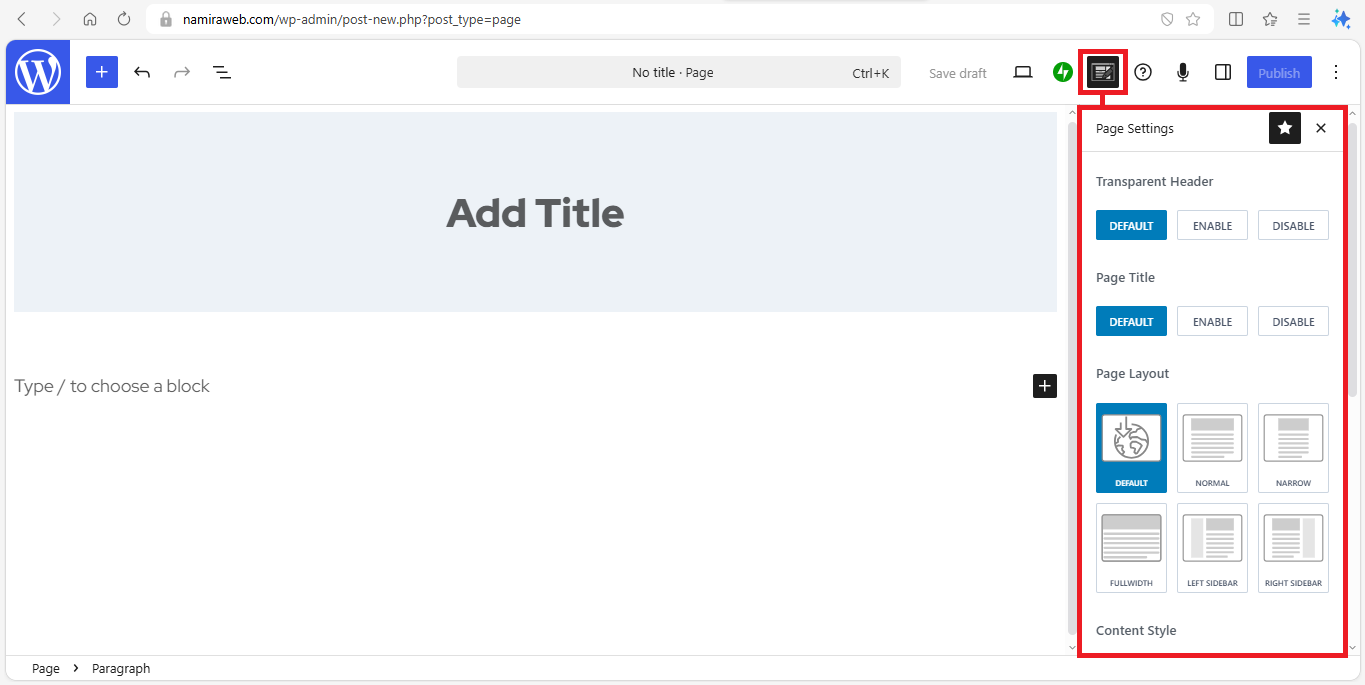
You can also configure page-specific settings, although you may have already configured the page appearance while customizing your theme. To do this, click the “Page Settings” icon. There, you’ll find options such as Transparent Header, Page Title, Page Layout, and more.
Once the page is complete, click the “Publish” button. There’s no need to worry about publishing your page at this stage because your blog is not yet public.
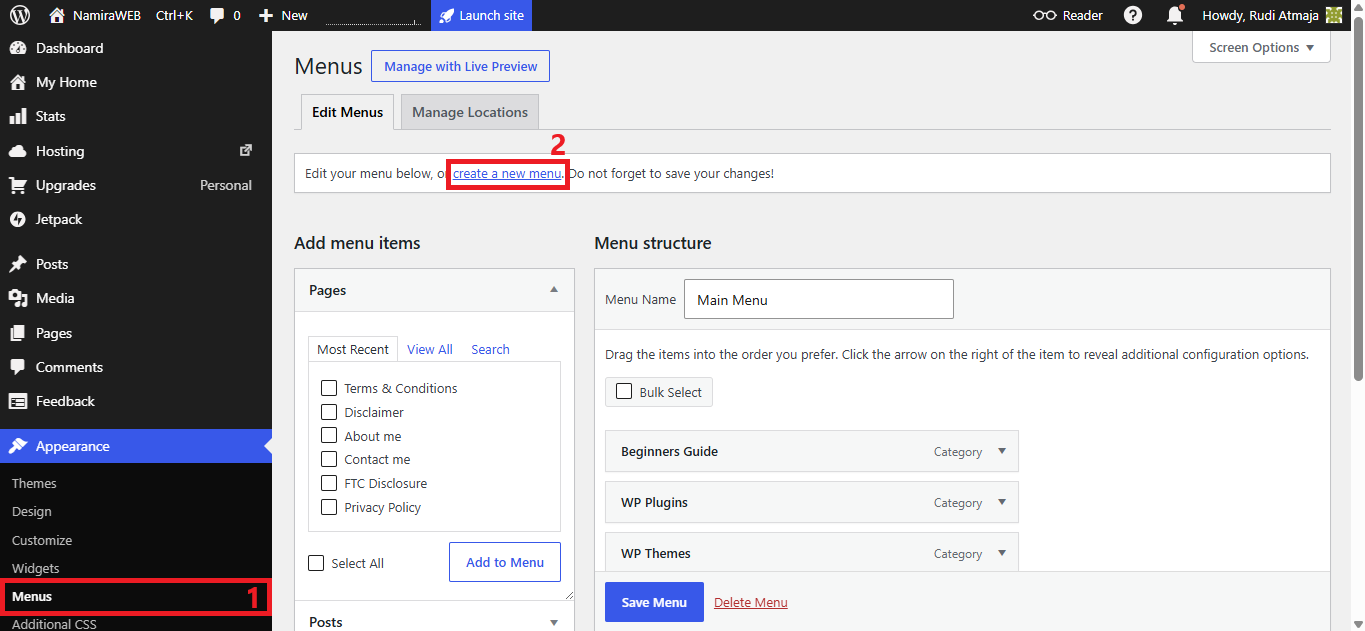
Now that you’ve created those important pages, it’s time to place them in the footer section. To do this, we need to add those pages to a footer menu. Click Appearance > Menus. On the Menus page, click the “Create a New Menu” option.
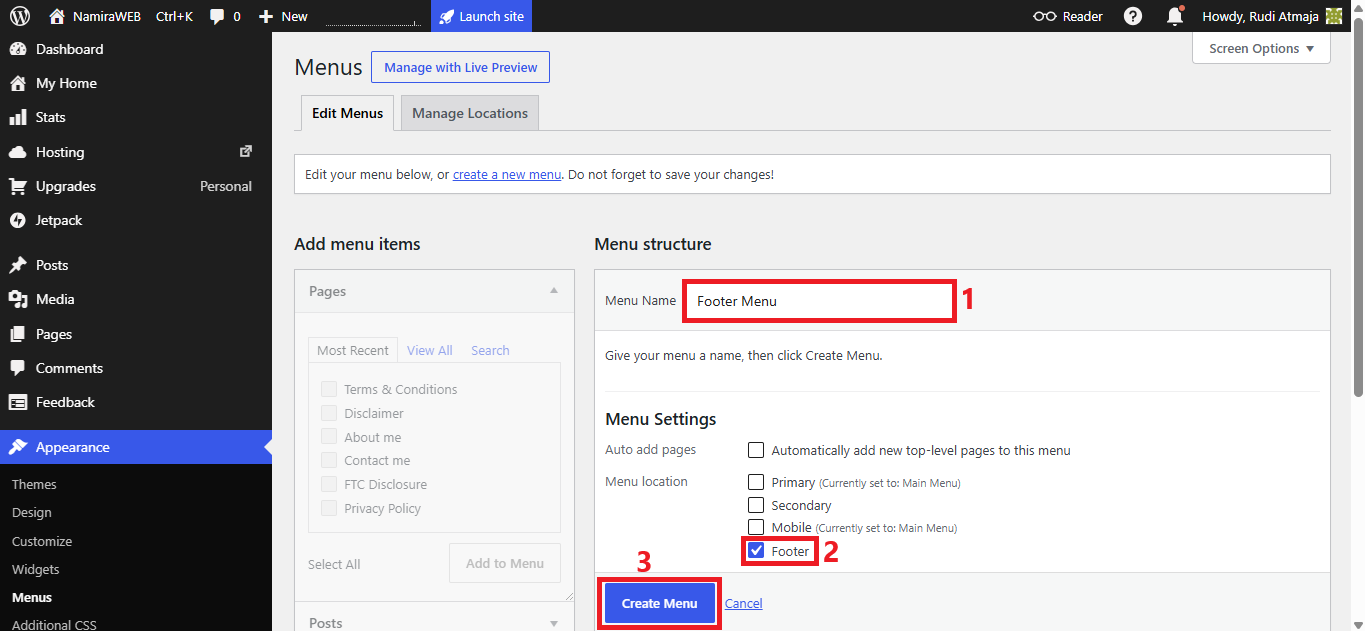
Then, enter a menu name such as Footer Menu, check the Footer box, and click the “Create Menu” button.
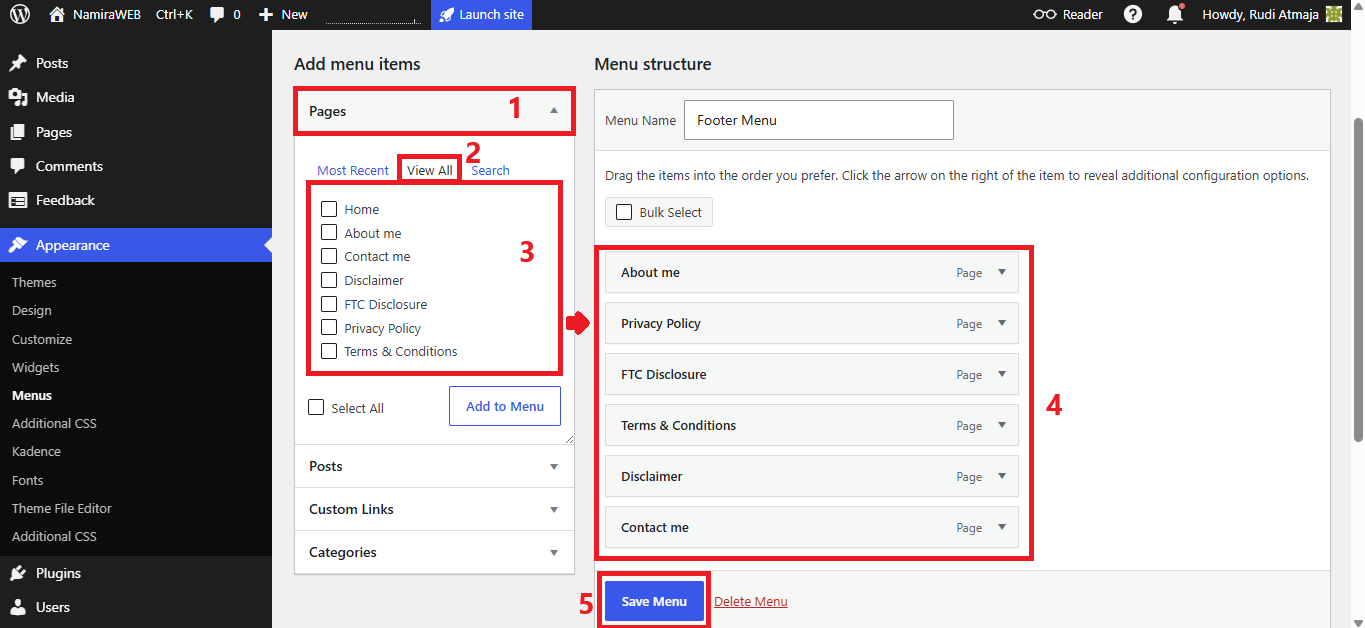
Next, under Add Menu Items, click the Pages tab. Then click the “View All” option, check the box next to each page you want to include in the footer menu (except the Home page), and click the “Add to Menu” button.
You can also rearrange the menu items by clicking and dragging them into your preferred order. Once you’re satisfied with the menu structure, click the “Save Menu” button.
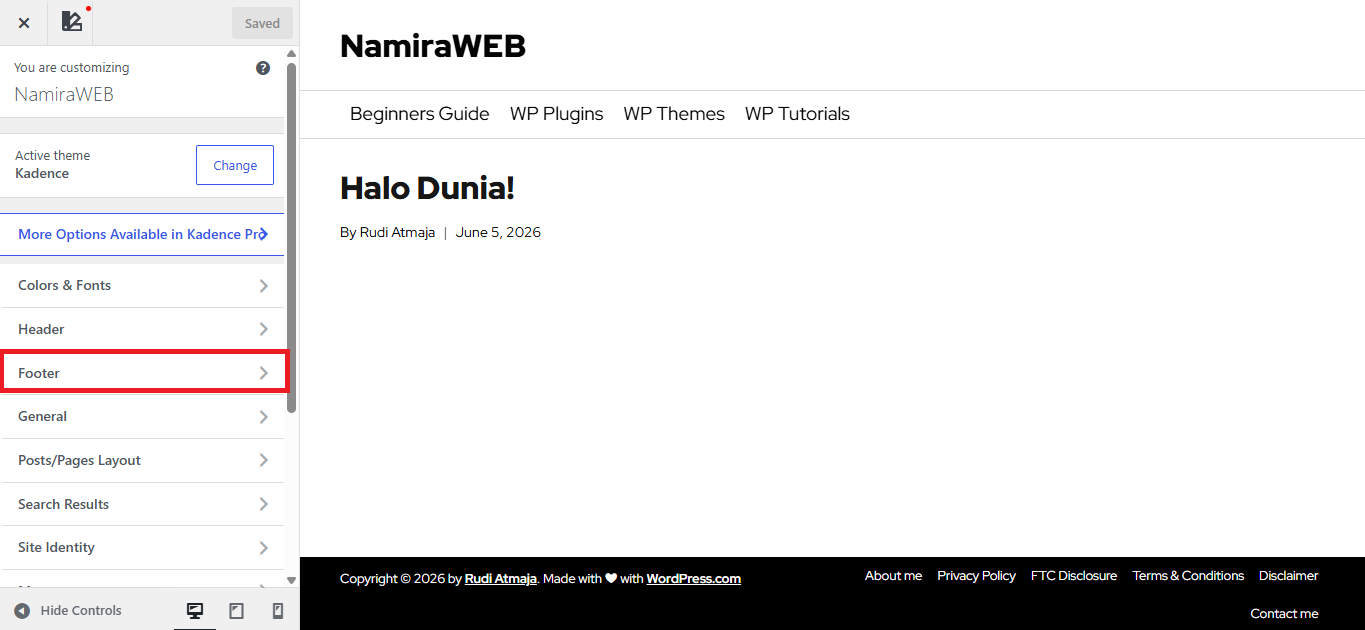
Next, you can display that footer menu at the bottom of your WordPress.com blog. Click Appearance > Customize. There, click the Footer tab. Then, add the “Footer Navigation” widget. You can also configure its settings there.
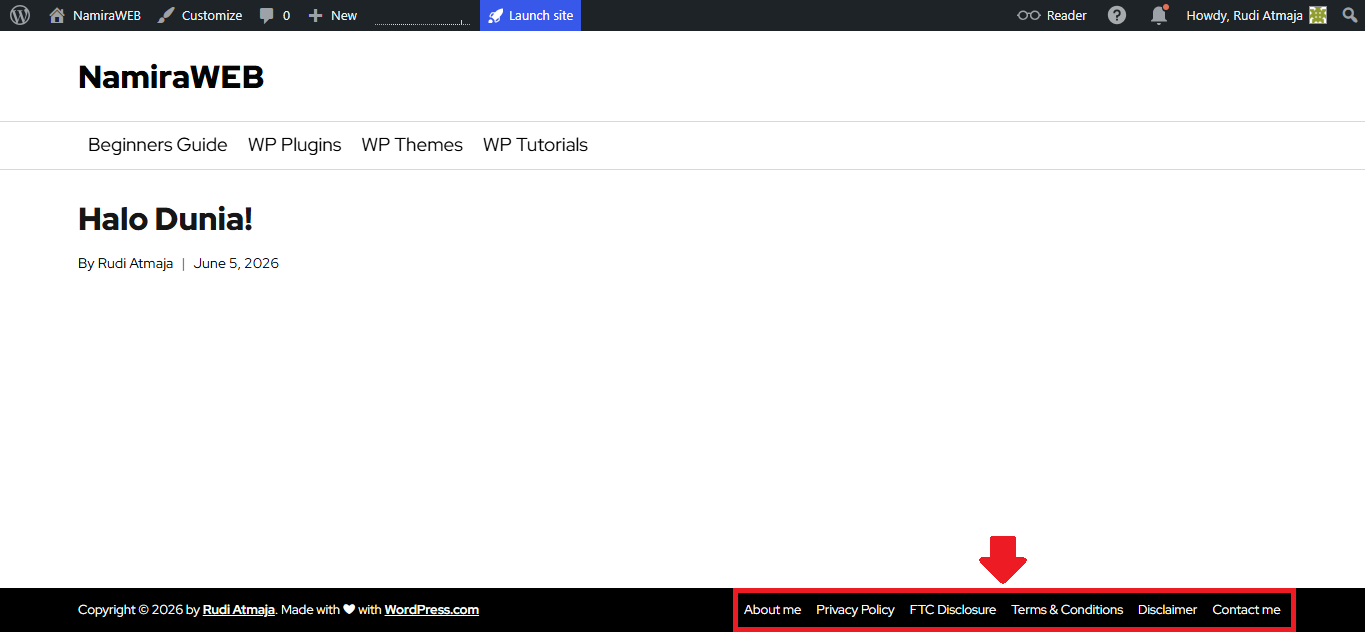
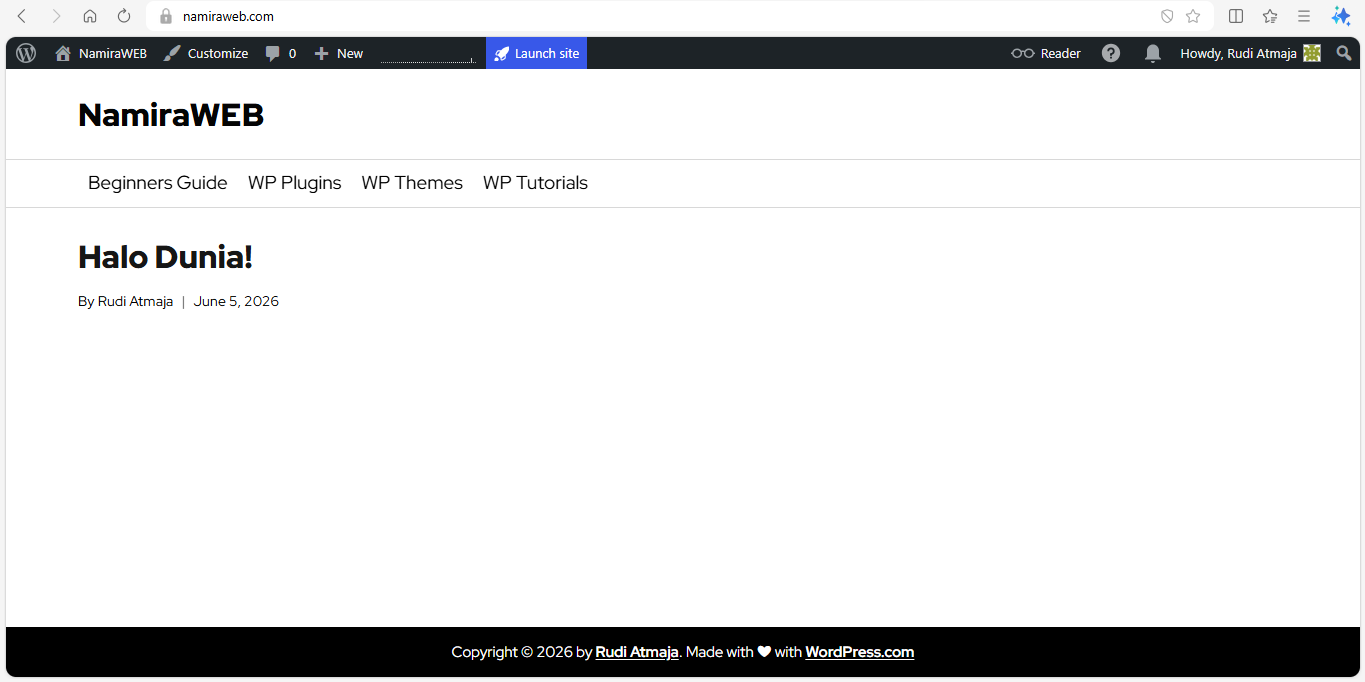
After saving your changes, you can open your blog in a new browser tab by typing your domain name into the address bar. The footer menu should now be visible. As for the design and layout, it will depend on how you’ve customized it.
11. Create Your First Post
So far, I hope you’ve been able to follow this guide without any problems. I also hope your blog now has at least the layout and appearance you want. At this stage, you don’t need to create a Home page because your homepage is already displaying your latest blog posts.
Now it’s time to create a new post. However, before creating a new post, we need to delete WordPress’s default post, Hello World.
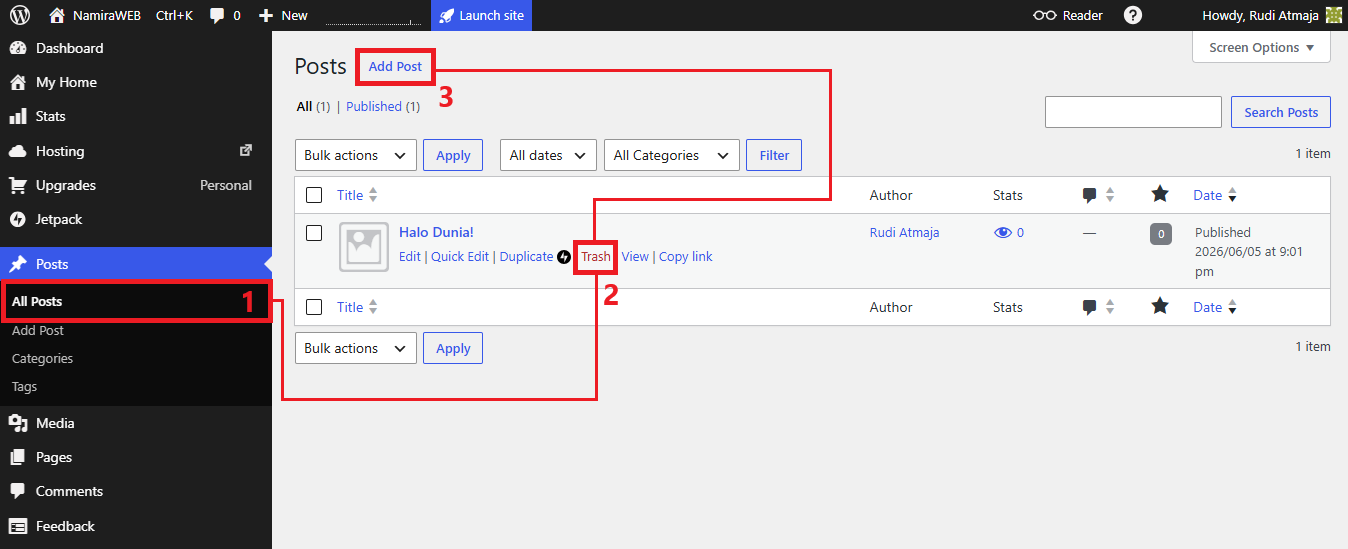
To do this, click Posts > All Posts. There, you’ll find the Hello World post. Hover your cursor over it and click the “Trash” option to move it to the Trash. After deleting it, click the “Add Post” button to start creating a new post.
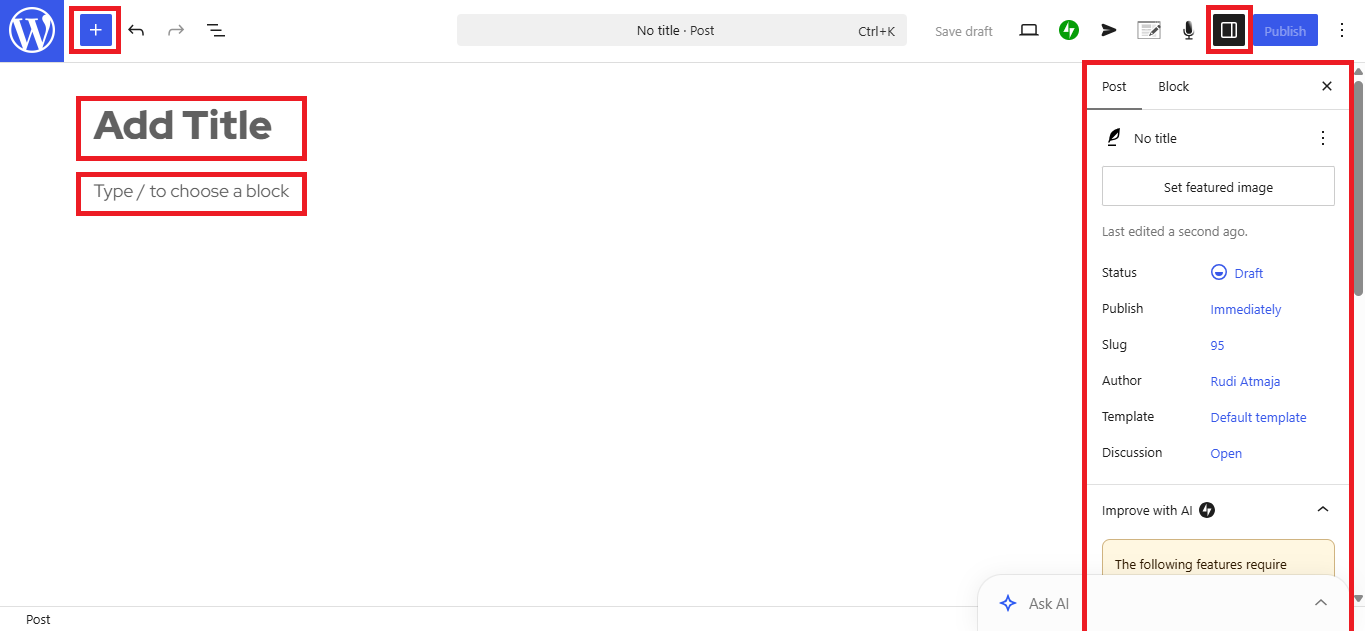
Next, you can enter your post title and create your content. You can also add blocks by clicking the + icon in the upper-left corner (Block Inserter). Don’t forget to assign a category to the post, upload a featured image, and configure any other settings you need.
If you’re not ready to write yet, you can click the “Save Draft” option so you can edit or continue working on it later. Or, if everything is ready, you can click “Publish” right away.
12. Launch Site
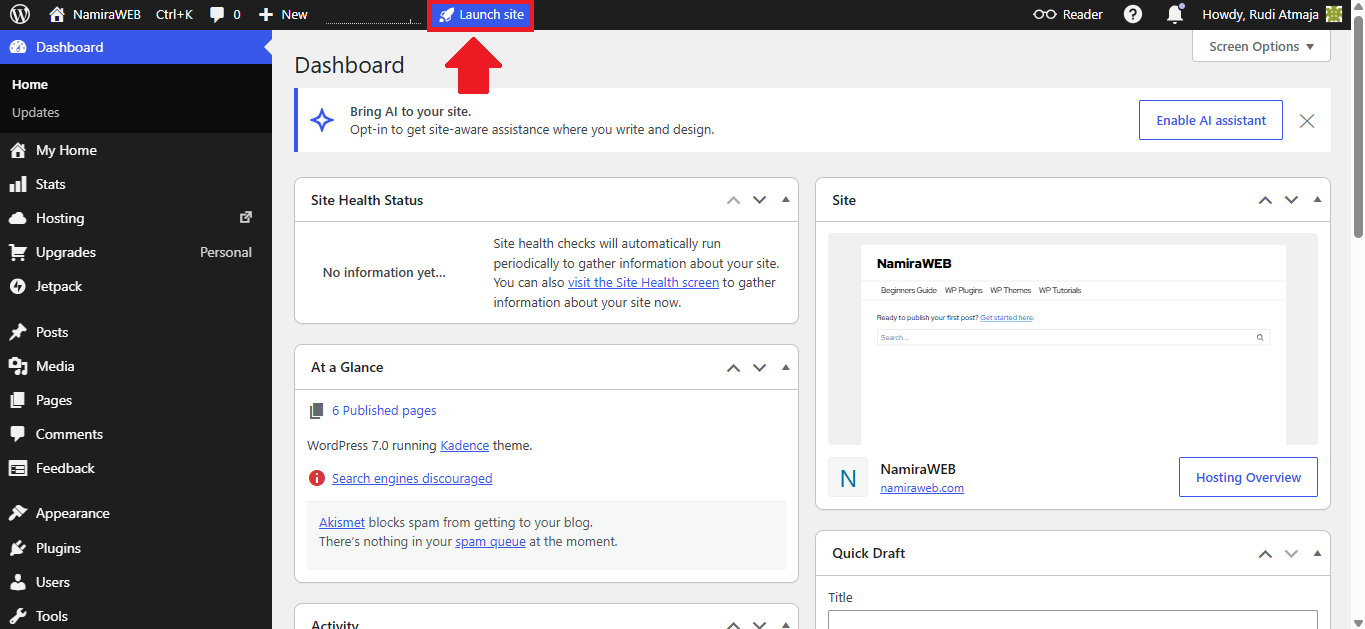
After creating your post, you can launch your blog publicly right away. By doing this, people will be able to find your blog on the internet and in WP Reader. To do this, you only need to click the “Launch Site” option in the top bar of your blog.
Final Thoughts
Congratulations! You now have a fully functional WordPress.com blog. By following this guide, you’ve learned how to set up WordPress.com, install and customize a theme, create pages and menus, publish content, and launch your blog to the public.
If you’d rather skip the setup process, I’m happy to help. If you purchase any annual WordPress.com plan through my affiliate link, I’ll build your WordPress.com blog for you at no additional cost. This includes helping you set up the essential components needed to get your blog online and ready for publishing.
In addition, I’ll also help you optimize your blog’s SEO for free using the Rank Math SEO plugin. This way, your blog won’t just look good—it will also have a stronger foundation for attracting organic traffic from search engines.
As for the SEO setup itself, I’ll be covering that in a separate tutorial. In the next guide, you’ll learn how to configure Rank Math SEO and optimize your WordPress.com blog so it has a better chance of ranking in search engine results.