Creating regular backups is one of the most important habits every WordPress site owner should develop. Even a small website can run into unexpected issues such as plugin conflicts, accidental changes, or server problems. Having a reliable backup ensures that your website can be restored quickly without losing valuable data or content.
Many hosting providers already include automatic backup features as part of their service. While this is helpful, relying solely on hosting backups may not always be the safest approach. Keeping an additional backup outside your hosting environment adds another layer of protection for your website.
Offsite backups are especially useful when something goes wrong with the hosting server itself. If your website files and backups are stored in the same place, both could be affected during a server failure or security breach. Storing backups in cloud services like Google Drive helps ensure your data remains accessible when you need it most.
Fortunately, creating a full WordPress backup is not as complicated as it may seem. With the right plugin, you can easily back up your website files and database without touching any technical settings. This makes the process accessible even for beginners who have never handled backups before.
Another benefit of using a backup plugin is the ability to automate the process. Instead of manually creating backups every time you update your site, you can schedule them to run regularly in the background. This ensures your website is always protected with the latest backup available.
Some backup tools also allow you to store your backups in external storage services. Platforms like Google Drive, Dropbox, or other cloud storage providers make it easy to keep copies of your website safely outside your hosting account. This approach reduces the risk of losing both your website and its backups at the same time.
One of the most popular plugins that offers these features is UpdraftPlus. It allows you to create full WordPress backups, schedule automatic backups, store them in cloud services, and restore your site whenever necessary. In the next section, we will take a closer look at UpdraftPlus and why it is widely used by WordPress users.
What is UpdraftPlus?
UpdraftPlus is one of the most widely used backup plugins available for WordPress. It allows website owners to create complete backups of their WordPress files and database directly from the dashboard without needing technical knowledge. The plugin is trusted by millions of users because it simplifies a task that would otherwise require manual work and server access.
A full WordPress backup usually includes several important components such as the database, plugins, themes, uploads, and other core files. Managing these elements manually can be complicated, especially for beginners who are unfamiliar with file managers or database tools. UpdraftPlus handles the entire process automatically, allowing users to generate a complete backup with just a few clicks.
Another reason many website owners choose UpdraftPlus is its ability to store backups outside the hosting server. The plugin supports multiple remote storage options including cloud services like Google Drive, Dropbox, and Microsoft OneDrive. Storing backups in external locations helps ensure that your website data remains safe even if something happens to the hosting account.
UpdraftPlus also includes flexible scheduling options that allow backups to run automatically. Instead of manually backing up your site every time you make changes, you can configure the plugin to perform backups daily, weekly, or at other intervals. This feature is particularly useful for websites that are frequently updated with new content.
Another key feature of UpdraftPlus is its built-in restore functionality. If your website experiences problems such as a failed update, plugin conflict, or accidental deletion, you can restore the site directly from a previous backup. The restoration process can be completed from the WordPress dashboard without requiring advanced technical steps.
The plugin also offers a free version that already includes most of the essential backup features needed by typical WordPress websites. Users can create manual backups, schedule automatic backups, and connect their site to external cloud storage services without paying for premium upgrades. This makes UpdraftPlus a practical solution for beginners, bloggers, and small business website owners who want a reliable backup system.
How to Create a Full WordPress Backup
Before creating a backup, it is important to understand which version of WordPress this guide refers to. The steps in this tutorial apply to WordPress.org, the self-hosted version of WordPress where you have full control over your website, plugins, and files. If you are using managed hosting or installed WordPress on your own hosting account, then you are most likely using WordPress.org.
This guide does not apply to WordPress.com, which is a hosted platform with different limitations depending on the plan you use. On WordPress.com, plugin installation is restricted unless you are on higher-tier plans, which means you may not be able to install backup plugins like UpdraftPlus. Because of this difference, the backup process described here is specifically designed for self-hosted WordPress websites.
If you are still unsure about the difference between the two platforms, it is worth taking a moment to understand how WordPress works. I previously explained the basics in another guide titled “What is WordPress?”, which covers the differences between WordPress.org and WordPress.com, as well as how WordPress websites are typically hosted. Understanding this distinction will help ensure you follow the correct steps for managing and protecting your website.
Once you are using a self-hosted WordPress website, creating backups becomes much more flexible. You can install backup plugins, store backups outside your hosting server, and schedule automatic backups to run regularly. This is exactly what makes plugins like UpdraftPlus so useful for protecting your website.
In the following steps, you will learn how to create a full WordPress backup using UpdraftPlus. The process includes installing the plugin, configuring backup settings, connecting it to cloud storage such as Google Drive, and generating your first backup.
1. Install and Activate the UpdraftPlus Plugin
The first step in creating a full WordPress backup is installing the backup plugin on your website. Since this guide uses UpdraftPlus, you will need to install the plugin directly from your WordPress dashboard. The process only takes a few minutes and does not require any technical configuration.
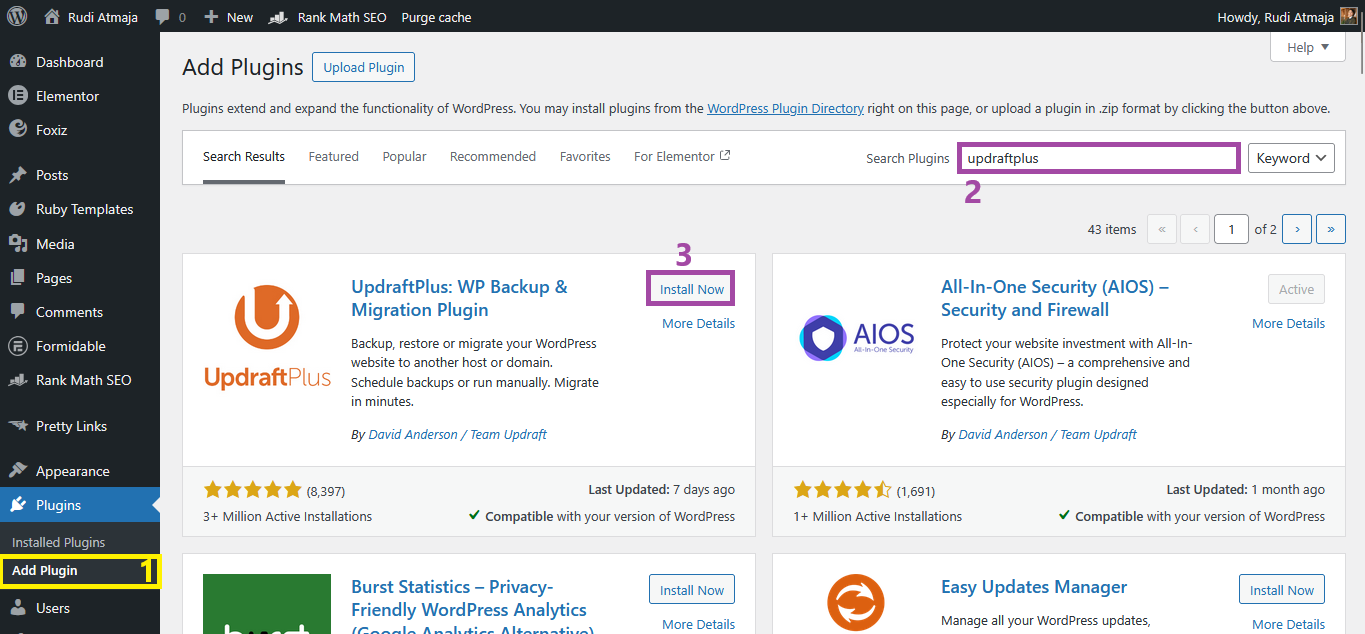
Start by logging in to your WordPress admin area. From the left-hand menu, go to Plugins and select Add New Plugin, which opens the WordPress plugin library where thousands of plugins are available. This is the official plugin directory provided by WordPress.
In the search bar located at the top right of the page, type UpdraftPlus. The plugin should appear in the search results as UpdraftPlus: WP Backup & Migration Plugin, which is widely used for creating backups and restoring WordPress websites. Make sure the plugin is developed by David Anderson / Team Updraft before installing it.
Once you find the correct plugin, click the Install Now button. WordPress will automatically download and install the plugin files on your website. This process usually only takes a few seconds depending on your hosting server speed.
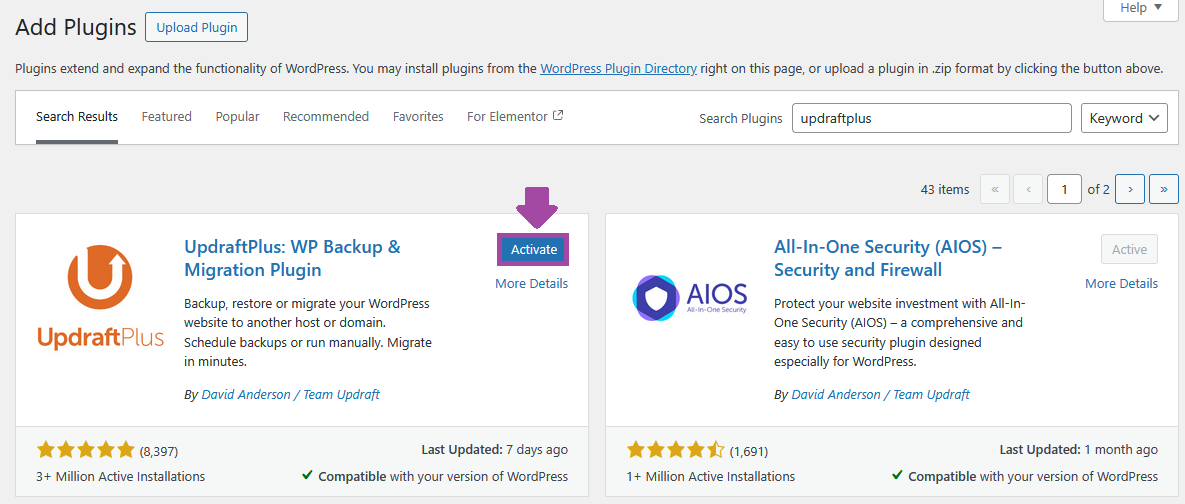
After the installation finishes, the Activate button will appear. Click Activate to enable the plugin so it can start working on your website. When the plugin is activated, a new menu called UpdraftPlus Backups will appear under the Settings section in your WordPress dashboard.
2. Connect UpdraftPlus to External or Cloud Storage
Once the plugin is installed and activated, the next step is connecting it to an external storage location. Storing backups outside your hosting server is highly recommended because it keeps your backup files safe even if something happens to your hosting account. Cloud storage services make this process simple and accessible from anywhere.
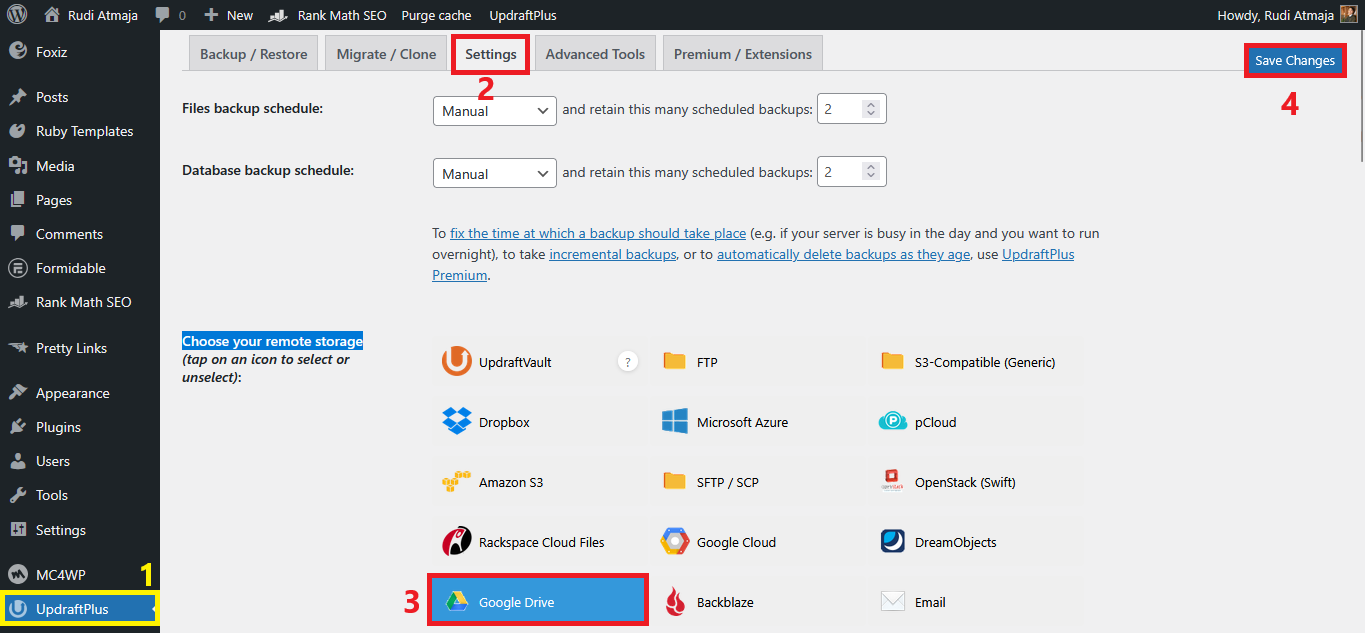
To begin, open the UpdraftPlus backup dashboard from your WordPress admin area. Inside the plugin interface, switch to the Settings tab where all backup configuration options are located. In the settings page, look for the section labeled Choose your remote storage. This area allows you to select where your backup files will be stored once they are created. The plugin supports several cloud storage options including Google Drive, Dropbox, Microsoft Azure, and Rackspace.
Each storage provider works slightly differently, but the overall setup process is very similar. You simply select the storage provider you want to use and then connect it to your WordPress website. This connection allows UpdraftPlus to automatically send backup files to the selected cloud storage account.
In this tutorial, the backup files will be stored in Google Drive because it is one of the most widely used and beginner-friendly cloud storage services. To proceed, select Google Drive from the list of remote storage options. After selecting it, scroll to the top right corner of the screen and click the Save Changes button to apply the new settings.
3. Authorize Access to Your Cloud Storage
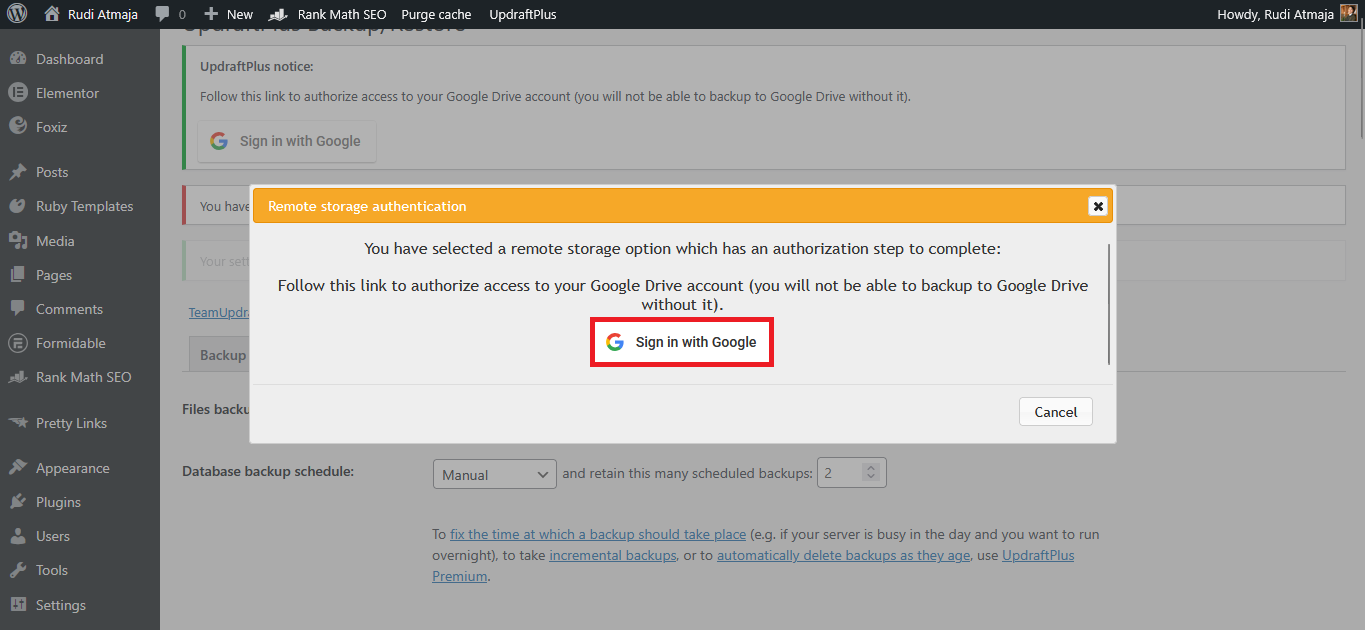
After clicking Save Changes, the page will refresh and display a new message asking you to authorize access to the selected cloud storage. This step allows the plugin to connect your website with the external storage service so it can upload backup files automatically. Without completing this authorization, the backups will not be sent to your remote storage.
On this screen, you will see a button or link prompting you to authenticate your account. Click the authorization button to begin the connection process with the storage provider you selected earlier. Since this tutorial uses Google Drive, the authentication process will direct you to the login page provided by Google.
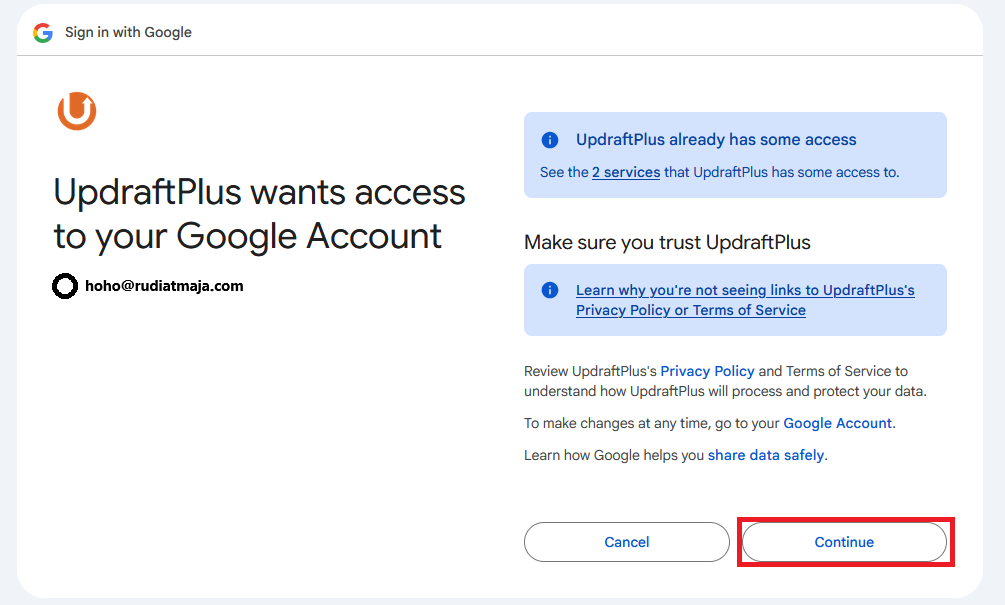
Sign in using the cloud storage account you want to use for storing your WordPress backups. After logging in, the service will display a permissions page explaining the access required by the plugin. Allow the requested permissions so the plugin can create and manage backup files in your cloud storage.
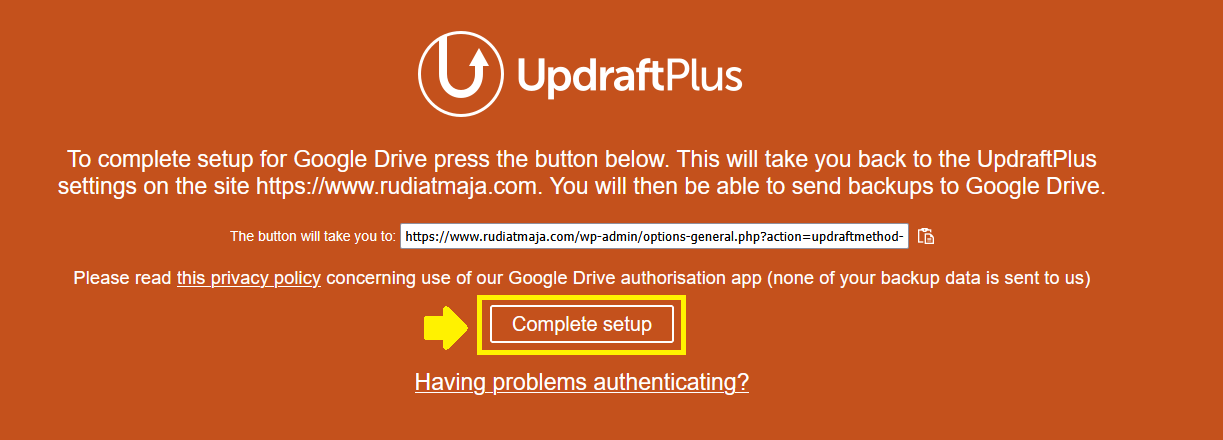
Once the permissions are approved, the system will automatically redirect you back to your WordPress dashboard. The connection between UpdraftPlus and your cloud storage will then be successfully established, allowing backups to be uploaded to your remote storage location.
4. Create Your First WordPress Backup
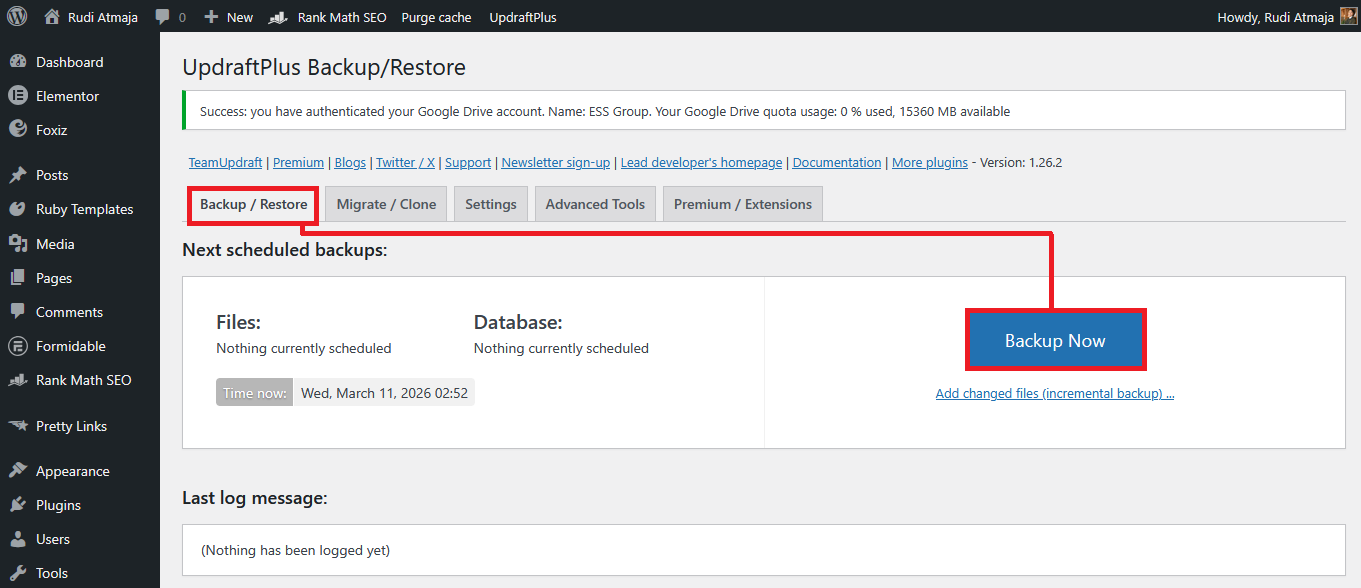
After successfully connecting your website to remote storage, the plugin will take you back to the Backup / Restore tab inside the UpdraftPlus dashboard. This is the main area where you can create new backups and manage existing ones. To start creating your first backup, click the Backup Now button.
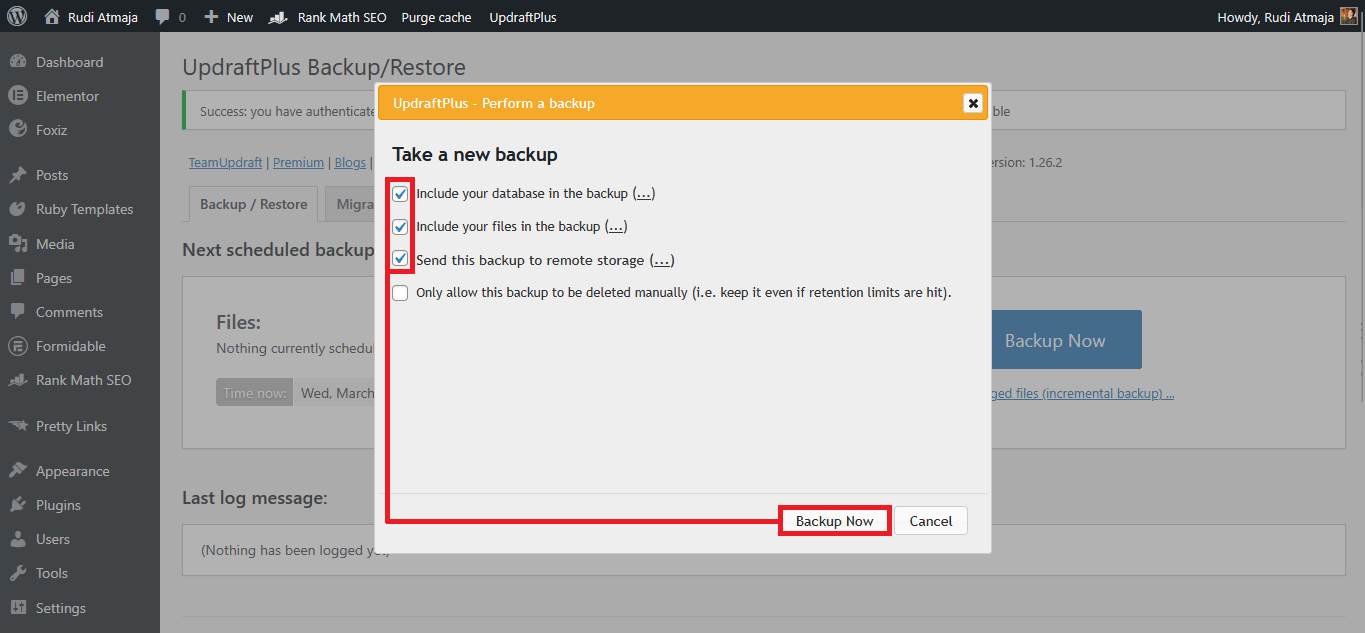
A popup window titled “Take a new backup” will appear on the screen. This window allows you to choose which parts of your website you want to include in the backup. You can select the database, the website files, or both depending on your needs.
For a full WordPress backup, it is recommended to select both the database and the files. The database contains important information such as posts, pages, settings, and user data, while the files include themes, plugins, uploads, and core WordPress components. Backing up both ensures that your website can be fully restored if necessary.
You should also check the option labeled “Send this backup to remote storage.” This setting allows the backup files to be automatically uploaded to the external storage service you connected earlier, such as Google Drive. Enabling this option ensures that your backup is safely stored outside your hosting server.
After confirming your selections, click the Backup Now button to start the backup process. The plugin will begin packaging your website files and database into backup archives. Depending on the size of your website and the performance of your hosting server, this process may take several minutes to complete.
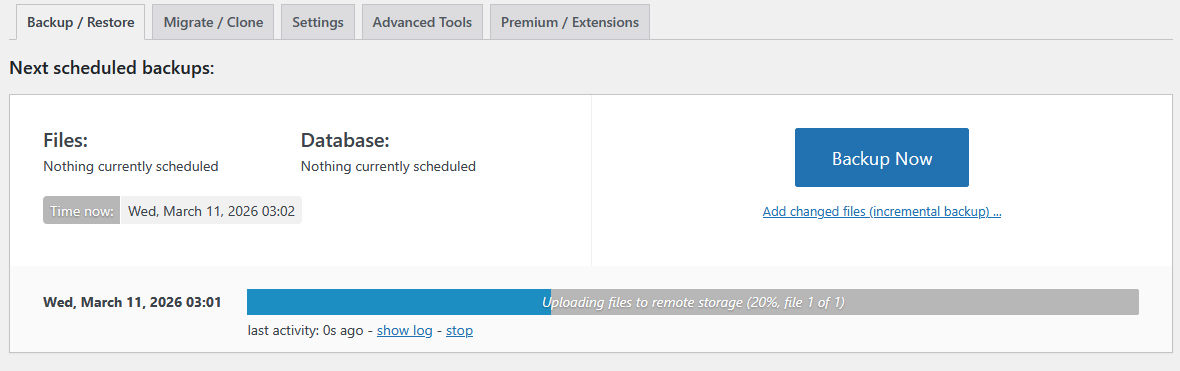
While the backup process is running, it is best to avoid making any changes to your website. Editing content, installing plugins, or modifying settings during the backup process may result in those changes not being included in the backup. Waiting until the process is finished helps ensure the backup captures a consistent version of your website.
5. Set Up Automatic WordPress Backups
Creating manual backups is useful, but setting up automatic backups ensures your website is always protected without needing to remember to do it yourself. UpdraftPlus allows you to schedule backups so they run automatically at specific intervals. This helps make sure you always have recent backup copies available if something goes wrong with your website.
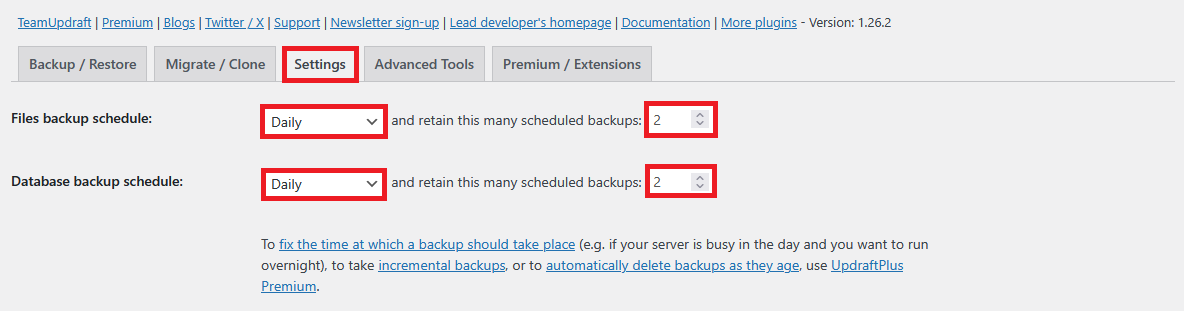
To configure automatic backups, open the UpdraftPlus dashboard and click the Settings tab. In this section, you will find several options related to backup scheduling and storage settings. The two most important options are Files backup schedule and Database backup schedule.
The Files backup schedule controls how often your website files are backed up. This includes themes, plugins, media uploads, and other files stored on your server. For most websites, setting this schedule to Weekly is a good balance between protection and storage usage.
Next, you will see the Database backup schedule option. The database contains your posts, pages, comments, settings, and other dynamic content that may change more frequently than your files. Because of this, a Daily backup schedule is usually recommended for the database.
In each schedule option, you will also see a setting labeled and retain this many scheduled backups. This determines how many backup copies UpdraftPlus will keep before older backups are automatically removed. A practical configuration for most websites is keeping 2 to 4 backups for files and 5 to 7 backups for the database, which provides multiple restore points without consuming too much storage space.
How to Restore a WordPress Backup
Restoring a backup is just as important as creating one, especially when your website encounters problems such as plugin conflicts, broken updates, or accidental file deletions. With the help of UpdraftPlus, restoring a WordPress website can be done directly from the dashboard without manually uploading files or importing databases. This makes the recovery process much easier even for users who are not familiar with server management.
If you need to restore your website on the same installation or a fresh WordPress setup, start by installing and activating the UpdraftPlus plugin again. After activation, connect the plugin to the same remote storage location where your backup files are stored. This could be a cloud storage service such as Google Drive or another supported provider that you used earlier when creating backups.
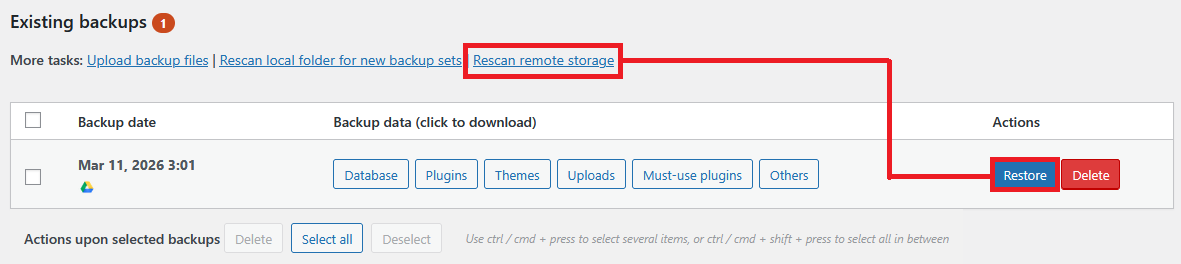
Once the connection is established, open the Backup / Restore tab inside the UpdraftPlus dashboard. In this section, you will see an option labeled Rescan remote storage. Click this button so the plugin can search your connected cloud storage and locate the backup files associated with your website.
After the scanning process finishes, the available backup files stored in your remote storage will appear in the backup list. Each backup entry will usually include the date and the different components included in that backup. This allows you to easily identify which backup version you want to restore.
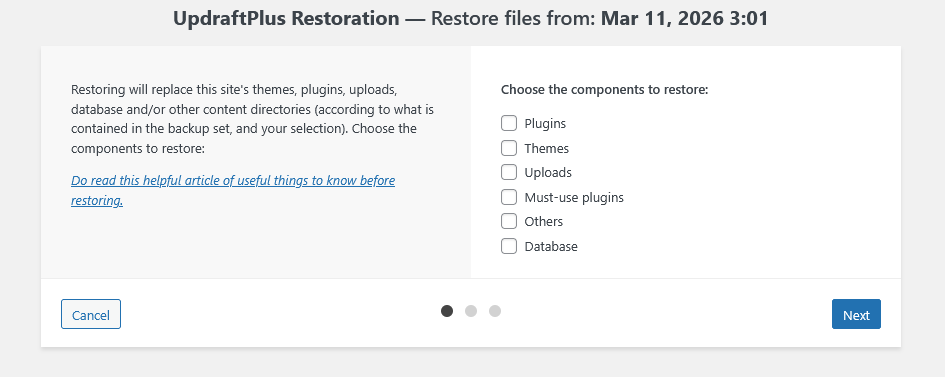
To begin restoring your website, click the Restore button next to the backup you want to use. A new window will appear showing the option Choose the components to restore. From here, you can select whether you want to restore the database, plugins, themes, uploads, or other WordPress files depending on what needs to be recovered.
Final Thoughts
Having a reliable backup system is one of the simplest ways to protect your WordPress website from unexpected problems. Issues such as plugin conflicts, failed updates, malware infections, or accidental deletions can happen at any time. With a proper backup available, you can quickly restore your website and minimize downtime.
Using a plugin like UpdraftPlus makes the entire backup process much easier to manage. From creating manual backups to scheduling automatic ones and restoring your site when necessary, everything can be done directly from the WordPress dashboard. This approach allows even beginners to maintain a solid backup strategy without needing advanced technical skills.
Storing backups in external cloud services also adds an extra layer of protection for your website. Instead of keeping backups on the same server as your website, you can store them safely on platforms such as Google Drive or Dropbox. This ensures that your backup files remain accessible even if something happens to your hosting account.
Developing a habit of regularly checking and maintaining your backups can save a lot of time and stress in the future. By combining automatic backups with remote storage, you can make sure your website data is always protected and ready to be restored whenever it is needed.