When I first started using WordPress.com, I quickly realized that plugins are the real game changer behind a functional and professional website. They allow you to extend features, improve performance, and customize your site without needing to code everything from scratch. In this guide, I’m going to share exactly how I install plugins on WordPress.com step by step, based on my own experience. If you’re just getting started, this beginner-friendly walkthrough will help you avoid confusion and get things running smoothly.
One important thing I learned early on is that not all WordPress.com plans support plugins. To install plugins on WordPress.com, you need to be on a plan that allows plugin access, such as the Business or higher tier. Once you have that covered, the entire process becomes much easier and more flexible. This is why understanding your plan is the first step before diving into plugin installation.
At first, the WordPress.com dashboard can feel a bit overwhelming, especially if you’ve never used it before. I remember spending quite some time just figuring out where everything was located. But once I got familiar with the interface, installing plugins became a quick and straightforward task. In this article, I’ll guide you through the exact navigation so you won’t waste time like I did.
Plugins on WordPress.com can help you do almost anything, from improving SEO and speeding up your website to adding contact forms and enhancing security. I personally rely on several essential plugins to keep my site running efficiently and professionally. Learning how to install and use these plugins properly can significantly improve your website’s performance. That’s why mastering this basic skill is so important for beginners.
Another thing I want to highlight is that installing a plugin is just the beginning. Knowing how to activate, configure, and manage plugins is equally important if you want to get the best results. I’ve made a few mistakes in the past by installing plugins without properly setting them up, and it affected my site’s performance. So in this guide, I’ll also touch on how I use plugins effectively after installation.
Throughout this guide, I’ll keep everything simple, practical, and easy to follow. I won’t use overly technical language because I know how frustrating that can be for beginners. Instead, I’ll walk you through each step as if we’re sitting together and working on your website. My goal is to make sure you feel confident installing plugins on WordPress.com by the end of this article.
If you’re looking for a clear and honest explanation of how to install plugins on WordPress.com, you’re in the right place. This step-by-step guide is based entirely on my personal experience, so you’ll get real insights instead of generic instructions. By following along, you’ll be able to add new features to your site quickly and safely. Let’s get started and turn your WordPress.com site into something much more powerful.
What You Need to Know
Before you jump into installing plugins on WordPress.com, there’s one important thing you need to understand. Plugins are not available on the free plan, which means you won’t be able to extend your website’s functionality unless you upgrade. From my experience, this is something many beginners overlook at the beginning. That’s why I always recommend starting with a paid plan right away if you’re serious about building a professional website.
On WordPress.com, plugin access is included across all paid plans, including Personal, Premium, Business, Commerce, and Enterprise. This means once you’re on any of these plans, you can start installing and using plugins without limitations tied to the free tier. Personally, I find this flexibility incredibly helpful because it allows me to customize my site exactly the way I want. Instead of being restricted, you get full control over how your website grows.
Choosing a paid plan early on can actually save you time and effort in the long run. If you start with the free plan, you’ll eventually hit limitations and need to migrate or upgrade later anyway. I’ve been through that phase, and it’s definitely more efficient to skip the limitations from the beginning. By going straight to a paid plan, you can immediately focus on building, optimizing, and scaling your website using plugins.
Another reason I confidently suggest upgrading is the refund policy offered by WordPress.com. If you choose an annual, two-year, or three-year subscription, you’re covered by a 14-day money-back guarantee with no complicated questions asked. Even if you go with a monthly plan, you still get a 7-day refund window if you’re not satisfied. This gives you a risk-free opportunity to explore plugins and see how much they can improve your site before fully committing.
Ready to unlock plugin access on your WordPress.com site? Start with a paid plan today and try it risk-free.
How to Install Plugins on WordPress.com
Before jumping into the actual steps, I want to briefly explain how simple and beginner-friendly this process really is. When I first tried installing plugins on WordPress.com, I expected it to be technical and complicated. But in reality, it’s mostly just clicking the right options in the dashboard. Once you understand the flow, you can install plugins in just a few minutes.
In this section, I’ll walk you through the exact steps how to to install plugins on my site. I’ll keep everything clear, practical, and easy to follow so you don’t feel overwhelmed. You don’t need any coding skills or advanced knowledge to do this. As long as you can navigate the dashboard, you’re already good to go.
What I like most about installing plugins on WordPress.com is how streamlined the process is. Everything is handled inside the dashboard, from searching for plugins to activating them instantly. You don’t have to deal with manual configurations unless you want to. This makes it perfect for beginners who just want to get things done quickly.
So if you’re ready to start adding new features to your website, you’re in the right place. Follow along with the steps I’m about to show you, and you’ll have your first plugin installed in no time. Let’s go step by step and make this process as simple as possible.
Step 1: Log in to Your WordPress.com Account
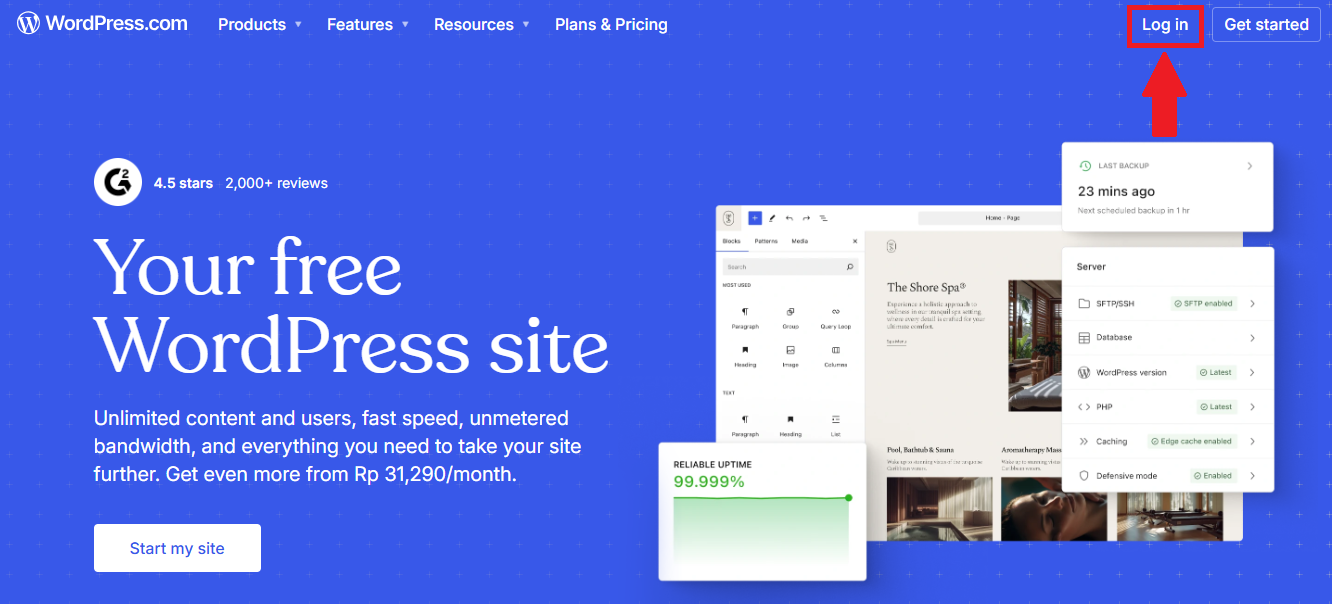
To get started, the first thing you need to do is access your WordPress.com account. Open your browser and go to WordPress.com, then look at the top-right corner of the screen. You’ll see two main buttons there, and you should click on the “Log in” option right next to the “Get Started” button. This will take you to the login page where you can access your dashboard.
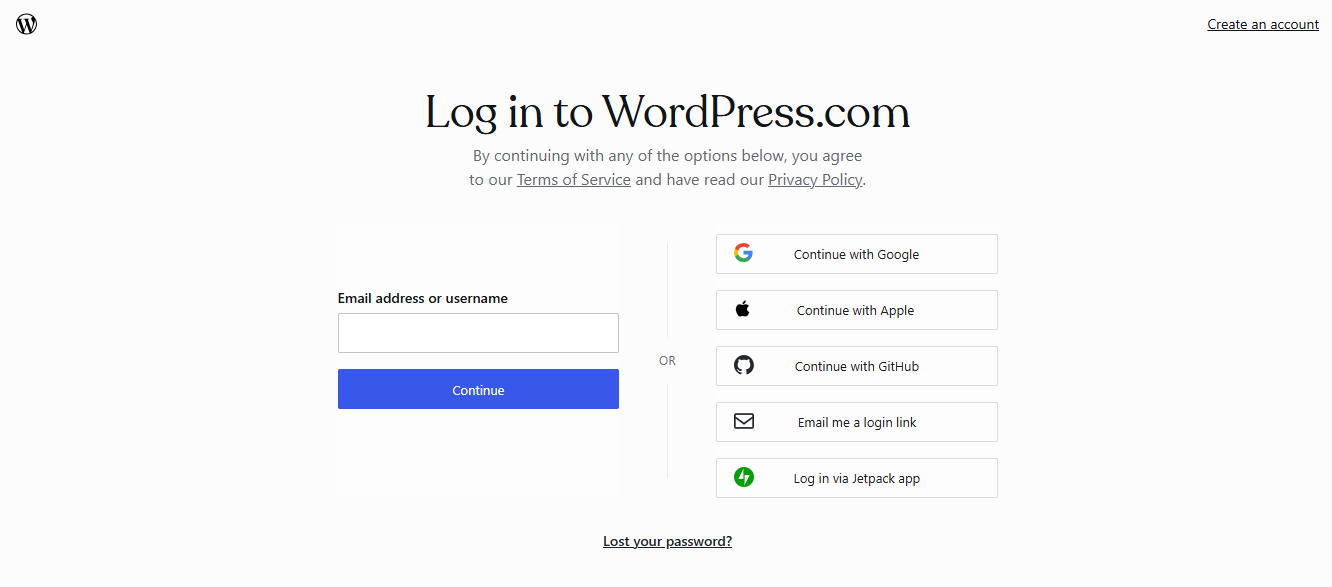
On the next page, you’ll be given several login options depending on how you originally created your account. WordPress.com makes it very flexible, so you can log in using your preferred method without any hassle. You might see options like Google, Apple, GitHub, “Email me a login link,” login via Jetpack, or the traditional email and password combination. Just choose the method you used when signing up.
Step 2: Open Your WordPress Site Dashboard
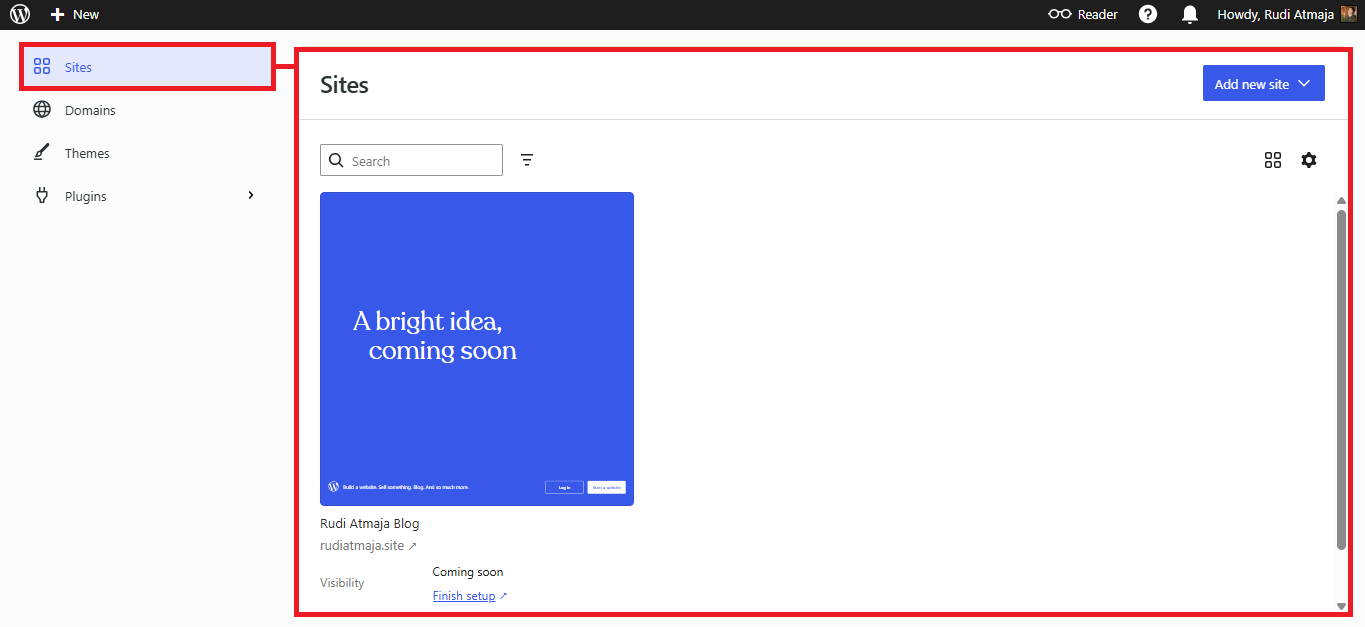
After logging into your WordPress.com account, you’ll be taken to the WordPress Sites dashboard, where all of your websites are listed in one place. This is essentially your central hub for managing multiple sites if you have more than one. From here, you need to choose which website you want to install a plugin on. Simply click on the site you want to work with to continue.
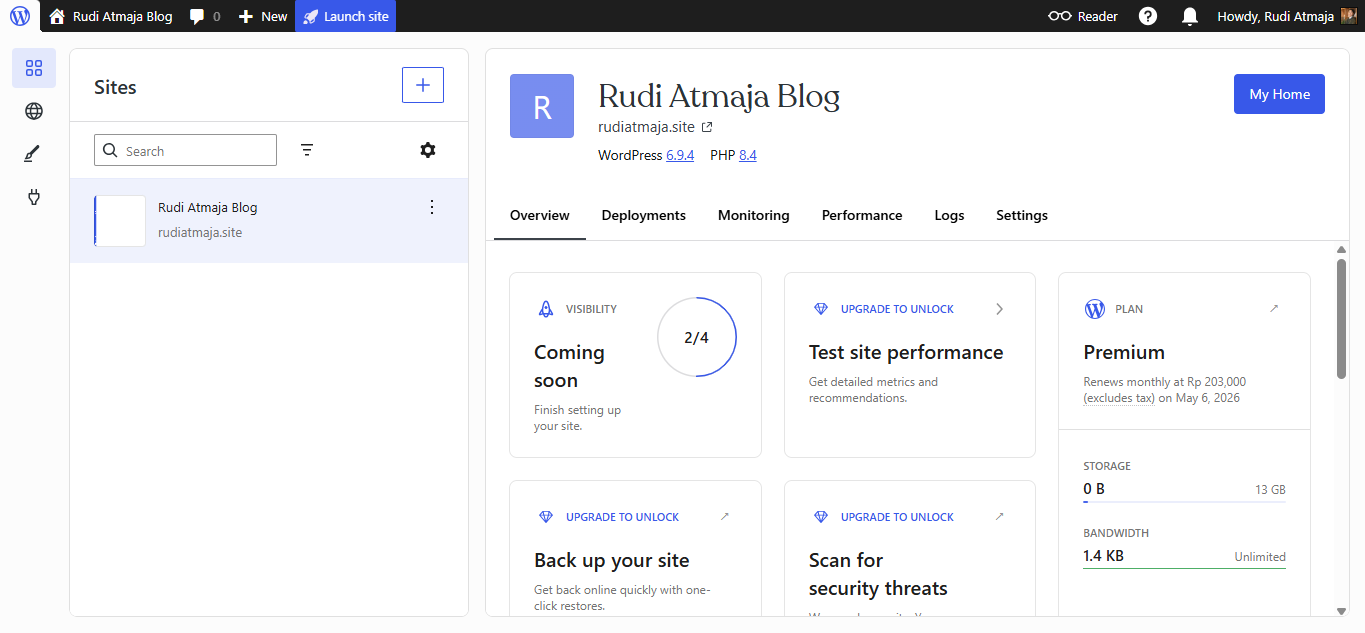
Once you select your preferred site, WordPress.com will redirect you to that site’s management area. In many cases, you may initially land on a section related to your plan or site overview. Don’t worry if it doesn’t immediately look like the typical dashboard you’re expecting. This is just part of the navigation flow within WordPress.com.
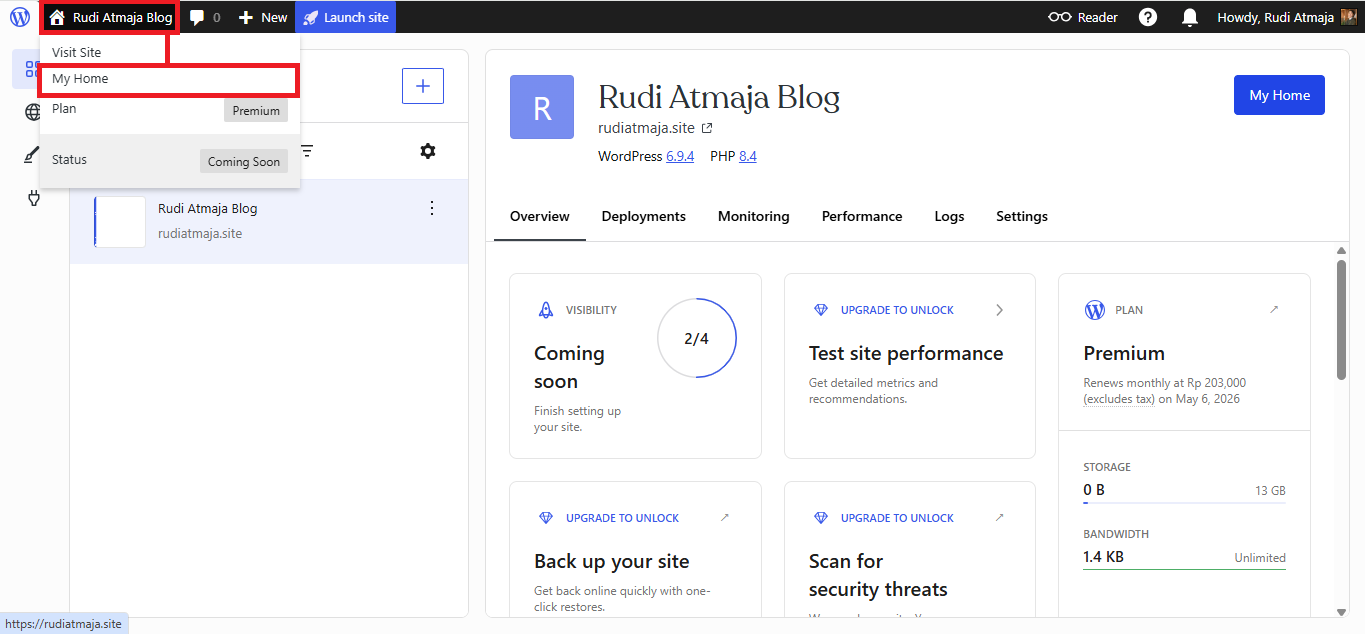
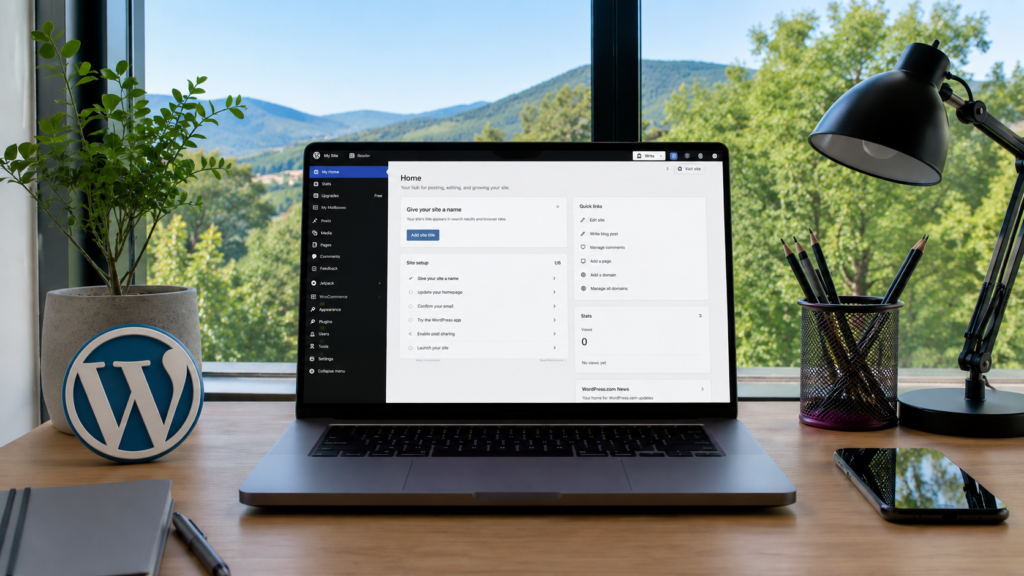
To access the main dashboard interface, look at the top-left corner of your screen. You’ll see a small home icon located next to the WordPress logo. Click on that icon, and then select the “My Home” option from the menu that appears or you can also click on “My Home” button. This will take you to the primary dashboard view for your selected website.

Once you’re inside the “My Home” section, you’re in the right place to manage everything related to your site. From here, you can access plugins, themes, posts, and all other settings needed to customize your website. Now that your site dashboard is open, you’re ready to move on to the next step and start installing plugins.
Step 3: Find the Plugin You Want to Install
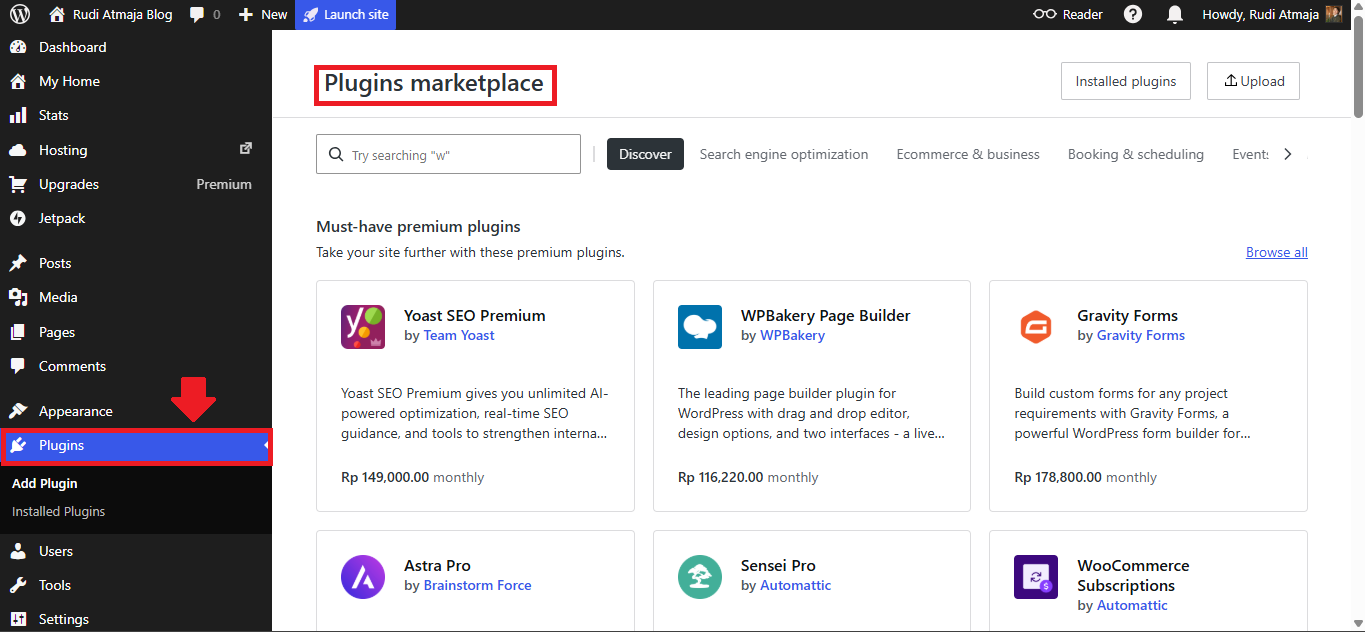
From your site dashboard on WordPress.com, the next step is to open the plugin library. To do this, simply click on the “Plugins” menu from the left-hand sidebar. Once you click it, you’ll be redirected to the Plugins Marketplace, where you can explore a wide range of available plugins. This is where you’ll discover tools to enhance your website’s functionality.
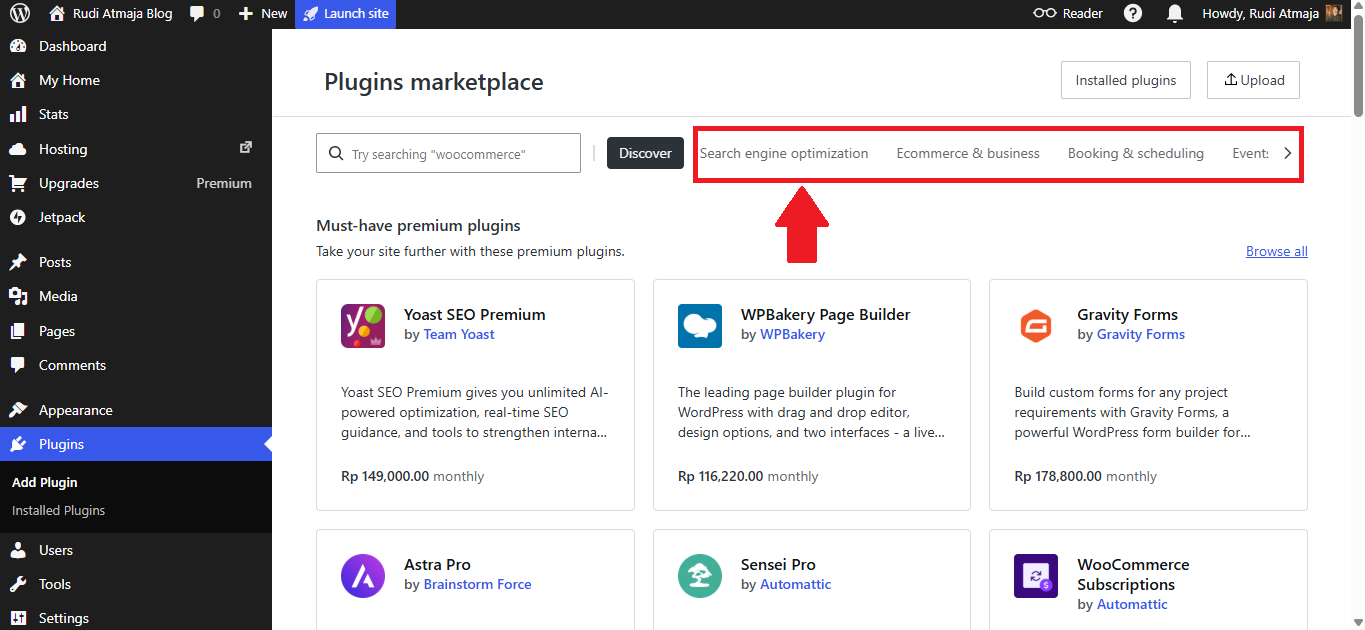
Inside the Plugins Marketplace, you’ll notice several categorized tabs that help you browse plugins more easily. For example, you can click on the “Search Engine Optimization” tab to view SEO-related plugins, or explore the “Ecommerce & Business” tab if you’re building an online store or business site. There are also other categories available depending on your needs, making it easier to narrow down your options. I personally like browsing these categories when I’m not sure exactly which plugin I need.

If you already know the name of the plugin you want, the fastest way to find it is by using the search box. Just type the plugin name into the search field and press Enter on your keyboard to display the results. This method saves a lot of time, especially if you already have a specific plugin in mind. It’s usually how I install most of my plugins.
You can also use the search box more broadly by typing a function instead of a specific plugin name. For example, you can type “SEO,” “form,” or “security” and press Enter to see a list of relevant plugins. This is very helpful if you’re still exploring and want to compare different options.
Step 4: Review the Plugin Information Before Installing
After you find a plugin that looks suitable on WordPress.com, the next step I always recommend is taking a closer look at its details. Instead of installing it right away, click on the plugin you’re interested in to open its dedicated page. This will bring you to the plugin’s full overview inside your WordPress dashboard. It’s a simple step, but it can save you from choosing the wrong plugin.
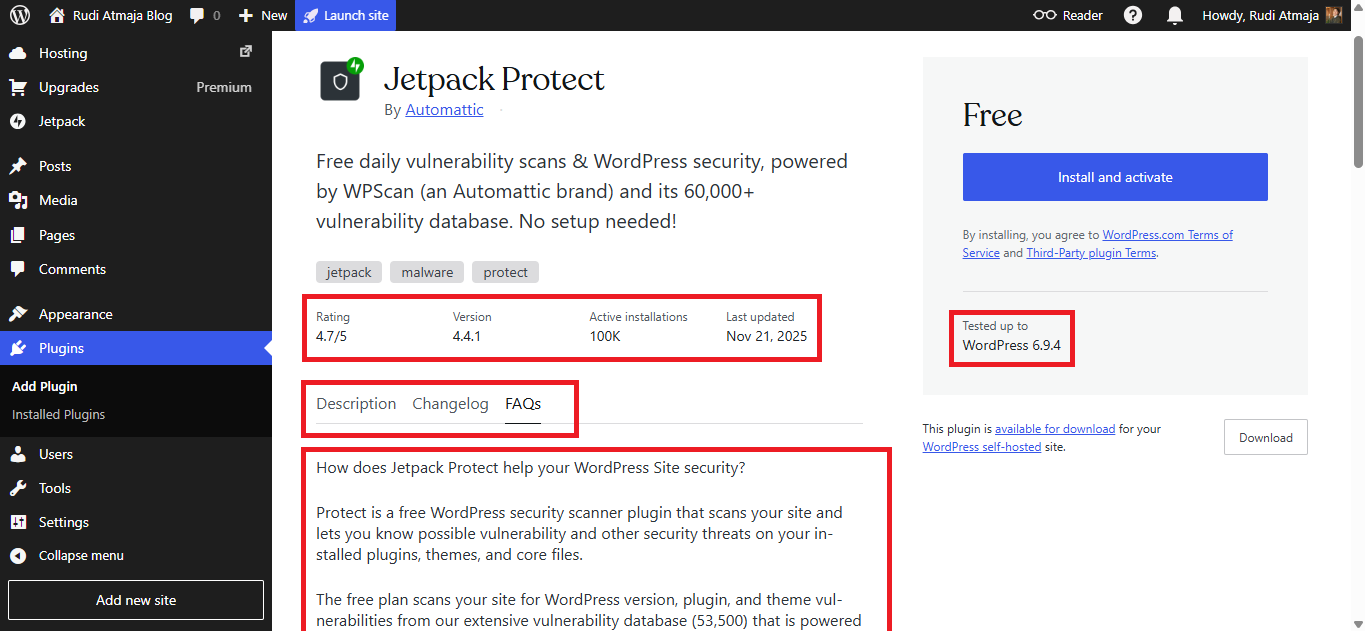
On the plugin page, you’ll find several important sections that explain how the plugin works. The Description section gives you a general overview of its features and what it’s designed to do. There’s also a Changelog, which shows recent updates and improvements made by the developer. Additionally, the FAQs section can help answer common questions and give you a better understanding of how to use the plugin properly.
I personally like to spend a few minutes reviewing this information before installing anything. It helps me make sure the plugin is actively maintained and compatible with my needs. Sometimes, I even discover better alternatives just by comparing features and update history. This habit has saved me from installing plugins that could potentially slow down or conflict with my site.
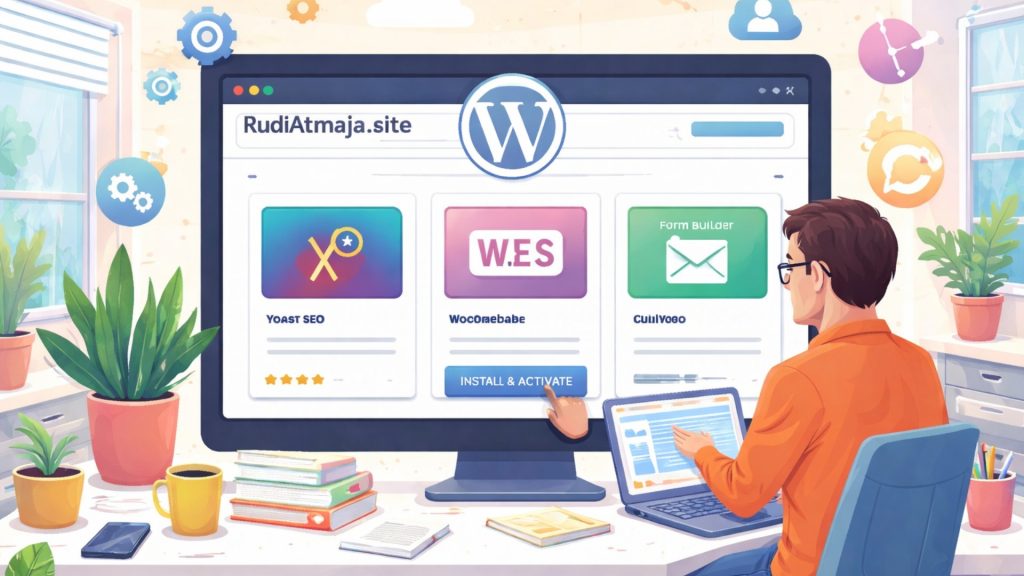
Step 5: Install and Activate the Plugin
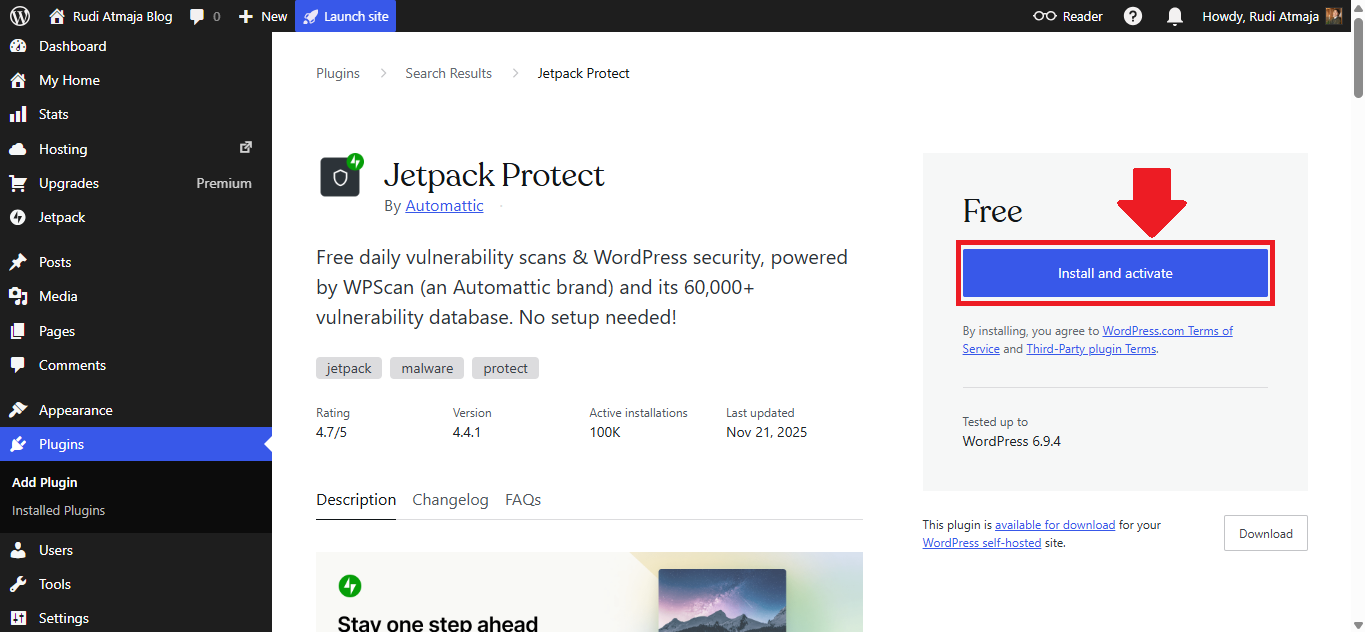
Once you feel confident that the plugin matches your needs, it’s time to install and activate it on your WordPress.com site. On the plugin page, simply click the “Install & Activate” button. This is the only action you need to take to get the plugin up and running. I personally like how WordPress.com combines both steps into a single click, making the process very beginner-friendly.
After clicking the button, WordPress.com will automatically start installing the plugin for you. This usually takes just a few seconds, depending on your connection and the size of the plugin. During this process, you don’t need to do anything else – just wait for it to complete. In my experience, it’s fast and works smoothly most of the time.
Once the installation is finished, the plugin will be activated automatically. This means it’s now live and ready to be used on your website. You may also see new menu options appear in your dashboard, depending on the plugin you installed. This is a good sign that the plugin has been successfully added to your site.
At this point, the plugin is fully installed and active.
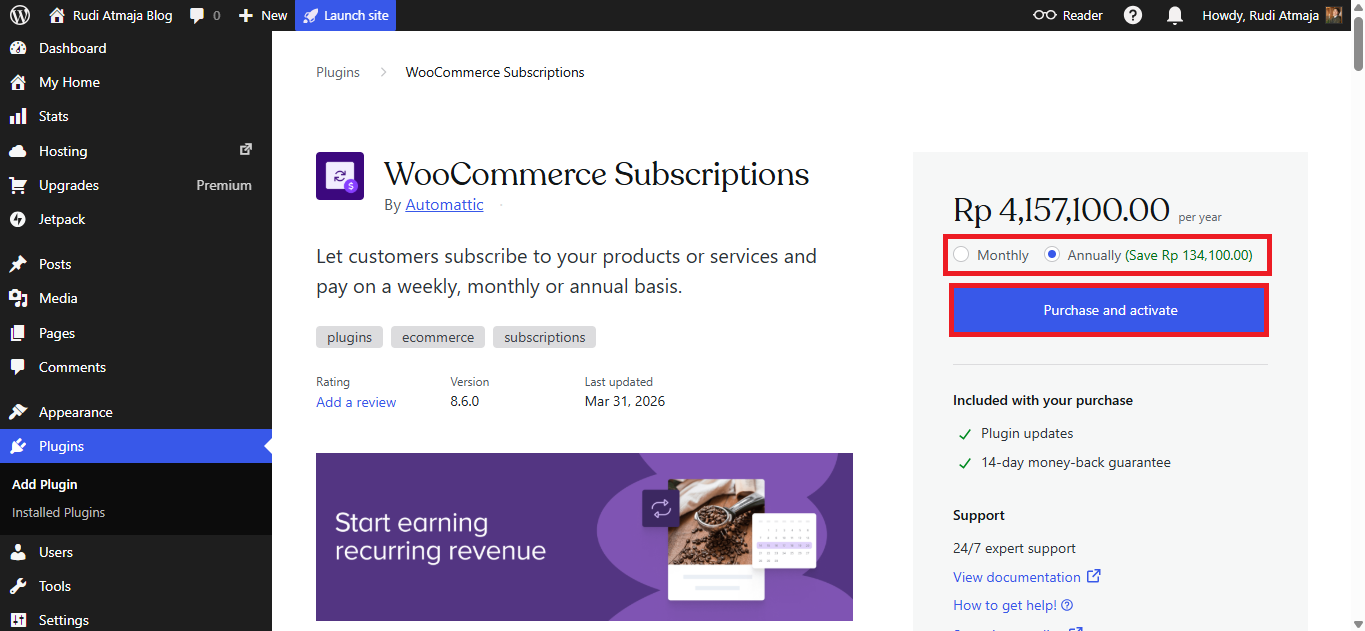
If the plugin you want is a premium (paid) plugin – like WooCommerce Subscriptions – the process is slightly different. You’ll need to choose your subscription plan, whether it’s monthly or annually, and then click the “Purchase & Activate” button. After that, you’ll be redirected to the payment page to complete your purchase. Once the payment is successful, WordPress.com will automatically install and activate the plugin for you, just like a regular plugin.
Ready to unlock plugin access on your WordPress.com site? Start with a paid plan today and try it risk-free.
How to Upload and Install a Plugin Manually on WordPress.com
In some cases, the plugin you want to use may not be available in the built-in marketplace on WordPress.com. This usually happens with premium plugins that are sold directly by their developers, such as Rank Math SEO Pro. When that’s the case, you’ll need to install the plugin manually by uploading its file. I’ve done this several times, and once you understand the steps, it’s actually very simple.
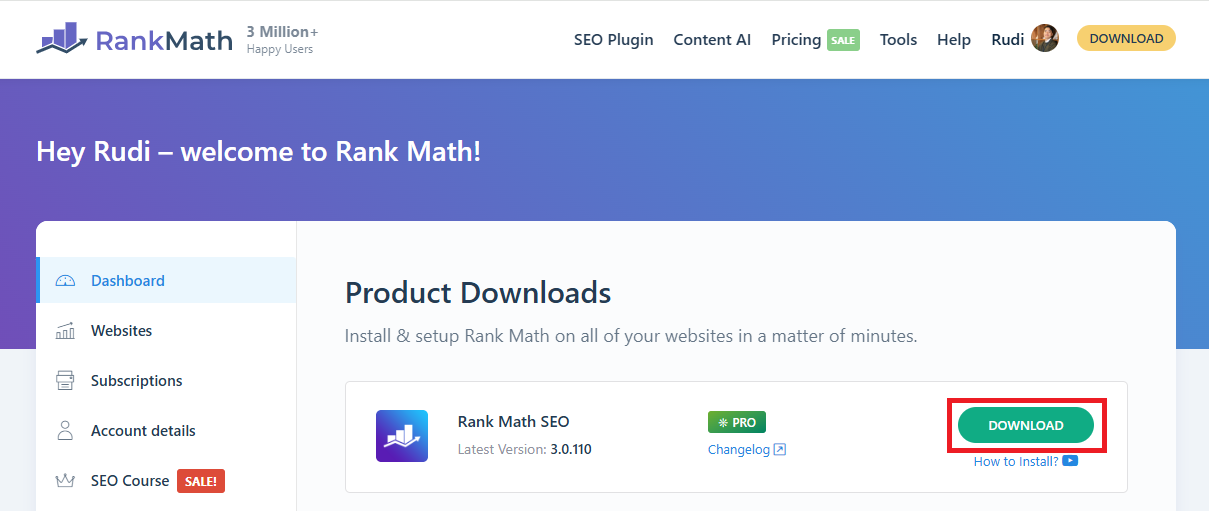
The first thing you need to do is download the plugin file from the official developer’s website. Make sure the file is in .zip format, as this is the format WordPress accepts for manual uploads. I always double-check that I’m downloading from a trusted source to avoid any security issues. Once the file is ready on your computer, you can move on to the next step.
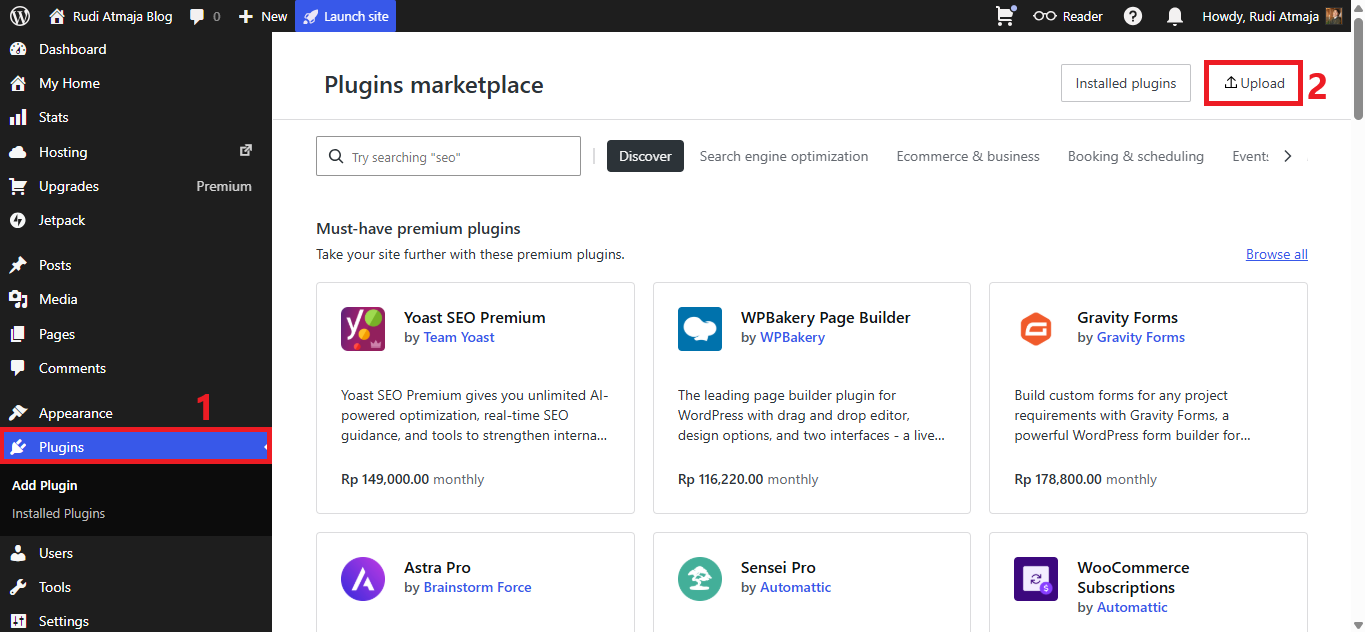
Next, go back to your WordPress.com site dashboard and click on the “Plugins” menu from the sidebar. At the top of the Plugins page, you’ll see an “Upload” button. Click on that button, and you’ll be taken to the upload interface where you can add your plugin file. This is where the manual installation process begins.
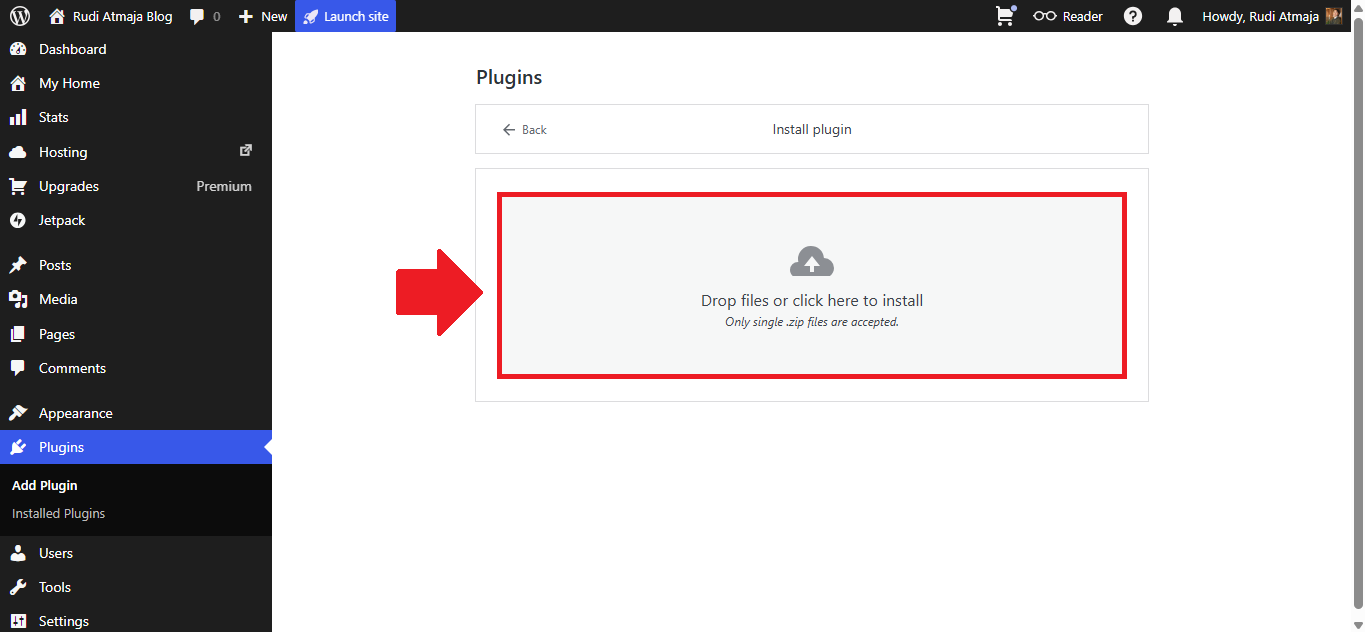
From there, simply choose your plugin’s .zip file or drag and drop your plugin’s .zip file into the upload box, or select it manually from your computer. WordPress.com will automatically upload, install, and activate the plugin for you once the process is complete. Just like that, your premium plugin is ready to use on your site without needing any complicated setup.
Ready to unlock plugin access on your WordPress.com site? Start with a paid plan today and try it risk-free.
How to Use and Configure Plugins on WordPress.com
After installing a plugin on WordPress.com, the next step is understanding how to use and configure it properly. From my experience, this is where things can feel a bit confusing at first, especially for beginners. Every plugin comes with its own interface and settings, so there’s no single standard layout. That’s why I always take a moment to explore where the plugin’s settings are located right after activation.
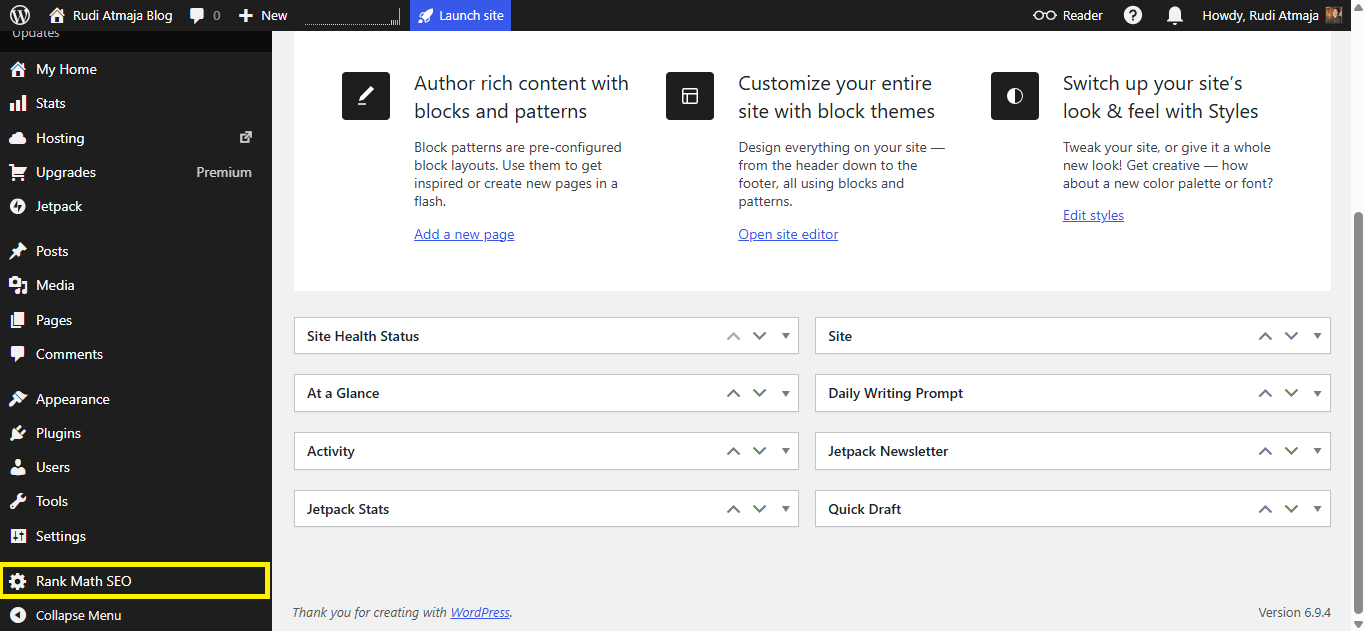
Most plugins will either appear under the “Settings” menu or create their own dedicated menu in the dashboard. For example, plugins like Rank Math SEO add a separate menu labeled with their name, such as “Rank Math SEO.” This means you shouldn’t rely only on the Settings section, but also look for a new menu item that matches the plugin you just installed. I usually scan the sidebar to quickly find where the plugin is located.
Once you find the plugin’s menu, click on it to open its dashboard or setup page. This is where you can configure how the plugin works on your site. I typically go through the available options one by one to understand what each feature does. Some plugins even offer a setup wizard, which makes the process much easier by guiding you step by step.
I also recommend starting with the essential settings instead of trying to customize everything at once. Many plugins are designed to work well with their default configuration, so you don’t need to overcomplicate things in the beginning. I usually enable the core features first, then come back later to fine-tune the settings as my site grows. This approach keeps things simple and avoids unnecessary mistakes.
Finally, I always test the plugin after making any changes. Whether it’s checking SEO settings, submitting a form, or reviewing performance improvements, testing ensures everything is working correctly. Over time, you’ll become more comfortable using different plugins and managing their settings. Once you get used to it, plugins become one of the most powerful tools to customize and improve your WordPress.com site.
Ready to unlock plugin access on your WordPress.com site? Start with a paid plan today and try it risk-free.
How to Delete Plugins on WordPress.com
At some point, you may want to remove a plugin that you no longer use on your WordPress.com site. From my experience, keeping unused plugins installed can clutter your dashboard and potentially affect performance. That’s why I make it a habit to regularly review and clean up plugins I don’t need anymore. Thankfully, WordPress.com makes this process very simple and straightforward.
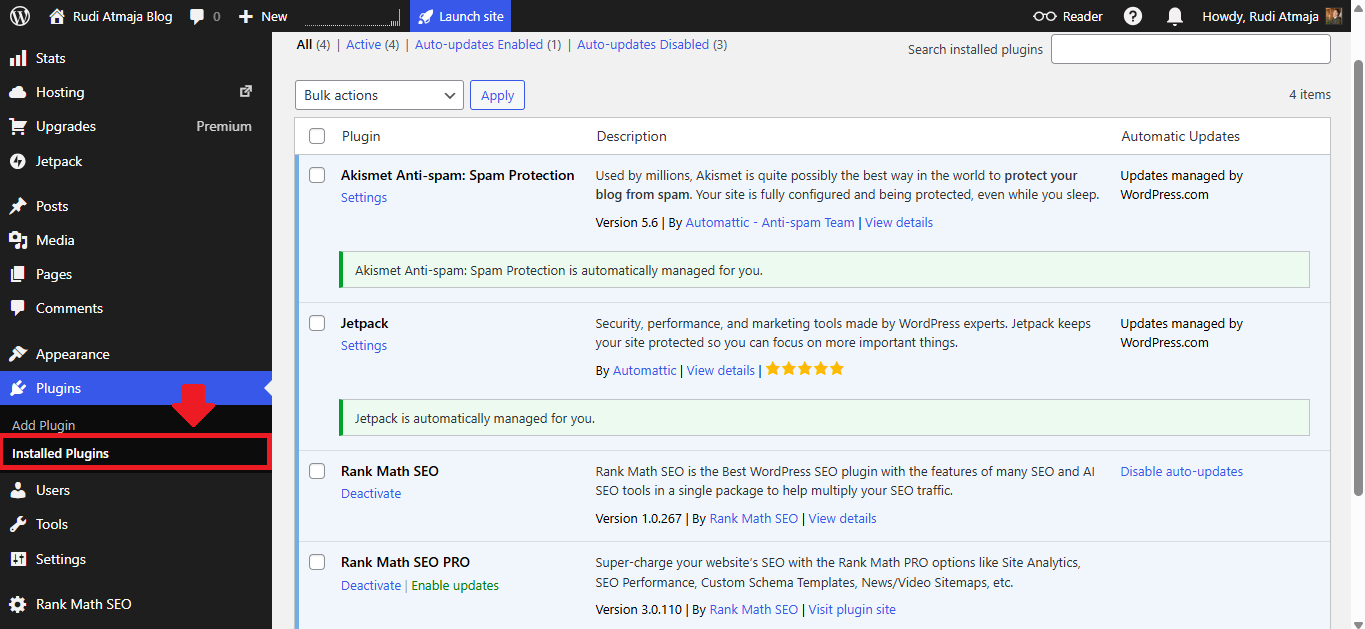
To get started, go to your site dashboard and navigate to “Plugins > Installed Plugins.” This page will display a list of all plugins that are currently installed on your website. Here, you can see which plugins are active and which ones are not. I usually take a moment to scan this list and identify plugins that are no longer necessary.

Once you’ve found the plugin you want to remove, click the “Deactivate” option located below the plugin’s name. This step is required before you can delete any plugin. After deactivating it, you’ll notice that a new option appears. Then, simply click the “Delete” option under the same plugin to remove it completely from your site.
After deleting the plugin, it will no longer exist on your website, and any related files will be removed. I always recommend double-checking that you’re not using the plugin before deleting it, just to avoid accidentally removing something important. By keeping your plugin list clean and organized, your WordPress.com site will run more efficiently and stay easier to manage.
Ready to unlock plugin access on your WordPress.com site? Start with a paid plan today and try it risk-free.
Final Thoughts
By now, you should have a clear understanding of how to install, use, and manage plugins on WordPress.com. From logging into your account to installing and configuring plugins, each step plays an important role in building a functional and professional website. I’ve shared this guide based on my personal experience, so you can follow it with confidence even if you’re just starting out. Once you get used to the process, working with plugins will feel natural and much faster.
One thing I’ve learned is that plugins are powerful, but they should be used wisely. Installing too many plugins can slow down your site or create conflicts, so it’s always better to focus on quality over quantity. I personally prefer using only the plugins that truly add value to my website. This approach keeps my site clean, efficient, and easy to manage in the long run.
If you’re just starting your journey, you might also want to explore another powerful feature offered by WordPress.com, which is the AI Site Builder. This tool allows you to create a blog or website much faster by simply describing what you want, and the system will generate a ready-to-use site for you. It’s especially helpful if you don’t want to spend too much time designing from scratch. I’ve found it to be a great starting point for beginners.
I’ve actually written a detailed article about this feature titled “10 Things You Can Do With WordPress AI Site Builder”, where I break down its capabilities and how you can use it effectively. It’s a great follow-up read if you want to take your website creation process to the next level. Just keep in mind that the WordPress AI Site Builder is currently not available for WooCommerce-based websites. So if you’re planning to build an online store, you’ll need to set things up manually.
Lastly, it’s worth noting that the AI Site Builder feature is available on every paid plans. This makes it accessible for most users who are serious about building their website on WordPress.com. Whether you choose to use plugins, the AI builder, or both, you now have all the tools you need to create and grow your site effectively.