


A few years ago, building a website for a business usually meant hiring a developer, waiting weeks for the project to be finished, and spending far more money than most small businesses could comfortably afford. Today, things look very different. With modern website builders and AI-powered tools, you can launch a professional-looking website in less time than it takes to finish a cup of coffee.
That shift has made it easier than ever for local shops, freelancers, consultants, and online stores to establish a digital presence. Even if you have zero design experience or technical knowledge, you can still create a website that looks polished and trustworthy. The biggest challenge is often knowing where to start rather than learning how to code.
A business website is no longer just a nice extra. When people hear about your company, one of the first things they do is search for it online. If they can’t find a website, there’s a good chance they’ll move on to a competitor that feels more established and easier to reach.
The good news is that creating a website doesn’t have to become another overwhelming project on your to-do list. Most of the heavy lifting can now be handled by intuitive platforms that guide you through each step. From choosing a design to publishing your pages, the process is much simpler than many business owners expect.
In this guide, you’ll learn exactly how to create a business website in minutes, even if you’ve never built one before. We’ll walk through the process step by step, explain the decisions that matter most, and show you how to get your site online without unnecessary complexity. By the end, you’ll have everything you need to launch a website that helps your business look professional and attract more customers.
How to Build a Business Website in Minutes
Before jumping into the steps, it’s worth mentioning that we’ll be using the AI Website Builder from WordPress.com to create the business website in this guide. Instead of starting with a blank page and building everything from scratch, the AI helps generate an initial website structure based on your business information. This can save a significant amount of time, especially if you’re creating your first website or simply want to get online as quickly as possible.
One important thing to know is that the AI Website Builder from WordPress.com currently isn’t designed for creating eCommerce websites. If your goal is to build an online store with product catalogs, shopping carts, and checkout functionality, you’ll need a different setup. However, for service-based businesses, local companies, agencies, consultants, portfolios, and many other types of business websites, it can be a fast and convenient starting point.
It’s also important to understand that the AI doesn’t take control away from you. Think of it as a helpful assistant rather than a replacement for your decisions. The AI creates a foundation, but you still have full control over your website’s design, content, pages, images, and settings. And if you’re curious about what else WordPress.com’s AI can do beyond building websites, you can learn more about its capabilities by clicking HERE.
If you decide to get started through my affiliate link, I’m also ready to help you build your business website from scratch at no additional cost. You can simply fill out the contact form on the Contact page, and I’ll guide you through the process or help you set everything up so your website is properly built and ready to go.
1. Visit the WordPress.com AI Site Builder and Describe Your Business
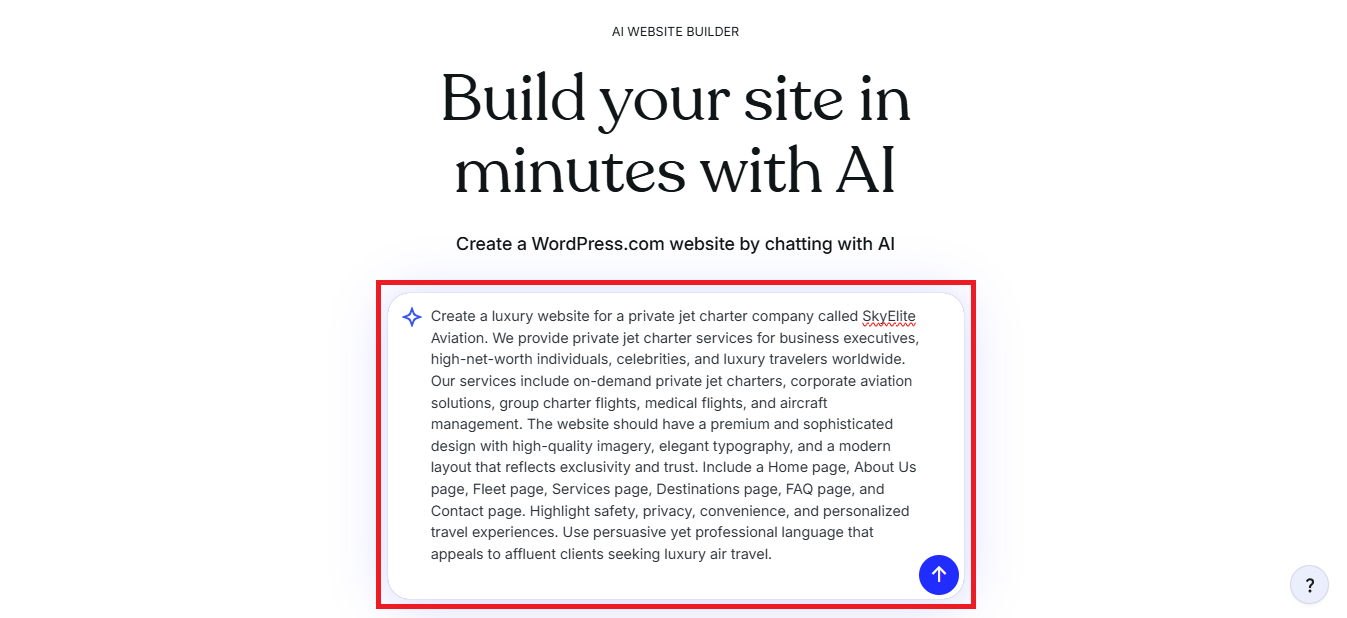
To get started, visit the WordPress.com AI Site Builder page or simply click HERE. Once you’re there, you’ll be asked to enter a prompt describing the website you’d like to create. This is where you can tell the AI about your business, your services, your target audience, and the overall style you want for the website.
The goal isn’t to write a perfect prompt. Instead, focus on providing enough information for the AI to understand your business. You can describe your company, the services you offer, the type of customers you serve, and any important pages you’d like included on the site.
Here’s an example prompt you can copy and paste:
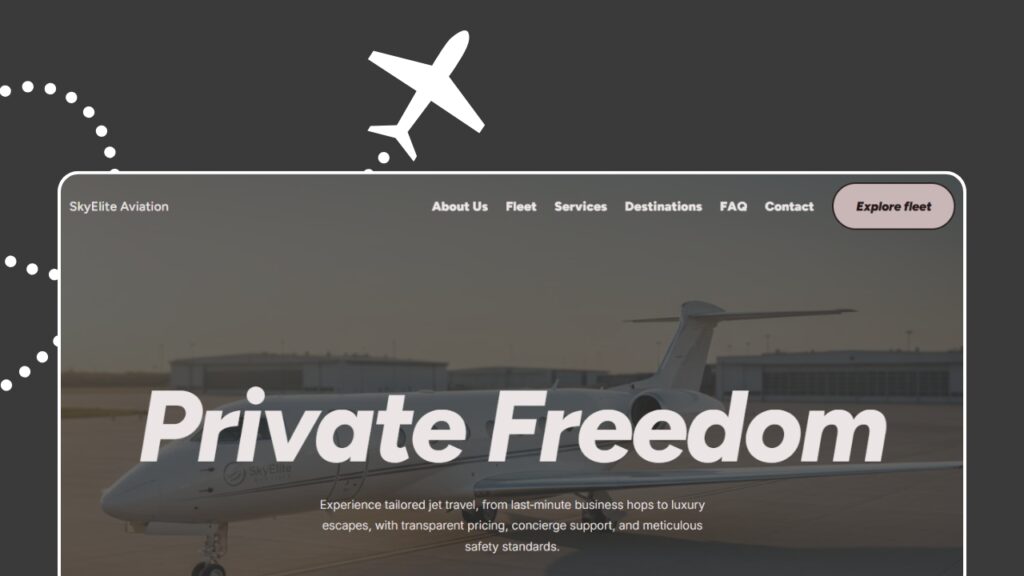
Create a luxury website for a private jet charter company called SkyElite Aviation. We provide private jet charter services for business executives, high-net-worth individuals, celebrities, and luxury travelers worldwide. Our services include on-demand private jet charters, corporate aviation solutions, group charter flights, medical flights, and aircraft management. The website should have a premium and sophisticated design with high-quality imagery, elegant typography, and a modern layout that reflects exclusivity and trust. Include a Home page, About Us page, Fleet page, Services page, Destinations page, FAQ page, and Contact page. Highlight safety, privacy, convenience, and personalized travel experiences. Use persuasive yet professional language that appeals to affluent clients seeking luxury air travel.
Feel free to use this prompt as-is or modify it to better match your own business. The more specific details you provide, the more accurately the AI can create a website that reflects your brand and the audience you want to attract.
2. Create a WordPress.com Account
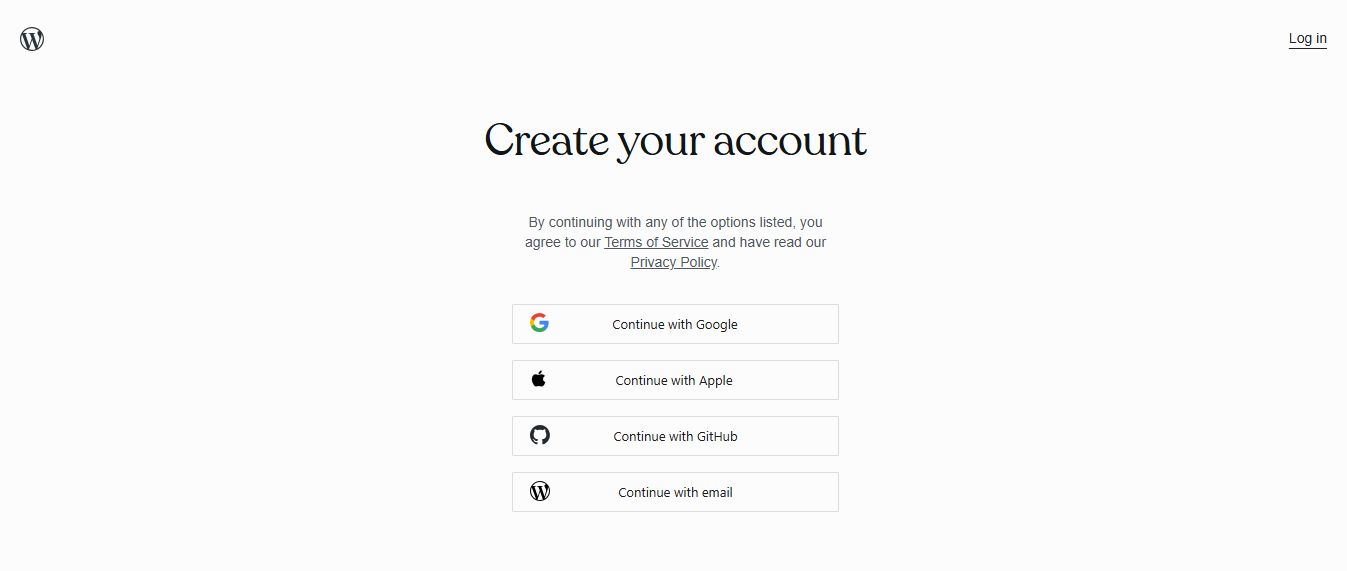
Before the AI can start building your business website, you’ll need to create a WordPress.com account. On the next screen, you’ll be prompted to sign up before continuing with the website creation process.
The good news is that you don’t need to provide any payment information at this stage. You can create your account for free and explore the AI Website Builder before deciding whether you want to upgrade to a paid plan later. This makes it easy to test the platform and see whether it fits your needs without any upfront commitment.
WordPress.com offers several signup options to make the process as convenient as possible. You can create an account using your email address, or sign up with an existing Google, Apple, or GitHub account. Simply choose the option you prefer, complete the registration process, and you’ll be ready to move on to the next step of building your website.
3. Answer Any Additional Questions from the AI
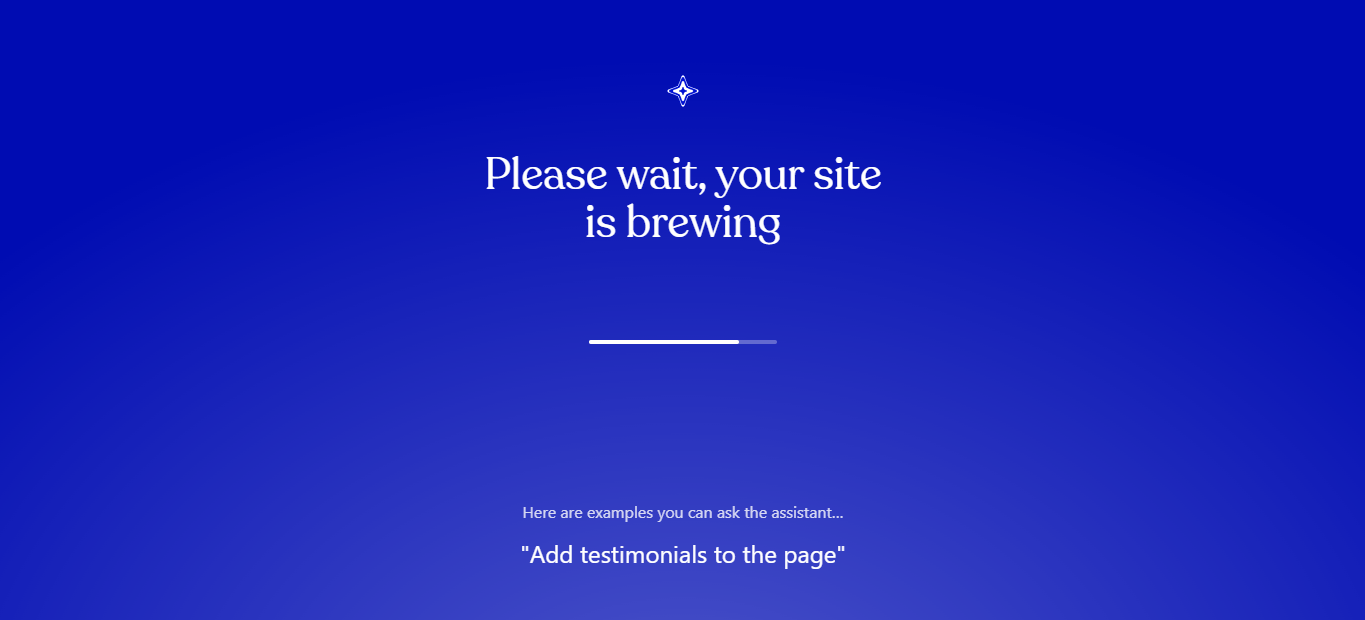
Once you’ve created your account, the AI will begin generating your website based on the description you provided earlier. In many cases, it can start building immediately. However, sometimes the AI may ask a few follow-up questions before proceeding.
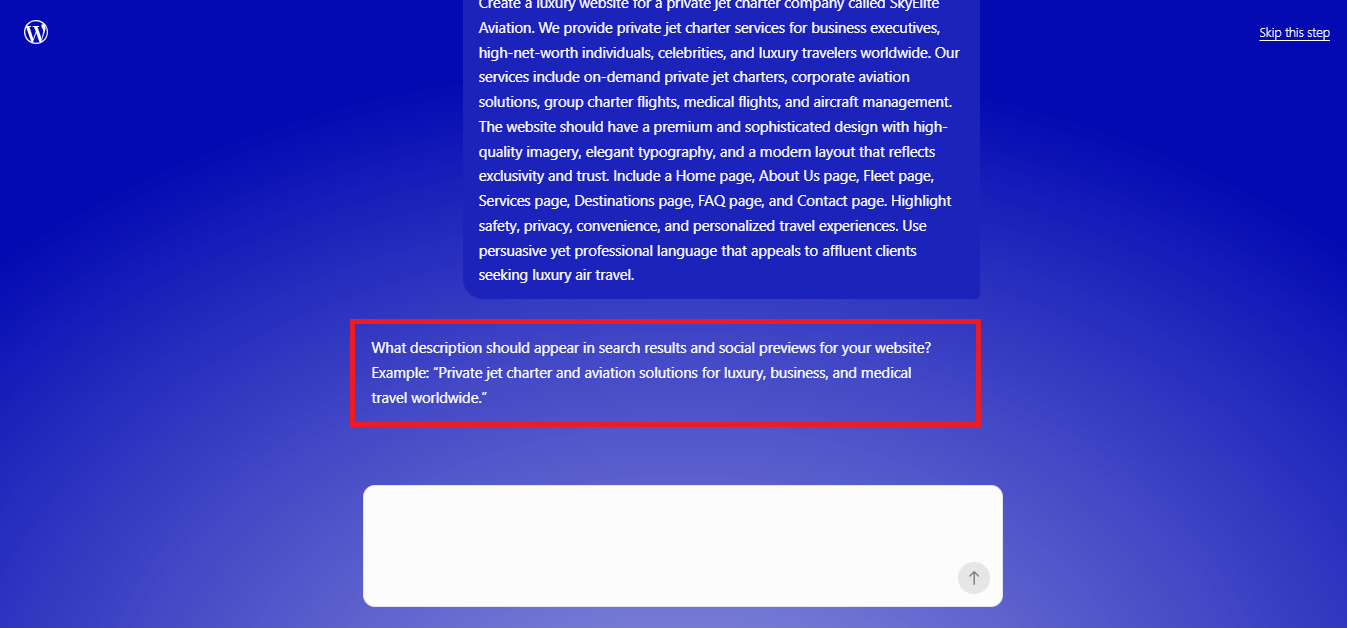
If that happens, simply answer the questions as accurately as possible. The AI isn’t asking these questions to make the process longer. Instead, it’s trying to fill in any gaps that could affect the quality of the website it creates. For example, it may ask about your target audience, preferred design style, business location, services, or the main goal of the website.
Providing clear answers helps the AI create a website that better reflects your business. Think of it as a web designer asking for additional details before starting a project. The more relevant information you provide, the more likely the AI will generate pages, content, layouts, and messaging that align with your brand, reducing the amount of editing you’ll need to do later.
4. Customize Your Homepage
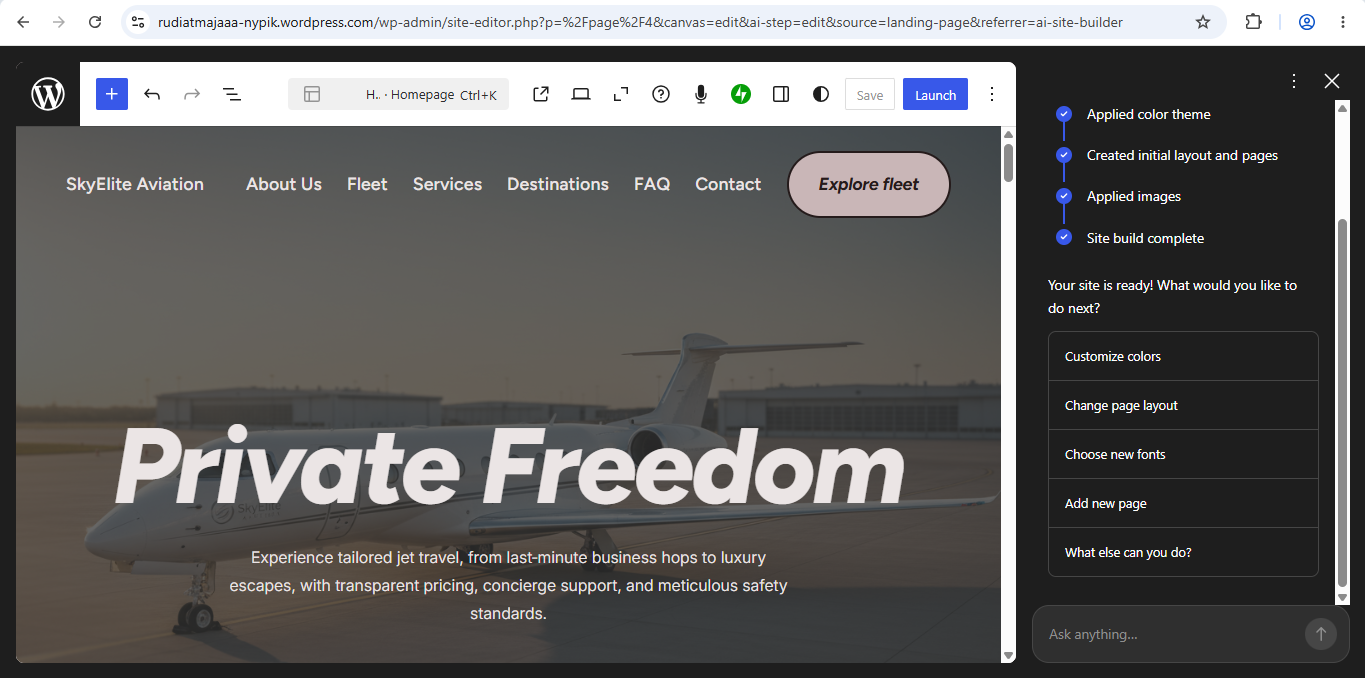
At this stage, you’ll notice that the AI has already generated a homepage for you. In some cases, it might look almost perfect right away, but more often than not, you’ll want to tweak a few things to better match your vision. The good part is, everything is fully editable, so you’re never stuck with the initial design.
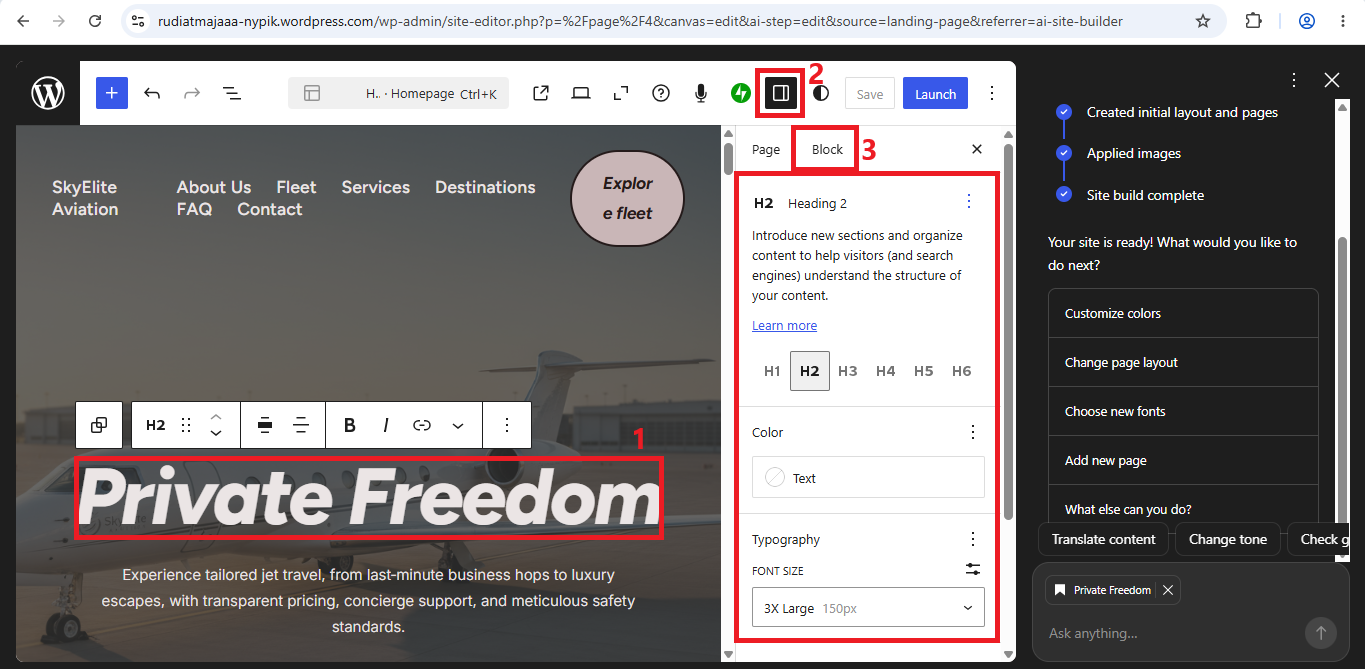
The good thing is, everything on the page is fully editable. You can click on any element – whether it’s text, images, sections (rows), buttons, or layouts – and adjust it directly. After selecting an element, click the settings icon to open its customization options. From there, you can change the content, style, alignment, and other details until it feels right for your brand.
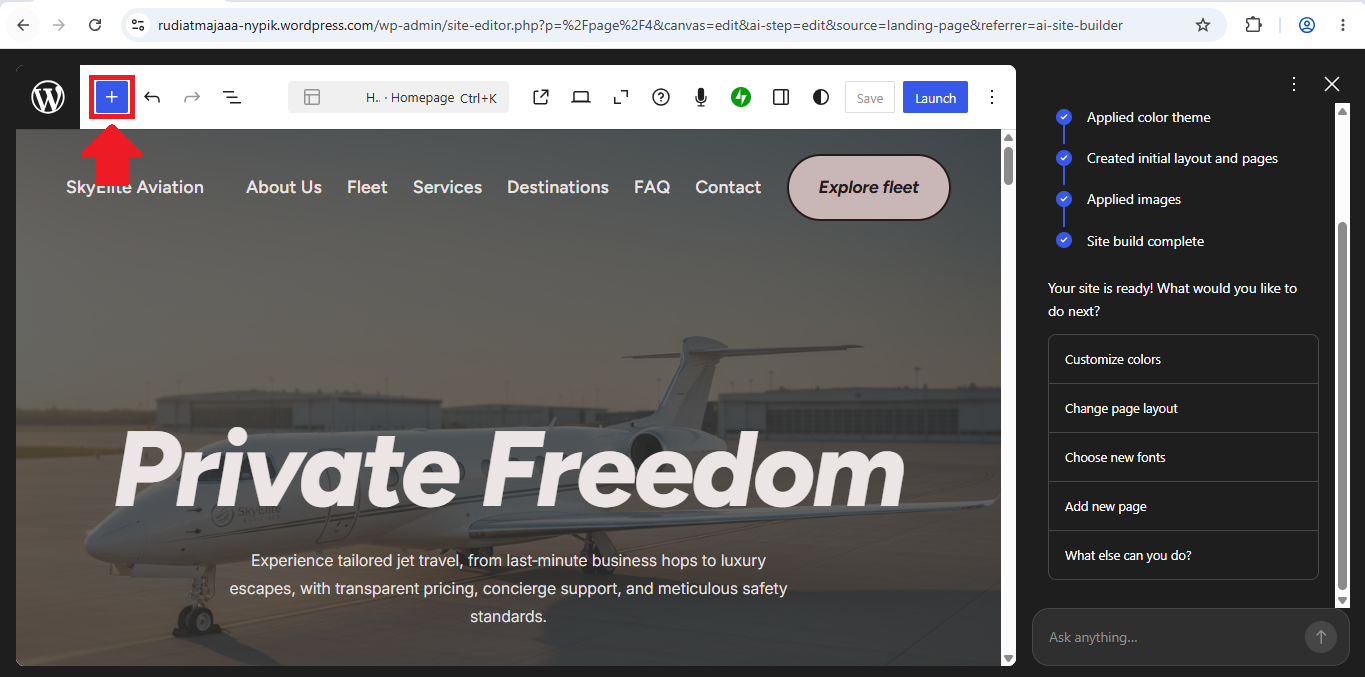
If you want to go further, you can also add new elements to the page. Just click the “+” icon in the top-left corner, and you’ll see a full list of available blocks and components you can insert. This makes it easy to expand your page with new sections like testimonials, service highlights, image galleries, or call-to-action buttons, giving you full control over how your website looks and functions.
You can also continue using AI to improve and redesign parts of your page. Instead of manually adjusting everything, you simply click on any element – text, image, or section – and then type a command into the AI prompt field.
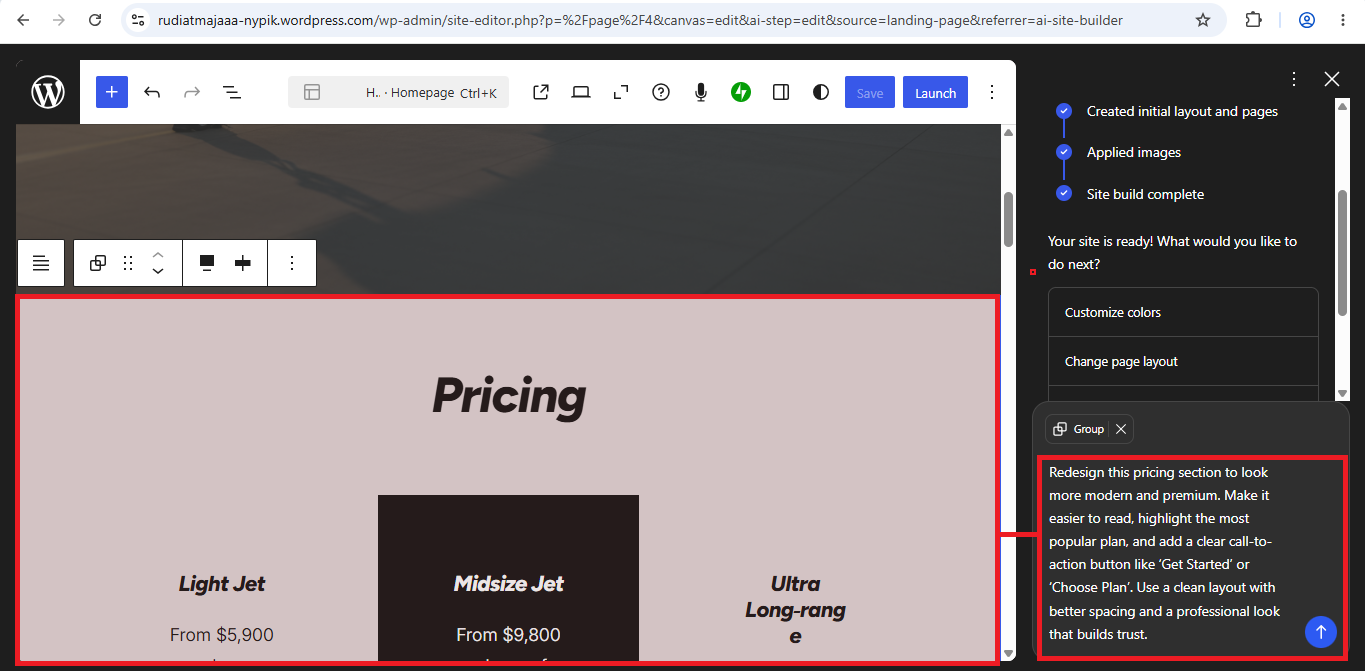
For example, let’s say you feel the Pricing section doesn’t look very appealing or clear. You would click on the pricing row, open the AI command box, and type something like this:
Redesign this pricing section to look more modern and premium. Make it easier to read, highlight the most popular plan, and add a clear call-to-action button like ‘Get Started’ or ‘Choose Plan’. Use a clean layout with better spacing and a professional look that builds trust.
The AI will then adjust that specific section based on your instructions, so you don’t need to rebuild everything manually. This makes it really easy to refine your website step by step until it matches the exact style and message you want.
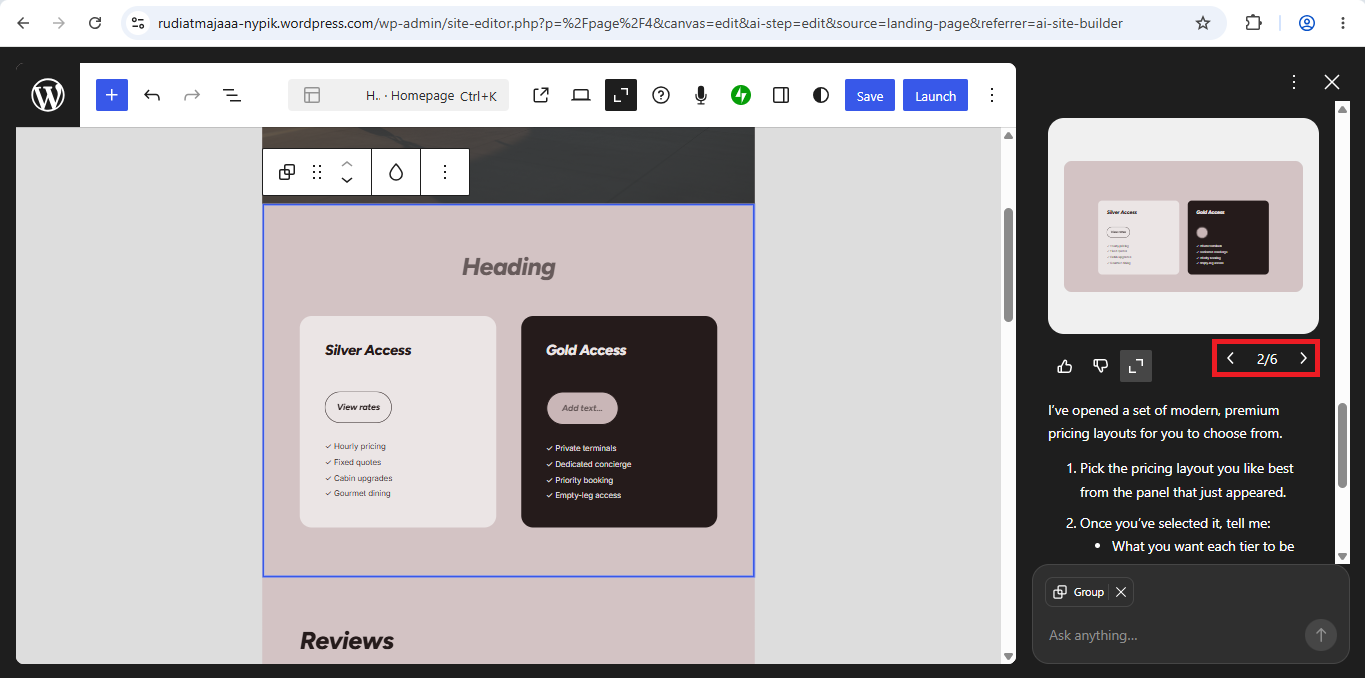
After that, the AI will usually generate a few different options for you to choose from – especially when you ask it to redesign or modify a specific section. This is actually really helpful because you’re not stuck with just one result.
Instead, you’ll see several variations of the updated section, each with a slightly different layout, style, or structure. For example, one might look more minimal, another might feel more bold and premium, while another focuses more on clarity and readability.
From there, you can simply pick the version that feels the most suitable for your website. If none of them feel quite right, you can refine your prompt and try again until you get a result that matches your vision better.
4. Add and Design New Pages
Now that you’ve finished designing your homepage, the next step is usually to create additional pages for your website. Most business websites need more than just a homepage, such as an About page, Services page, FAQ, Contact page, or even a Testimonials page to build trust with potential customers.
The good thing is, you don’t have to build these pages manually from scratch. You can simply instruct the AI to create them for you based on your business needs. Just describe what you want, and the AI will generate a complete page with structure and content that matches your website style.
For example, you can use a prompt like this:
Create a new About page for my private jet charter company. The page should explain our background, mission, and values. Highlight our focus on safety, luxury, privacy, and exceptional customer service. Make the tone professional and trustworthy, and include sections about our experience in aviation and why clients should choose us over competitors. The design should match the premium style of the homepage.
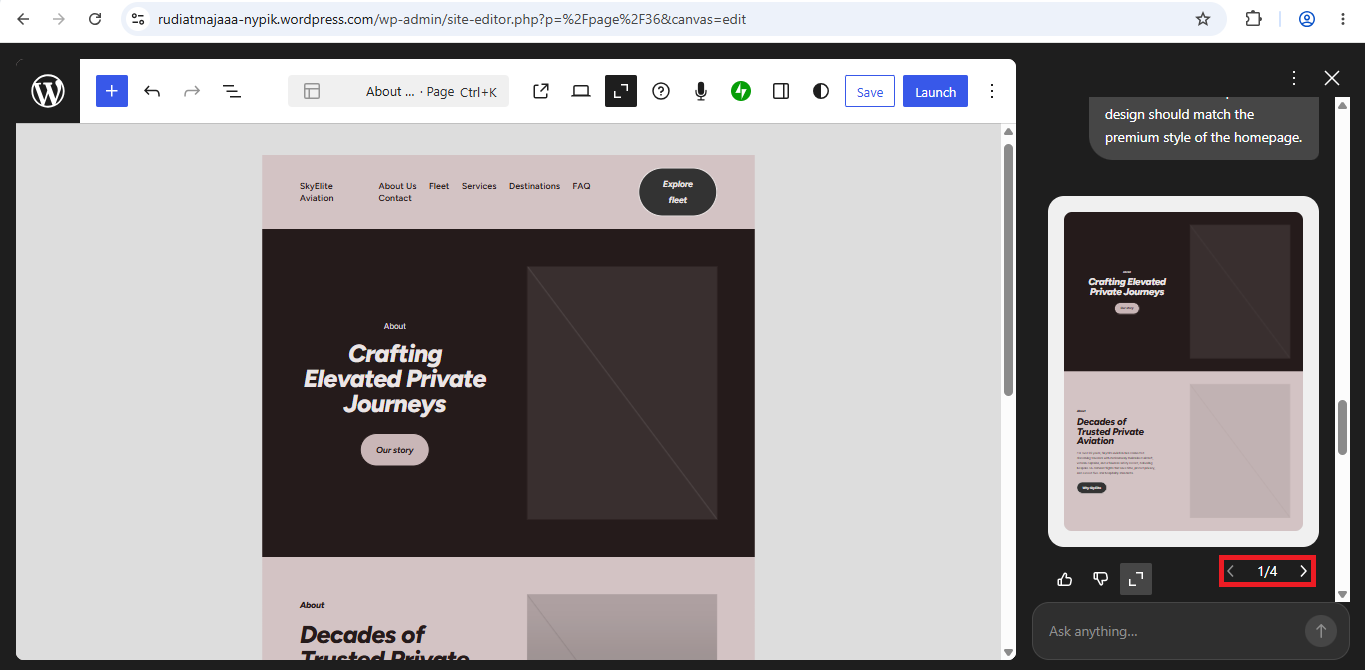
After that, the AI will start working on creating and designing your new page based on the prompt you provided. In most cases, it won’t just give you one version—it will also show a few different design options so you can choose the one that feels the most suitable for your website.
Once the page is generated, you can customize it the same way you did with your homepage. That means you can click on any section, edit text, replace images, adjust layouts, or even use AI again to refine specific parts until everything looks right.
Just make sure you don’t forget the basics while editing. Every time you make changes, click the “Save” button so your updates don’t get lost. This way, you can safely build and improve your website step by step without worrying about losing your progress.
5. Launch the Site
Now that everything is ready, it’s time to launch your website. This is the moment where your business site officially goes live and can be accessed by anyone on the internet. To make your website look more professional and trustworthy, it’s highly recommended to use a custom domain name such as yourbusiness.com or yourbusiness.net, instead of using a free subdomain like yourbusiness.wordpress.com.
On top of that, having a professional email address also makes a big difference. For example, using something like [email protected] looks far more credible compared to free email services like Gmail, Yahoo, or Outlook. These small details help build trust and make your business appear more established in the eyes of potential customers.
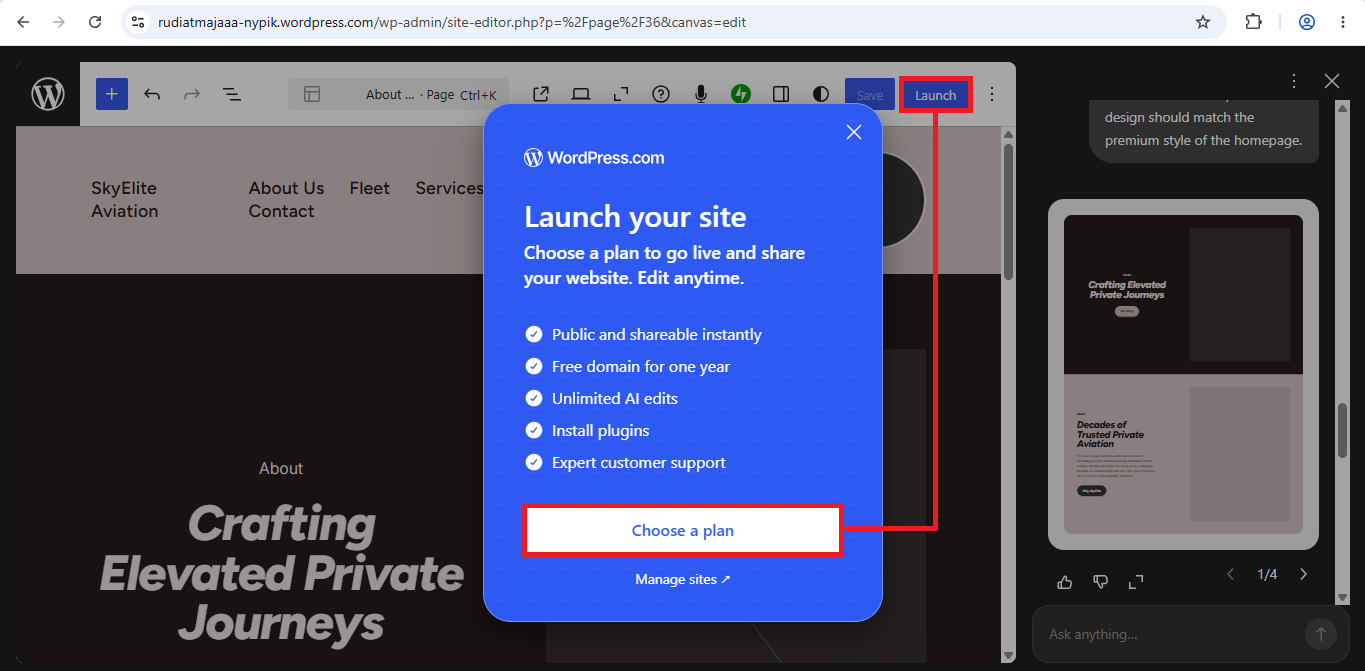
To set all of this up, you’ll need to upgrade from the free WordPress.com plan to a paid plan. Don’t worry, this is a normal step if you want to publish your site professionally. Once you’re ready, simply click the “Launch” button, then choose “Choose Plan” to select the package that fits your needs and complete the publishing process.
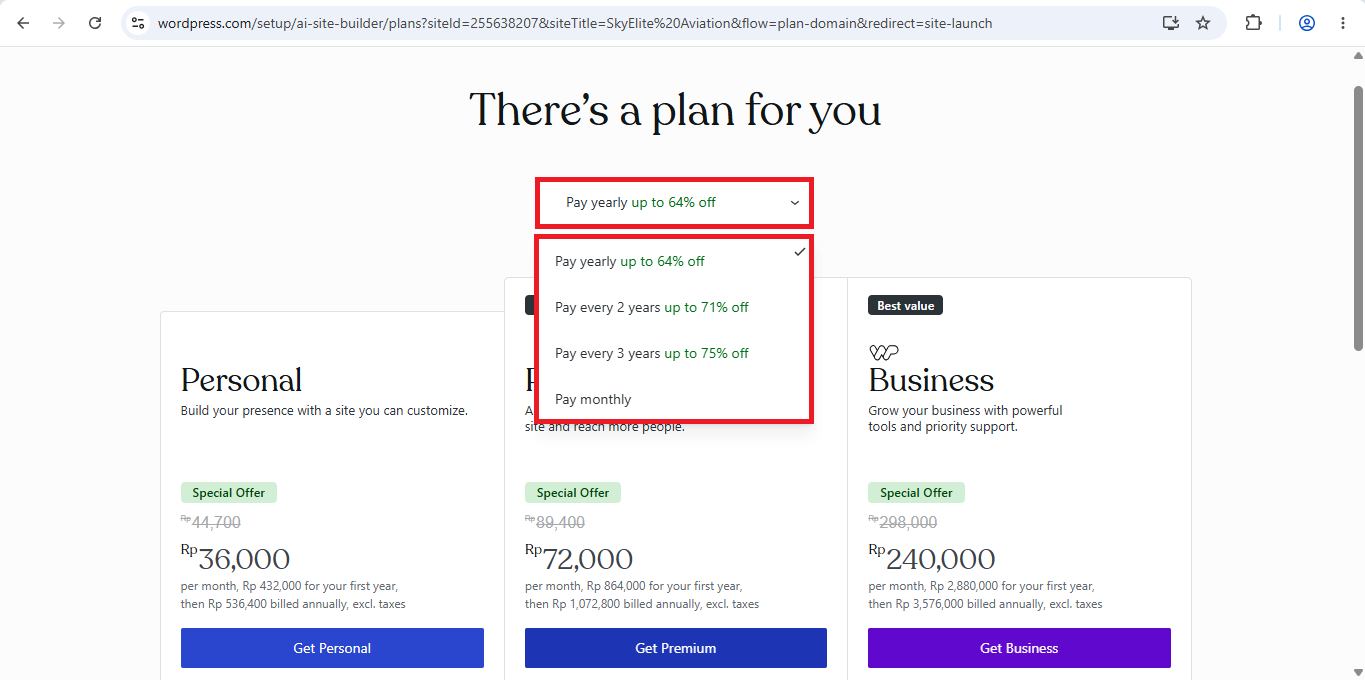
After that, you’ll be taken to the pricing page where you can choose your subscription duration. This is an important step because it affects both your cost and the features you’ll get.
At this stage, I’d personally recommend going with a 3-year plan if you’re just starting out. It might feel like a bigger commitment upfront, but it usually comes with a significant discount compared to paying monthly. Instead of treating it as a “try first” option, this approach actually helps you save more in the long run while setting your business up properly from the beginning.
Another advantage of yearly, 2-year, or 3-year plans is that they often include a free custom domain, regardless of the extension you choose. This means you’re not only saving money, but also managing your website and domain in one place, which makes everything much simpler. On top of that, WordPress.com typically offers a 14-day money-back guarantee for annual plans and above, so if you change your mind for any reason, you can still get a full refund without stress.
When it comes to choosing a plan, you can select based on your needs, but the Business plan is usually the most recommended. It comes with more advanced features, including promotional credits like a $200 Blaze ads package, free email for the first year, and other useful tools for growing your website. That said, if you’re just starting small, you can also begin with the Premium or Personal plan and upgrade later as your business grows.
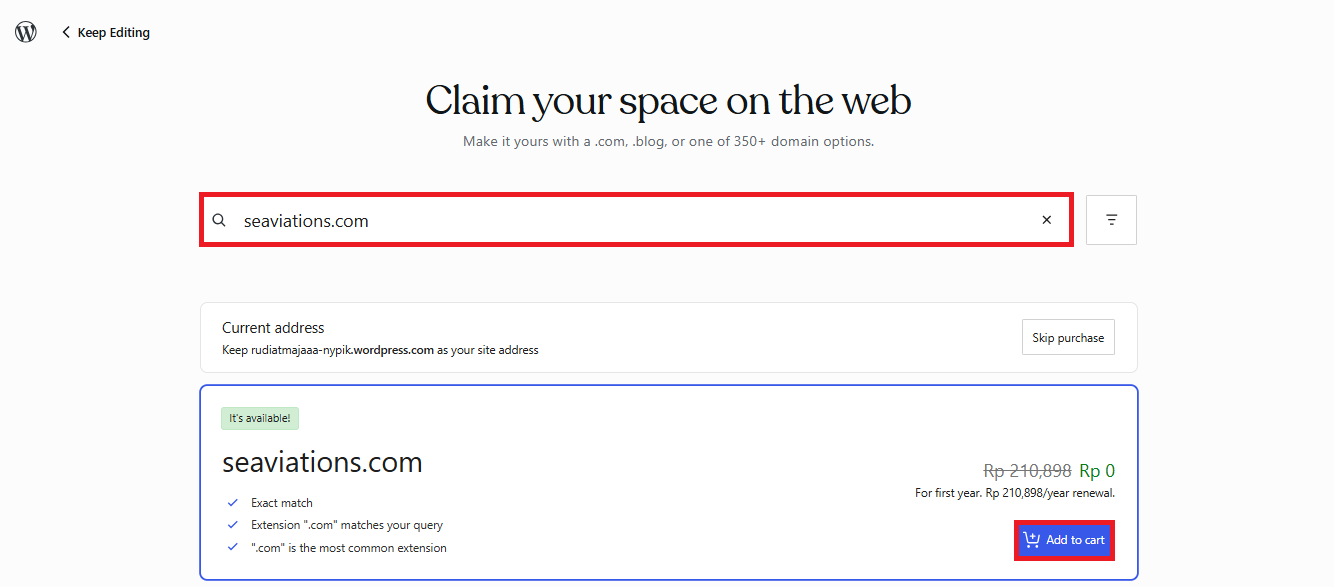
On the next page, you’ll be taken to the domain selection screen. This is where you choose the actual web address people will use to visit your site. Simply type the domain name you want along with the extension, such as .com, .net, or other available options.
For example, you could try something like skyeliteaviation.com, skyeliteaviation.net, or even variations like seaviations.com if the main one is already taken. Once you enter your preferred domain, the system will automatically check its availability.
If the domain is available, you can simply click the “Add to Cart” button to continue the setup process. However, if it’s already taken, WordPress will usually show you several alternative suggestions that are still close to your original idea. You can either choose one of those suggestions or try a different domain name until you find one that’s available and fits your brand.
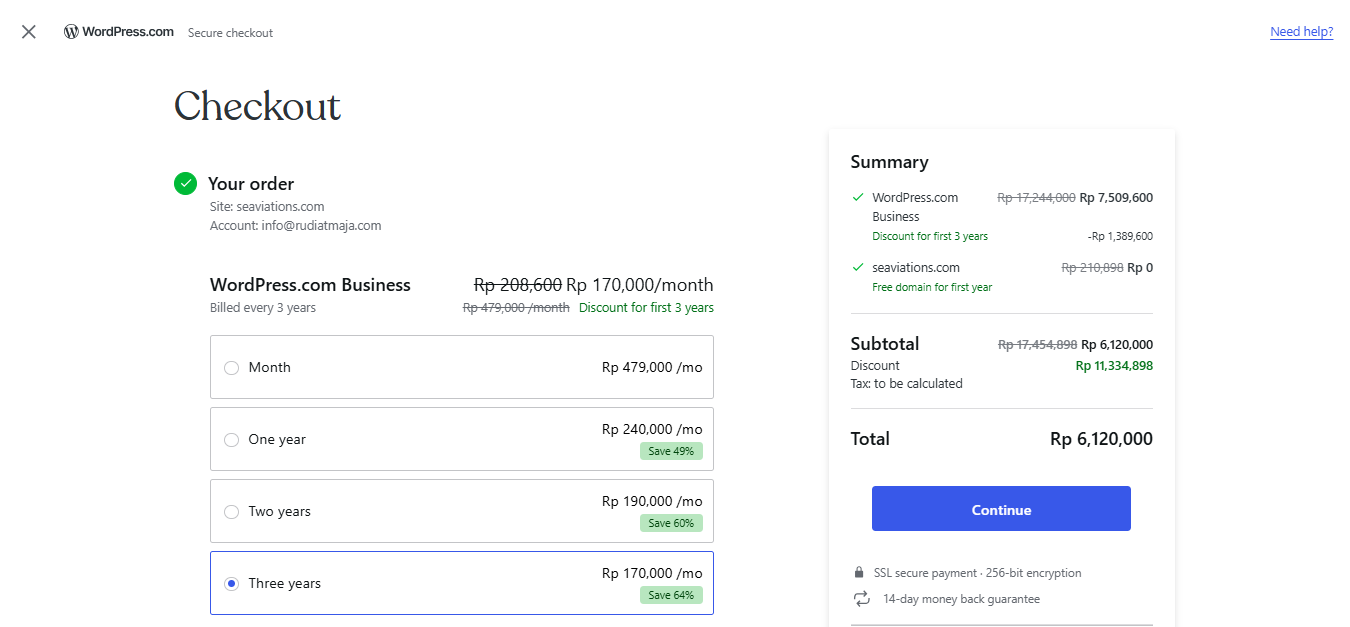
Finally, you’ll be asked to fill in your payment details and choose your preferred payment method to complete the purchase. Once everything is confirmed, go ahead and finish the payment process.
After the payment is successfully completed, I’d recommend waiting a few hours before expecting everything to work perfectly. This waiting time is normal because it allows your custom domain to fully connect to your website and for the SSL certificate to be installed automatically.
Within a few hours, you should be able to access your website by simply typing your domain name into the browser. This is also the moment where you can check whether everything is properly connected and your site is already live. If everything is set up correctly, your business website will be fully accessible with a secure connection and a professional domain.
Final Thoughts
Building a business website is no longer something complicated that only developers can handle. With the help of the WordPress.com AI Website Builder, you can go from an idea to a fully functional website in just a short amount of time. What used to take days or even weeks can now be done in a much simpler and more guided process.
The key thing to remember is that AI is there to assist you, not replace you. You still have full control over every part of your website, from the design and content to the structure and branding. This means you can keep refining and improving your site until it truly represents your business the way you want it to.
Now it’s your turn to put everything into action. Start building, experiment with different designs, and don’t be afraid to adjust things along the way. The sooner you launch your website, the sooner your business can start building an online presence and reaching more customers.