Your WordPress.com blog or website is now up and running, which is already a big step toward building your presence online. But launching a site is only the beginning. If you want people to actually find your content through Google and other search engines, SEO (Search Engine Optimization) is something you can’t afford to ignore.
So, how do you improve your WordPress.com site’s SEO?
If you’re on a Premium plan or higher, WordPress.com already includes built-in SEO tools that can help you optimize your content. However, things work a little differently if you’re using the Personal plan. In that case, you won’t have access to those advanced SEO features by default. The good news is that you don’t necessarily need expensive tools to get started. There are several free SEO plugins available that can help improve your site’s search visibility, making them a practical solution for Personal plan users who want better rankings without spending extra money.
Before continuing, there’s one important requirement to keep in mind. This tutorial is intended for WordPress.com users with a paid plan. If you’re currently using the free plan, you won’t be able to follow along because WordPress.com doesn’t allow plugin installation on free websites. To use the methods covered here, you’ll need to upgrade to at least the Personal plan.
You might also be wondering whether this guide is only useful for Personal plan users. Not at all. The steps in this tutorial can be followed by anyone using a paid WordPress.com plan, including Personal, Premium, Business, or higher. No matter which paid plan you’re on, you’ll be able to apply the techniques covered in this guide to improve your site’s SEO performance.
How to Optimize SEO on WordPress.com
For this tutorial, we’ll be using the free version of Yoast SEO, one of the most popular SEO plugins available for WordPress. It’s completely free to use and provides all the essential tools you need to improve your blog or website’s visibility in search engines.
One of the reasons Yoast SEO is so widely recommended is its simplicity. The settings are easy to understand, the interface is clean and organized, and you don’t need to be an SEO expert to start using it effectively. Once everything is set up, you’ll be able to manage many important SEO settings on your own without constantly searching for additional tutorials.
For most blogs and small business websites, the free version is more than enough. It covers the core SEO fundamentals, including search appearance settings, XML sitemaps, content optimization guidance, and many other features that can help search engines better understand your site.
That said, Yoast SEO also offers a Premium version for those who want access to more advanced tools. Upgrading unlocks additional features such as optimization for multiple focus keywords, internal linking suggestions, and more advanced content analysis.
Premium users can also access specialized add-ons like Local SEO, Video SEO, and News SEO, which are designed for websites with specific SEO needs. On top of that, Yoast SEO Premium includes AI-powered optimization suggestions, Instant Indexing capabilities, and several other productivity features that can help streamline your SEO workflow and potentially improve your search performance even further.
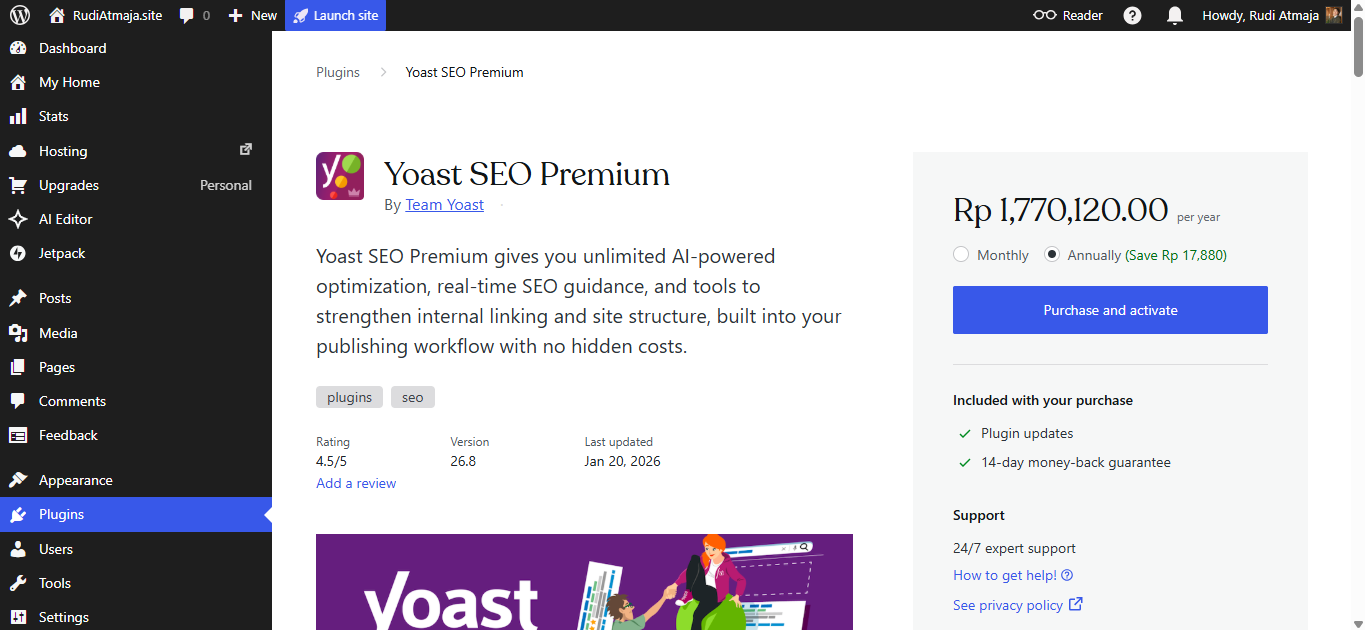
One more thing worth mentioning before we begin: if you decide that the free version of Yoast SEO no longer meets your needs, upgrading is surprisingly easy. You can purchase and activate Yoast SEO Premium directly from your WordPress.com dashboard without going through a separate installation process.
Doing it this way keeps everything under one roof. The plugin is automatically connected to your WordPress.com site, setup is simpler, updates are handled more smoothly, and your billing is managed from a single place. For many site owners, that convenience alone can make the upgrade process much less of a hassle.
Of course, there’s no need to rush into a paid plan right away. The free version already includes everything most websites need to build a solid SEO foundation and start improving their visibility in search results.
With that out of the way, let’s jump in and start optimizing your WordPress.com site’s SEO.
1. Install and Activate the Yoast SEO Plugin
To get started, you’ll first need to install and activate the Yoast SEO plugin on your WordPress.com website. This plugin will provide the SEO tools and settings you’ll use throughout the rest of this guide. Once it’s installed and activated, you’ll be ready to begin optimizing your site for better visibility in search engines.
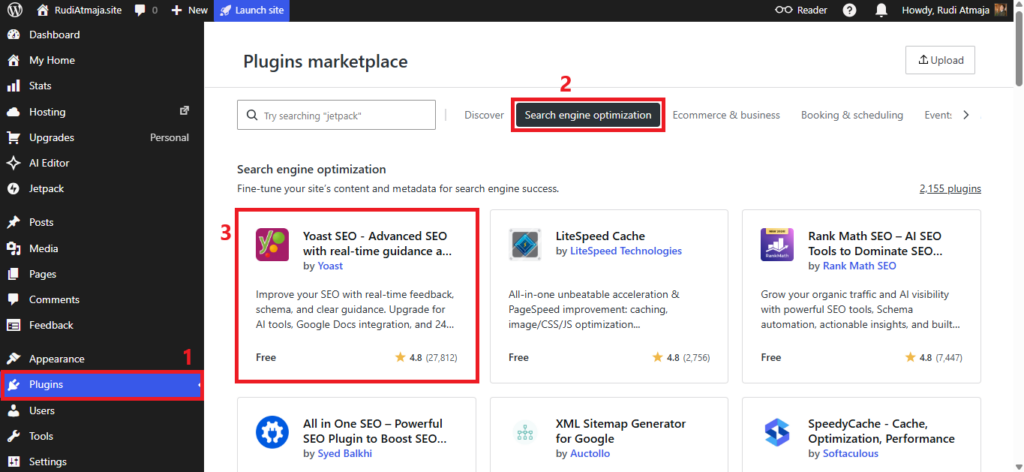
Once you’ve logged in to your WordPress.com dashboard, click on the Plugins menu in the sidebar. This will take you to the Plugins Marketplace, where you can browse and install plugins for your website. From there, open the Search Engine Optimization tab. You should quickly find the Yoast SEO Free plugin listed among the available options. Simply click on the Yoast SEO Free plugin card to open its details page and continue with the installation process.
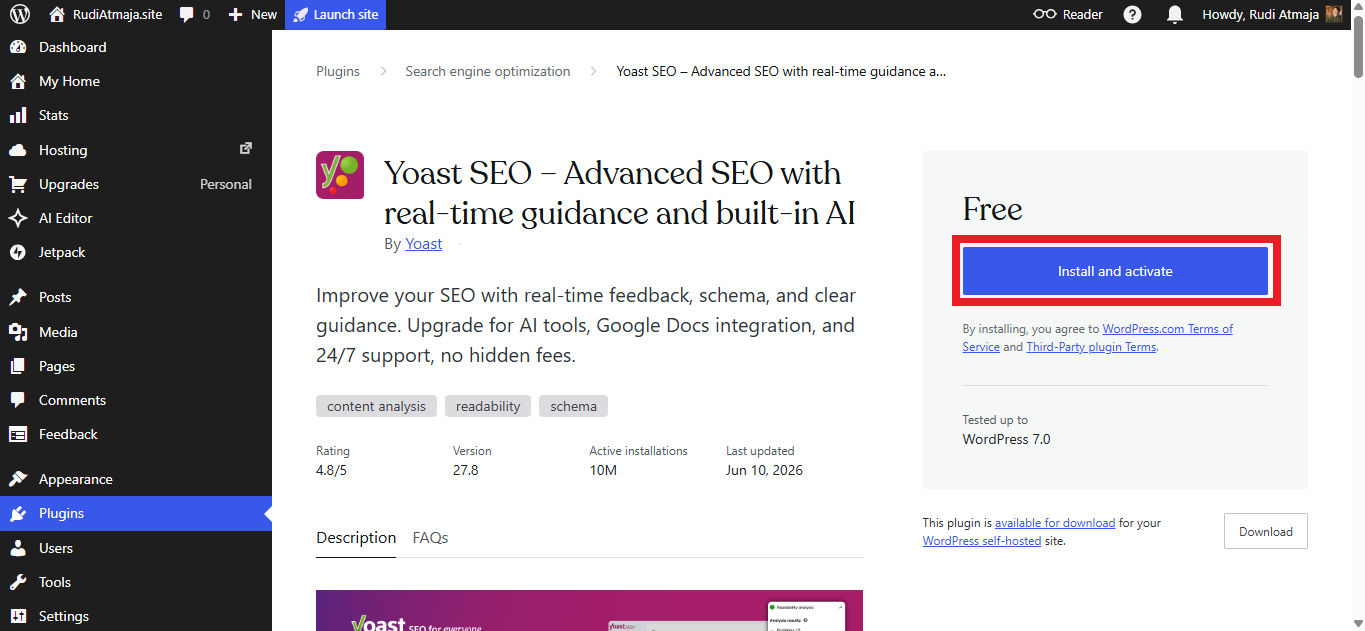
Once you’ve opened the Yoast SEO plugin page, click the Install & Activate button. WordPress.com will then handle the installation and activation process for you automatically. Depending on your connection and site configuration, this may take a few moments.
After the process is complete, Yoast SEO will be active on your website and ready to use.
2. Change Your Permalink Structure
Now that Yoast SEO has been activated, your site can take advantage of additional SEO-related features, including the ability to customize your permalink structure.
By default, WordPress.com uses the Day and Name permalink format, which creates URLs that look something like this:
yourwebsite.com/2026/06/21/sample-post/
While this format works perfectly fine, it’s not always the most SEO-friendly option. The extra date information makes URLs longer and can make older content appear outdated, even when the information is still relevant.
To create cleaner, shorter, and more search-engine-friendly URLs, we’ll change the default permalink structure in the next step. This simple adjustment can make your links easier to read, easier to share, and potentially more effective in search results.
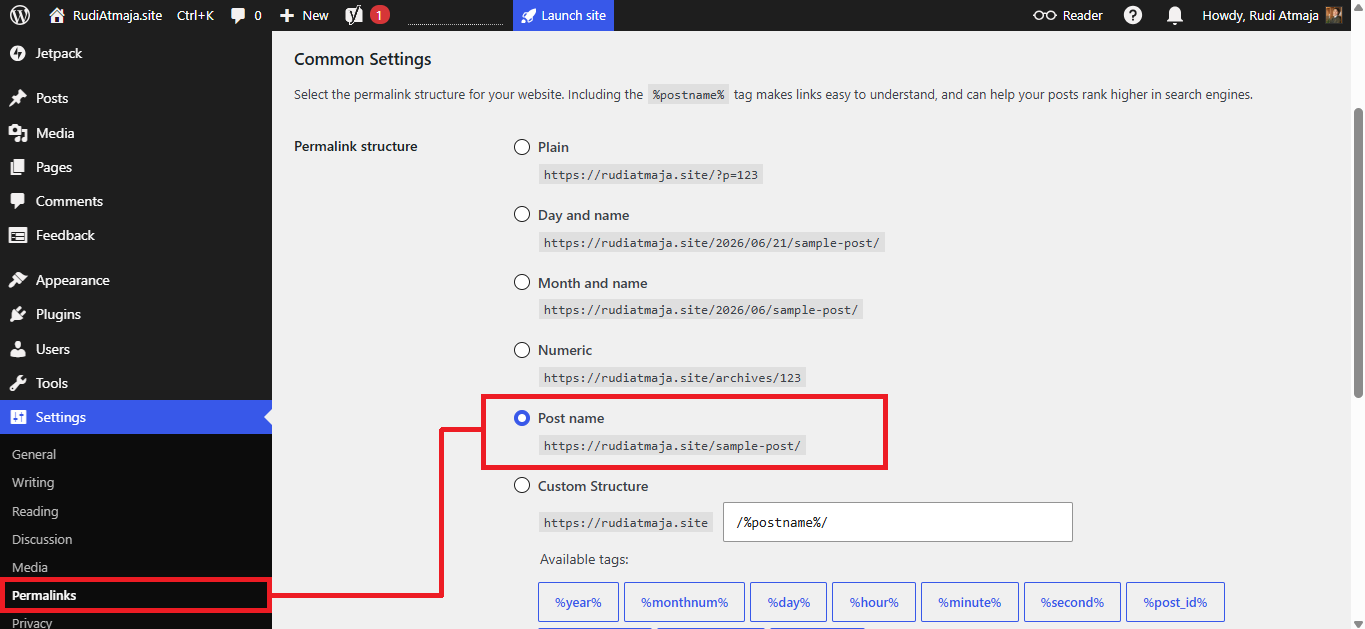
To make this change, navigate to Settings → Permalinks from your WordPress.com dashboard. On the Permalinks page, select the Post Name option.
This setting creates cleaner URLs that include only your post title, resulting in links that are shorter, easier to read, and more memorable. For example, instead of a URL like:
yourwebsite.com/2026/06/21/sample-post/
your post URL would simply become:
yourwebsite.com/sample-post/
Once you’ve selected Post Name, click the Save Changes button to apply the new permalink structure to your website. From this point forward, any new content you publish will use the updated URL format.
3. Yoast SEO First Configuration
Now that you’ve updated your permalink structure, it’s time to complete the initial setup of Yoast SEO. This process helps configure the plugin correctly and ensures that your website is ready for search engines from the start.
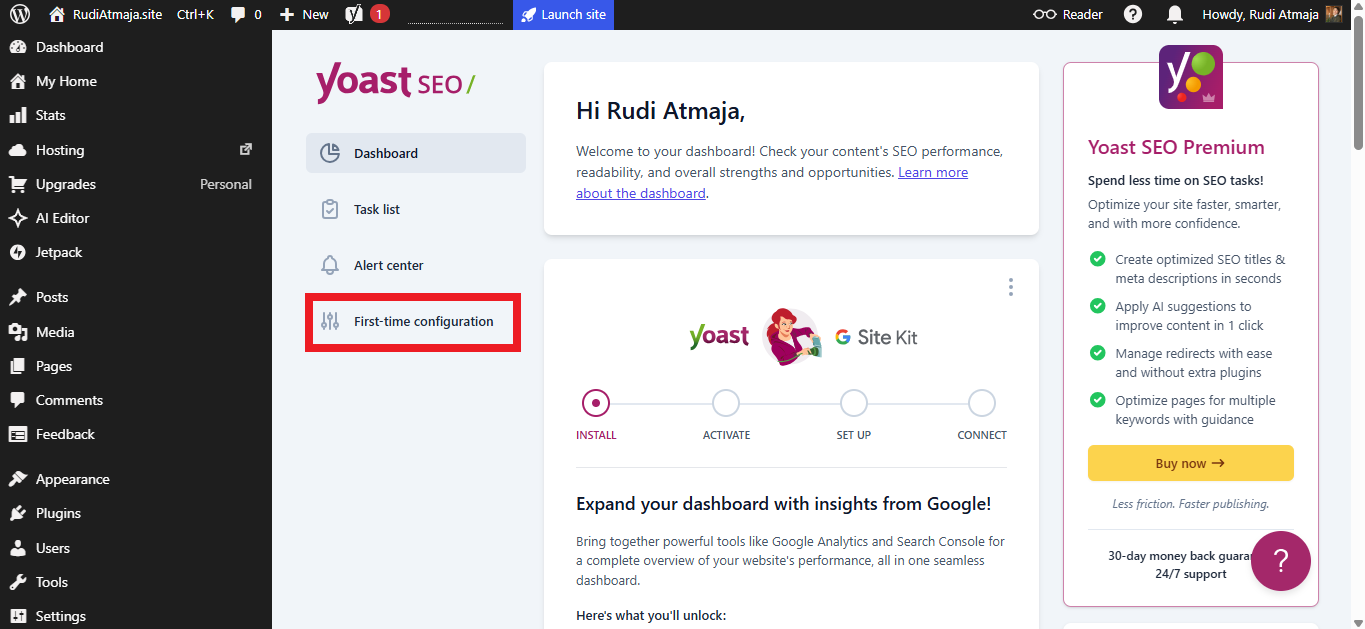
To begin, navigate to Yoast SEO → General in your WordPress.com dashboard. Once you’re on the General settings page, open the First-time Configuration tab.
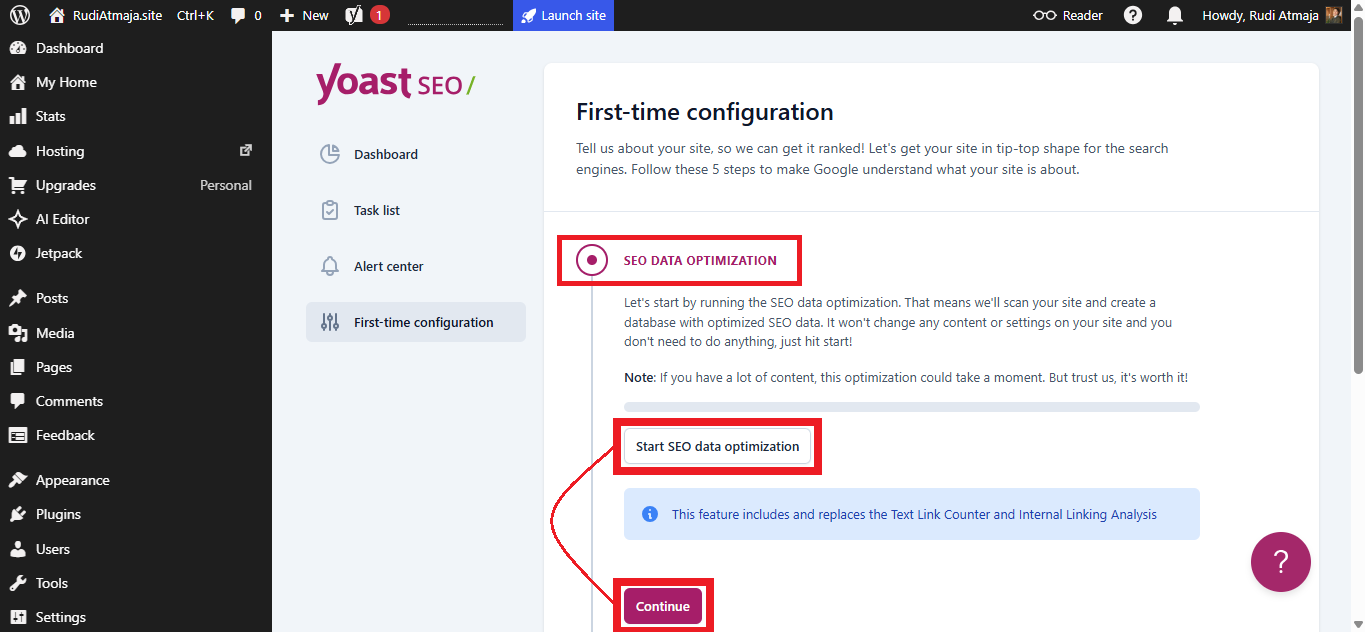
In the First-time Configuration section, you will find the SEO Data Optimization feature. This feature allows Yoast SEO to scan your website and create a database with optimized SEO data. This process will not modify any content or settings on your site, and no action is required from you. Therefore, click the “Start SEO Data Optimization” button. Please wait until the optimization process is complete, and then click the “Continue” button to proceed.
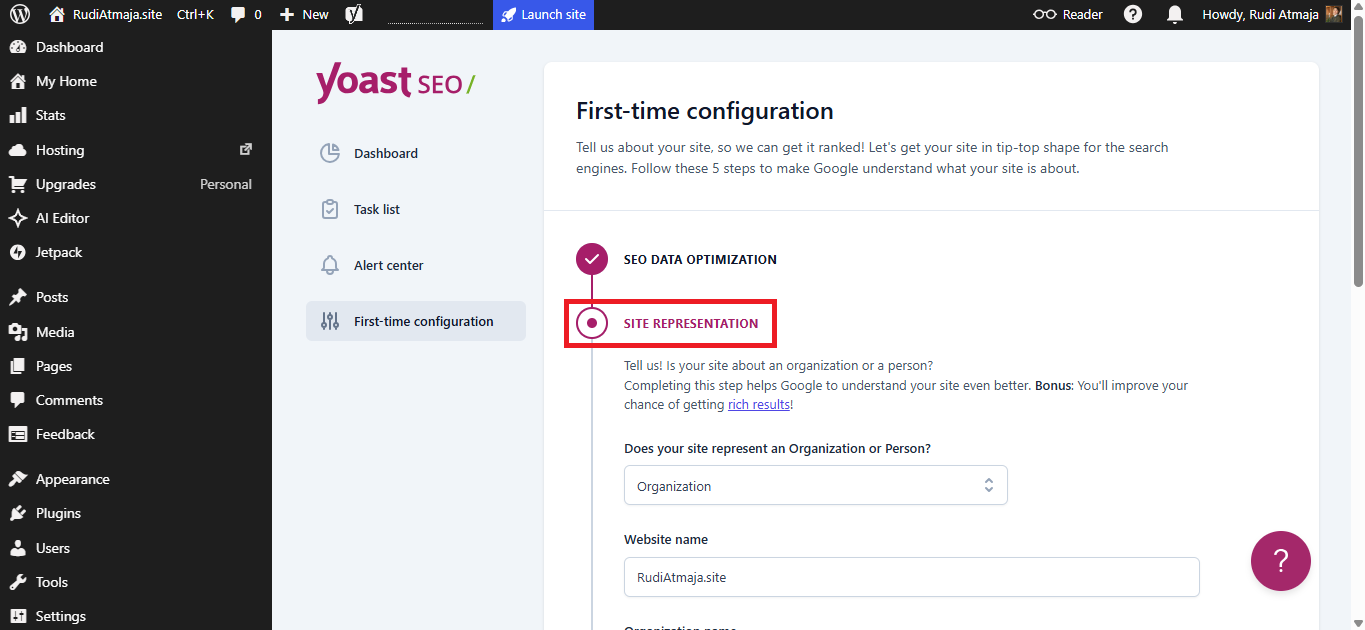
Next is Site Representation. Here, fill out all the fields with information that accurately represents your website. Completing this step will help Google better understand your site. In addition, it can increase your chances of earning rich results in search engines. Once you have finished, click the “Save and Continue” button to proceed.
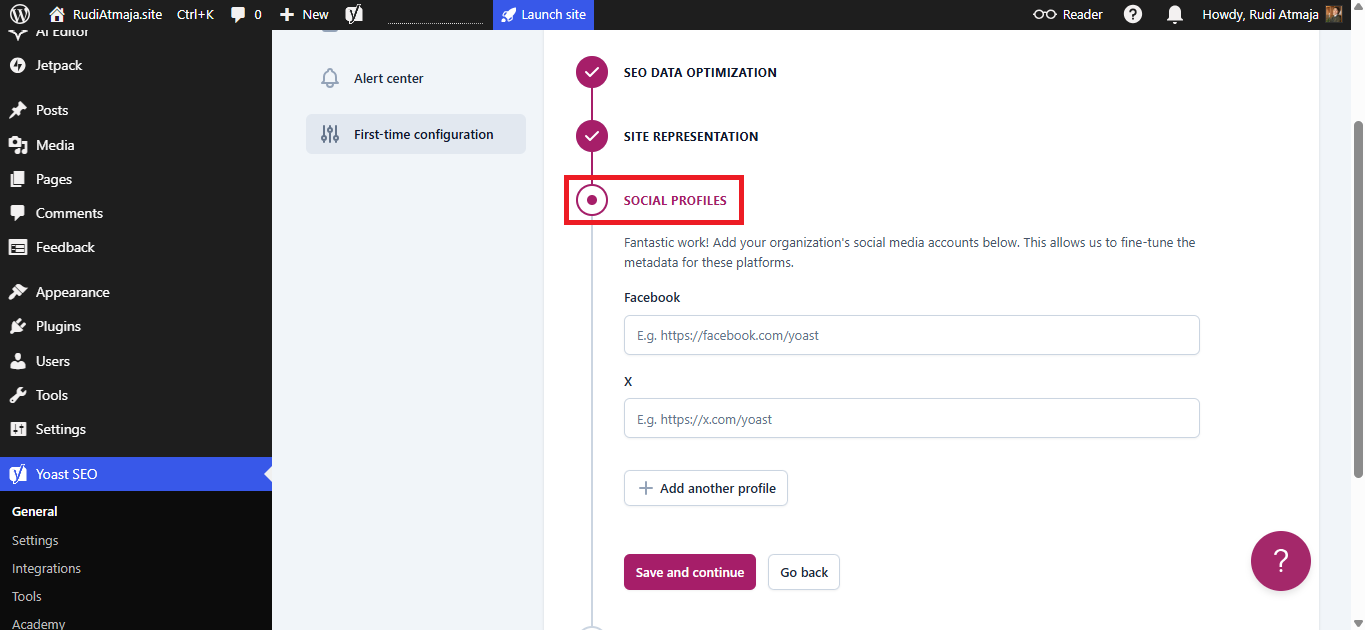
Next, you’ll see Social Profiles. Here, enter the URLs of your social media profiles, such as Facebook and X. You can also add additional social media profile URLs by clicking the “Add another profile” button. Once you have filled in all the information, click the “Save and Continue” button.
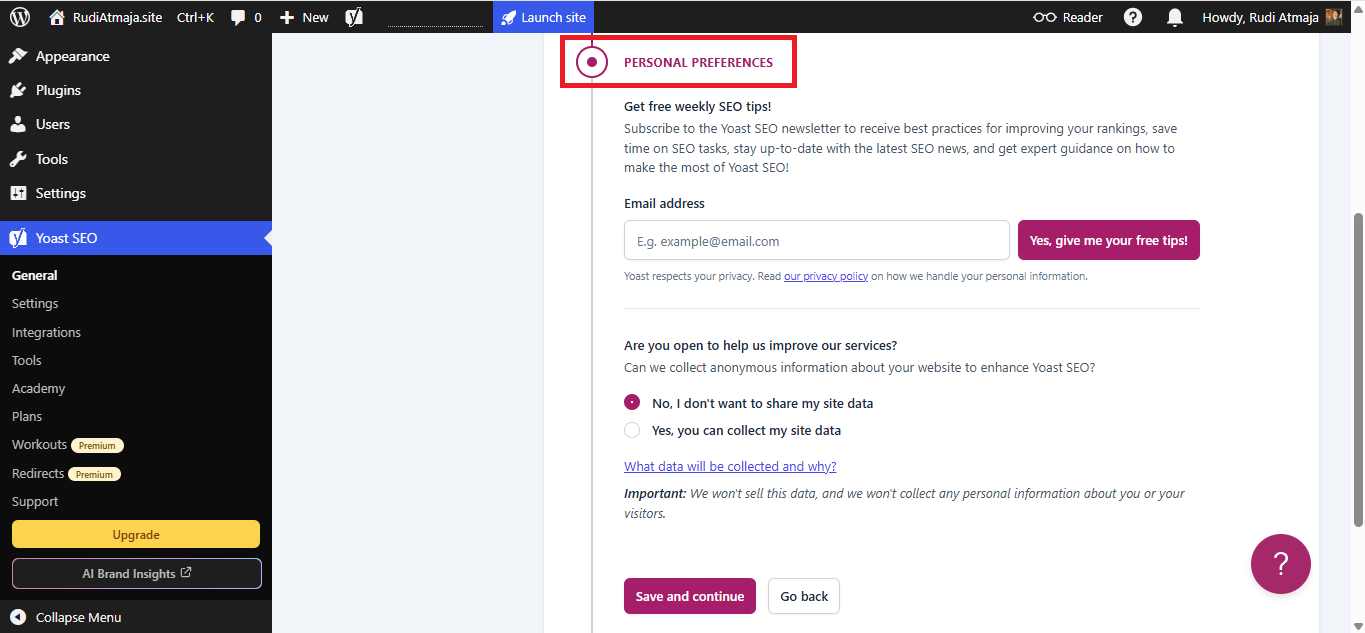
The next section is Personal Preferences. Here, you can sign up to receive free tips from Yoast SEO by entering your email address in the Email Address field. You also have the option to allow Yoast to collect anonymous information about how you use the plugin to help improve it in future updates by selecting “Yes, you can collect my site data.”
However, it’s important to note that whatever choice you make here will not affect your experience with the plugin. Therefore, you can simply proceed by clicking the “Save and Continue” button.
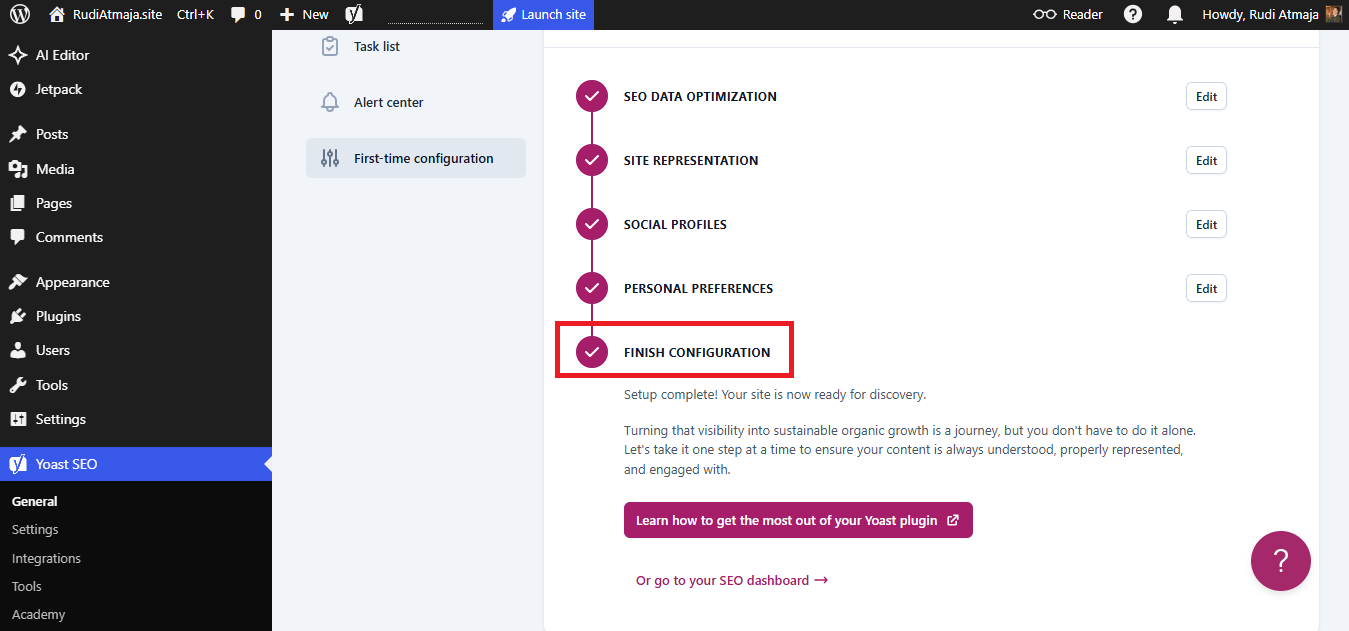
You have now completed the Yoast SEO first-time configuration process.
4. Set Up Category Meta Titles and Meta Descriptions
Before configuring these settings, it helps to understand what meta titles and meta descriptions are and why they matter. A meta title is the headline that typically appears in Google search results. Its purpose is to tell both search engines and potential visitors what a page is about. A meta description is the short summary displayed beneath the title in search results. Although it is not a direct ranking factor, a well-written meta description can encourage more people to click through to your website.
For many websites, creating meta titles and meta descriptions for every category page individually can be time-consuming. Fortunately, if your blog focuses on a specific topic, you can often create templates that automatically generate optimized metadata for all category pages.
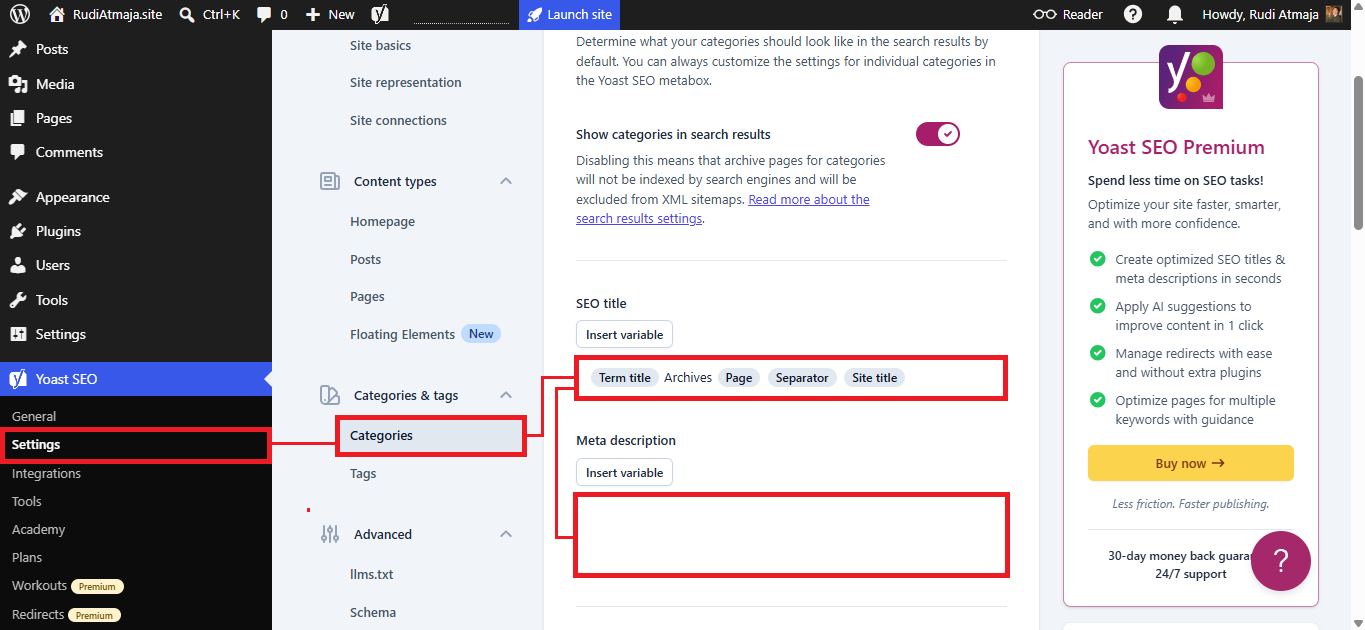
To configure category metadata, navigate to Yoast SEO > Settings. Once you’re on the Settings page, click the Categories & Tags tab and then select Categories. There, you’ll find fields for both SEO Title and Meta Description.
The SEO Title field determines the title search engines may display for your category pages. Rather than entering a fixed title, you can create a dynamic template using variables. To add a variable, click the Insert Variable button within the SEO Title field. A simple approach is to include the category name and your website name so that each category automatically receives a unique title while maintaining a consistent structure throughout your site.
The Meta Description field works in a similar way. By clicking the Insert Variable button above the Meta Description box, you can insert variables that automatically adapt the description to the category being displayed. Your goal should be to create a concise summary that explains the type of content visitors can expect to find within that category. This helps both search engines and readers better understand the page before they visit it.
When writing meta titles and meta descriptions, focus on clarity rather than trying to squeeze in as many keywords as possible. Describe the category accurately, write naturally, and make sure the text would still make sense to a real person reading it in search results. Search engines are increasingly focused on relevance and user experience, so clear and helpful descriptions are generally more effective than overly optimized ones.
Once you have finished configuring the SEO Title and Meta Description templates, save your changes. Yoast SEO will then automatically generate metadata for all of your category pages using the templates you’ve created.
What if your blog covers multiple topics instead of focusing on a single niche?
For example, your website may contain categories related to travel, shopping, technology, lifestyle, and other subjects. In that case, using a single category template may not always produce the most relevant meta titles and meta descriptions for every category.
Fortunately, Yoast SEO allows you to customize the metadata for each category individually. This approach gives you greater control and lets you create more targeted SEO titles and descriptions based on the specific topic of each category.
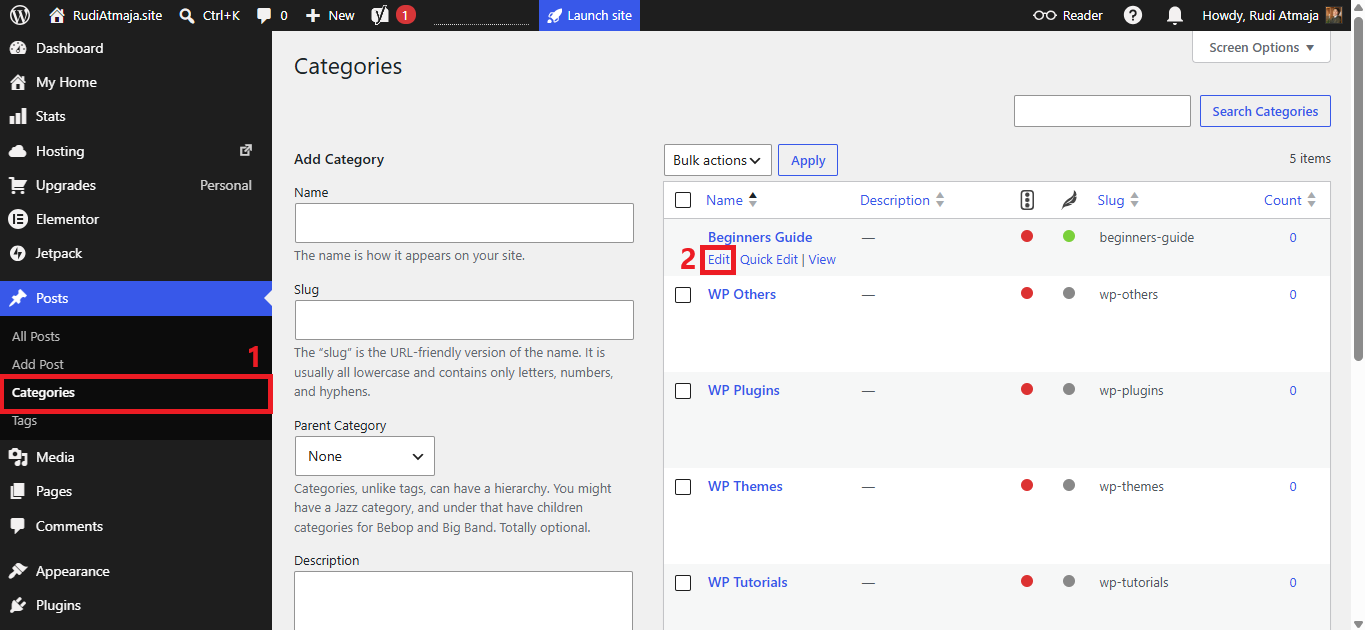
To do this, navigate to Posts > Categories in your WordPress dashboard. Next, locate the category you want to optimize and click the Edit option.
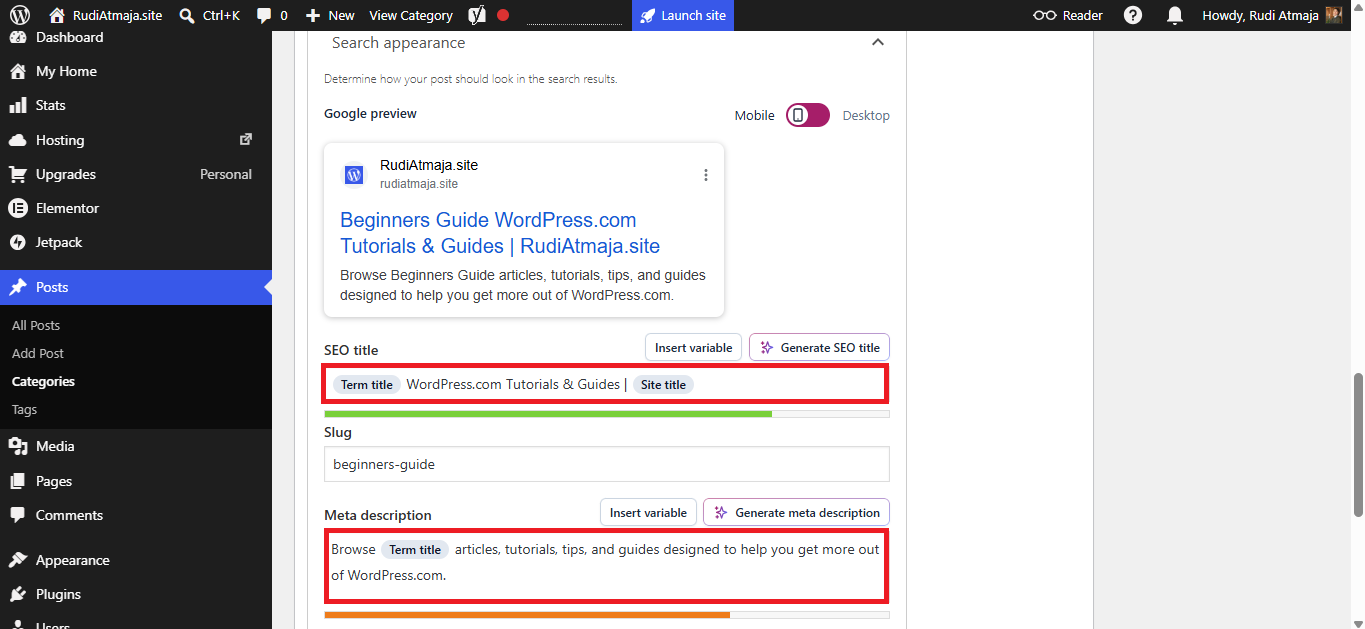
On the category editing page, scroll down until you find the Yoast SEO section. Within this area, open the Search Appearance settings. Here, you can create a custom SEO Title and Meta Description specifically for that category.
You can also use variables by clicking the Insert Variable button, allowing Yoast SEO to automatically insert dynamic information where appropriate. This can help you create more flexible metadata while still maintaining a consistent structure across your website.
Once you have finished configuring the SEO Title and Meta Description for the category, click the Save Changes button. You can then repeat the same process for your other categories, ensuring that each one has metadata that accurately reflects its unique topic and content.
5. Exclude Unnecessary Content from Your Sitemap
Not every type of content on your website needs to be indexed by search engines. Depending on the theme and plugins you’re using, WordPress may create additional content types that provide functionality for your site but offer little or no value in search results.
Allowing these pages to be indexed can clutter your sitemap and make it harder for search engines to focus on the content that actually matters, such as your blog posts, pages, and other important resources. For this reason, it’s a good idea to review the content types detected by Yoast SEO and exclude any that don’t need to appear in search results.
To do this, navigate to Yoast SEO > Settings. Once there, review the various content types listed within the settings area. Depending on your theme and installed plugins, the available content types may differ from one website to another.
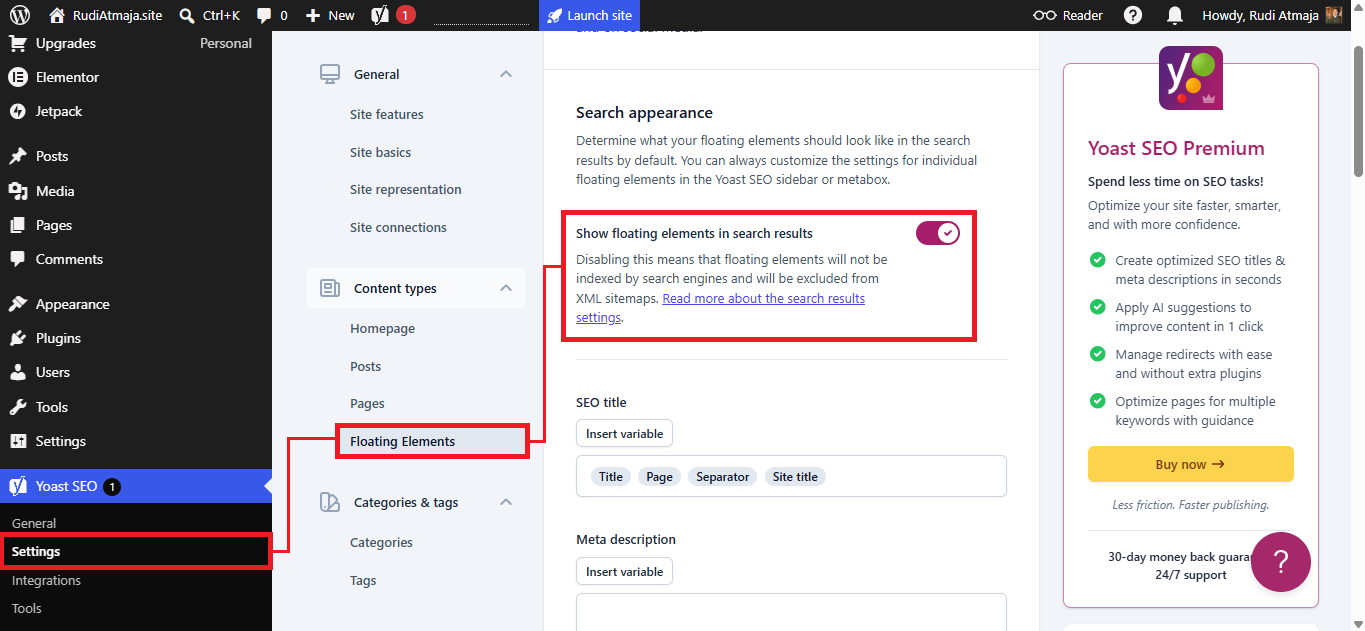
In my case, Yoast SEO detected a content type called Floating Elements, which was created by my website’s theme. Since these elements are intended to support the site’s design and functionality rather than provide standalone content for visitors, there is no reason for them to be indexed by search engines.
To exclude this content type from search results and the sitemap, click on the relevant content type and disable the Show <content type> in search results option. After making the change, save your settings.
It’s worth taking a few minutes to review all detected content types on your website. If you come across content that doesn’t provide value as a standalone page, consider excluding it from search results. Doing so can help keep your sitemap cleaner and ensure that search engines spend more attention on the pages that matter most.
6. Optimize SEO for Individual Posts
Now let’s move on to optimizing the SEO of individual blog posts. While the category settings you configured earlier help optimize category archive pages, each post still needs its own SEO optimization to maximize its visibility in search engines.
When editing a post, click the Yoast SEO icon located in the upper-right corner of the editor. This will open the Yoast SEO sidebar, where you’ll find several tools for optimizing your content.

One of the first settings you’ll see is the Focus Keyphrase field. Here, enter the primary keyword or phrase you want the post to rank for in search engines. This should represent the main topic of your article and ideally match the search terms your target audience is likely to use.
As mentioned earlier, the free version of Yoast SEO allows you to optimize a post for only one focus keyphrase. This means Yoast’s analysis will evaluate your content based on a single target keyword and provide recommendations accordingly.
If you upgrade to Yoast SEO Premium, you’ll be able to optimize a post for multiple keyphrases instead of just one. This can be particularly useful when an article naturally targets several closely related search terms. Rather than focusing exclusively on a single keyword, Premium allows you to evaluate how well your content addresses multiple keyword variations and related phrases. This can help you capture a wider range of search traffic while still keeping your content focused on a specific topic.
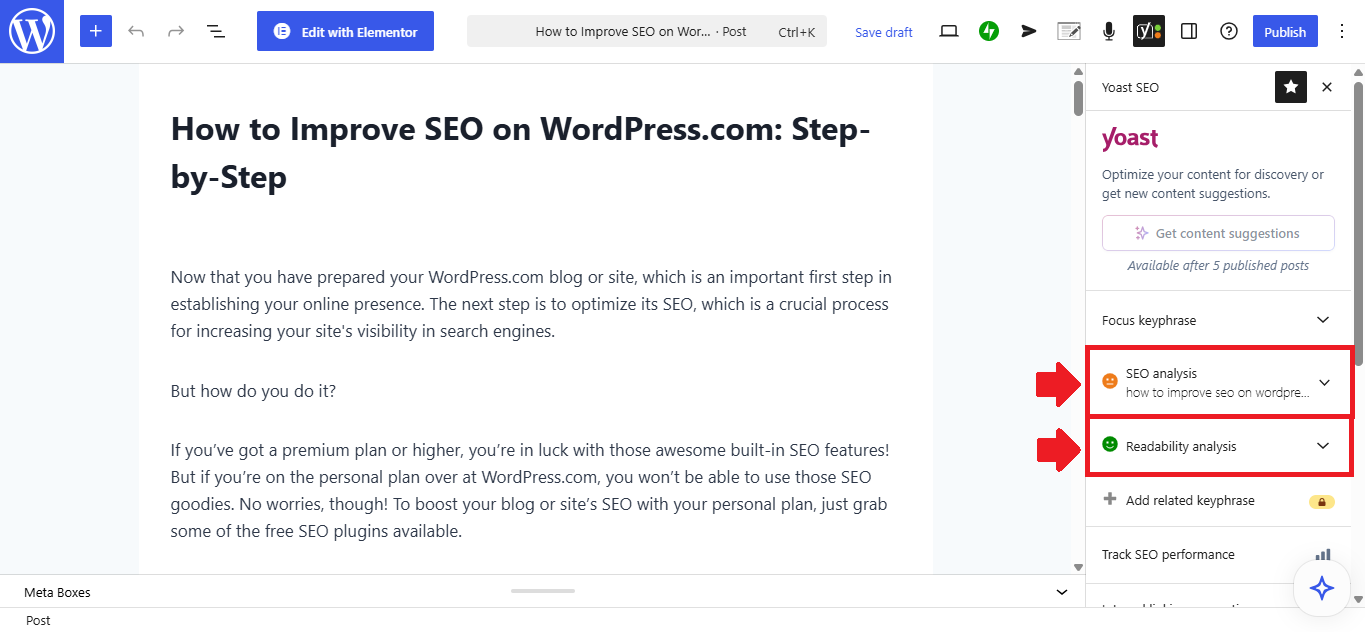
Below the Focus Keyphrase field, you’ll find the SEO Analysis section. This area provides recommendations designed to improve the SEO performance of your article. Yoast reviews factors such as keyword usage, title optimization, internal links, image attributes, content length, and various other SEO signals. As you make improvements, Yoast updates its analysis and displays indicators that help you identify areas that may still need attention.
You’ll also see the Readability Analysis section. While SEO helps search engines understand your content, readability helps human visitors understand it. This analysis evaluates factors such as sentence length, paragraph structure, transition words, passive voice usage, and overall reading flow. Articles that are easier to read often provide a better user experience, which can indirectly support your SEO efforts.
Further down the panel, you’ll find Search Appearance. Click this section to configure the SEO Title and Meta Description for the individual post.
Unlike category pages, post pages should not typically rely on a single template for all metadata. Every article covers a different subject, targets different keywords, and serves a different search intent. Because of this, each post deserves a unique meta title and meta description that accurately reflect its specific content.
For example, a category page may contain dozens or even hundreds of articles related to a broad topic, making a reusable template practical. An individual post, however, usually focuses on a specific question, tutorial, review, guide, or discussion. Writing a custom SEO title and meta description for each article allows you to highlight its unique value, improve relevance for the target keyword, and create a more compelling search result that encourages users to click.
When creating a post’s SEO title, make sure it clearly communicates the topic of the article and naturally includes the primary keyword when appropriate. For the meta description, summarize what readers will learn or gain from the content while giving them a reason to visit the page. Think of the title as the headline that attracts attention and the meta description as the short pitch that convinces someone to click.
Ready to start your own blog? With WordPress.com, you can get started on the Personal plan and even receive a free domain name for the first year. While the Personal plan doesn’t include WordPress.com’s built-in SEO features, you can still install powerful SEO plugins such as Yoast SEO and many other alternatives to optimize your content for search engines. As an added bonus, if you purchase any WordPress.com plan through my affiliate link, I’ll personally help you build your blog from the ground up and guide you through the SEO optimization process at no additional cost. Whether you need help with setup, configuration, customization, or SEO, I’ll be available to help you get everything up and running.
>>> Get Started Today <<<
7. Launch Your Site
Before your blog can appear in search engine results, it must be publicly accessible. Even if you’ve configured your SEO settings perfectly, search engines won’t be able to index your content if your website is still set to private or has not been launched yet.
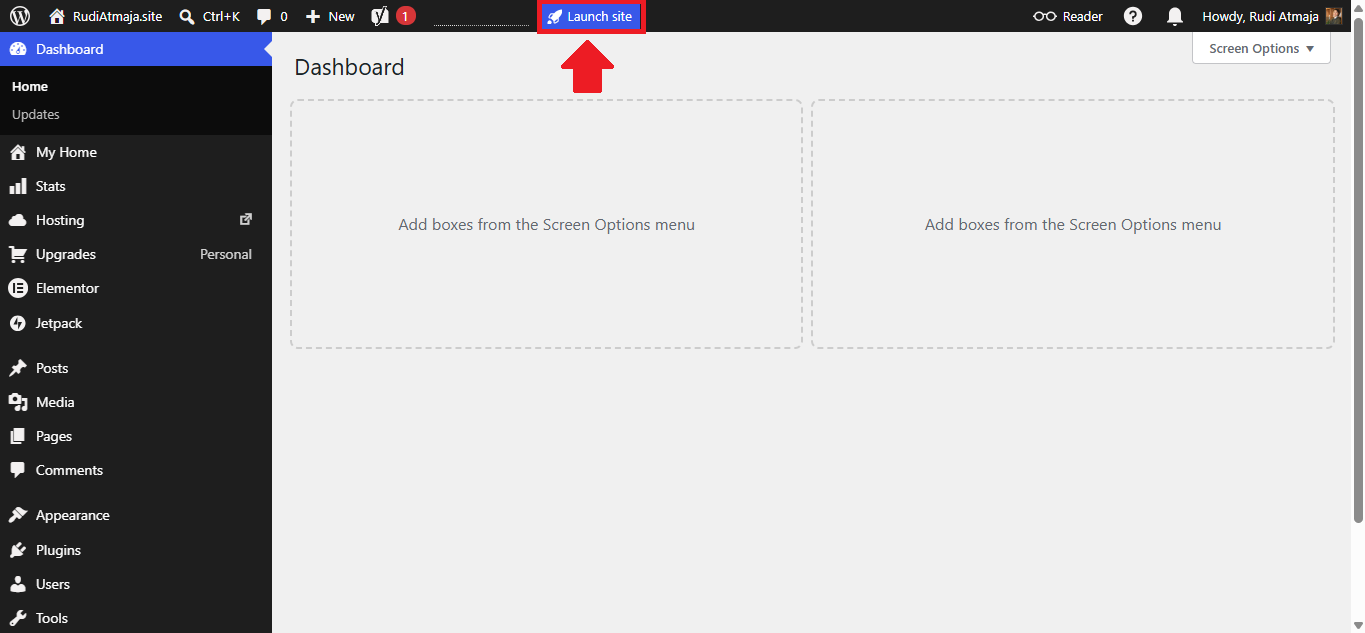
To check this, look for the Launch Site button in the top bar of your WordPress.com dashboard. If the button is available, click it and follow the prompts to make your website publicly accessible. Once your site has been launched, search engines will be able to discover and index your content.
After launching your site, you’ll be ready to move on to the next step: submitting your website to Google so it can be crawled and indexed more efficiently.
If you don’t see a Launch Site button anywhere in your dashboard, there’s usually no need to worry. In most cases, this means your website has already been launched and is publicly accessible. You can simply proceed to the next stage of the SEO setup process without making any additional changes.
8. Submit Your Sitemap to Google
Once your website is public, the next step is to let Google know that your site exists. While Google can eventually discover your website on its own, submitting your sitemap directly through Google Search Console can help speed up the discovery and indexing process.
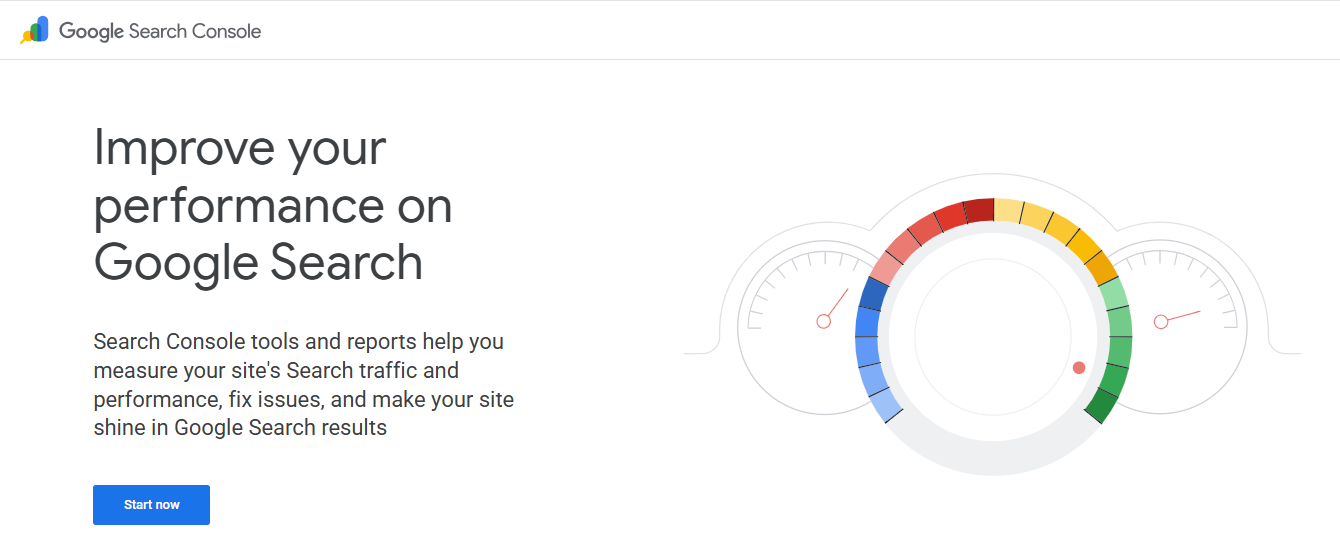
To get started, open a new browser tab and visit https://search.google.com/search-console/about. On that page, click the Start Now button. You will then be prompted to sign in with your Google account.
After signing in, you’ll be presented with two property types: Domain and URL Prefix. If your WordPress.com website does not have multiple subdomains that need to be indexed, select the URL Prefix option.
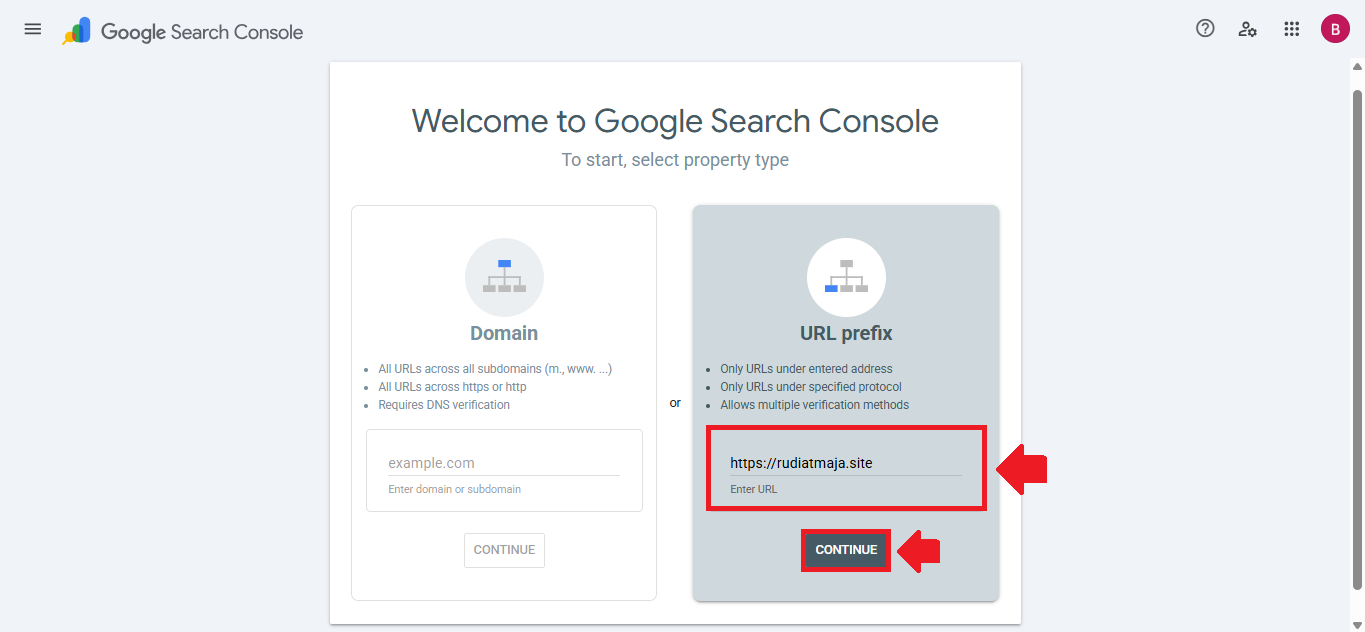
In the URL Prefix field, enter the full address of your website, including the protocol. For example, if your domain is yourdomain.com, enter it as https://yourdomain.com. Make sure the URL matches the exact address visitors use to access your website. Once you’ve entered your website address, click the Continue button to proceed to the verification step.

Next, you will need to verify ownership of your domain. To do this, click on the HTML Tag tab under Other verification methods. Then click the Copy button to copy the verification code.
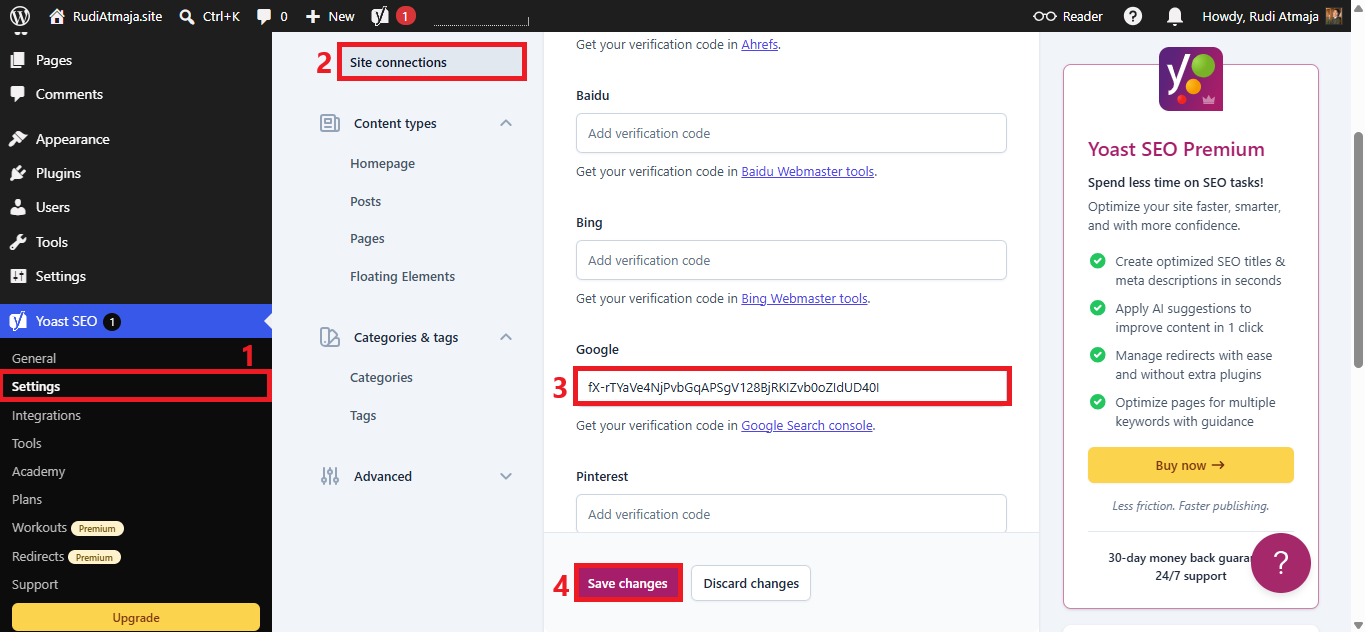
After that, return to your WordPress.com dashboard in your browser. Go to Yoast SEO > Settings, then under the General tab, open Site Connections. Paste the copied code into the Google field, and then click the Save Changes button.
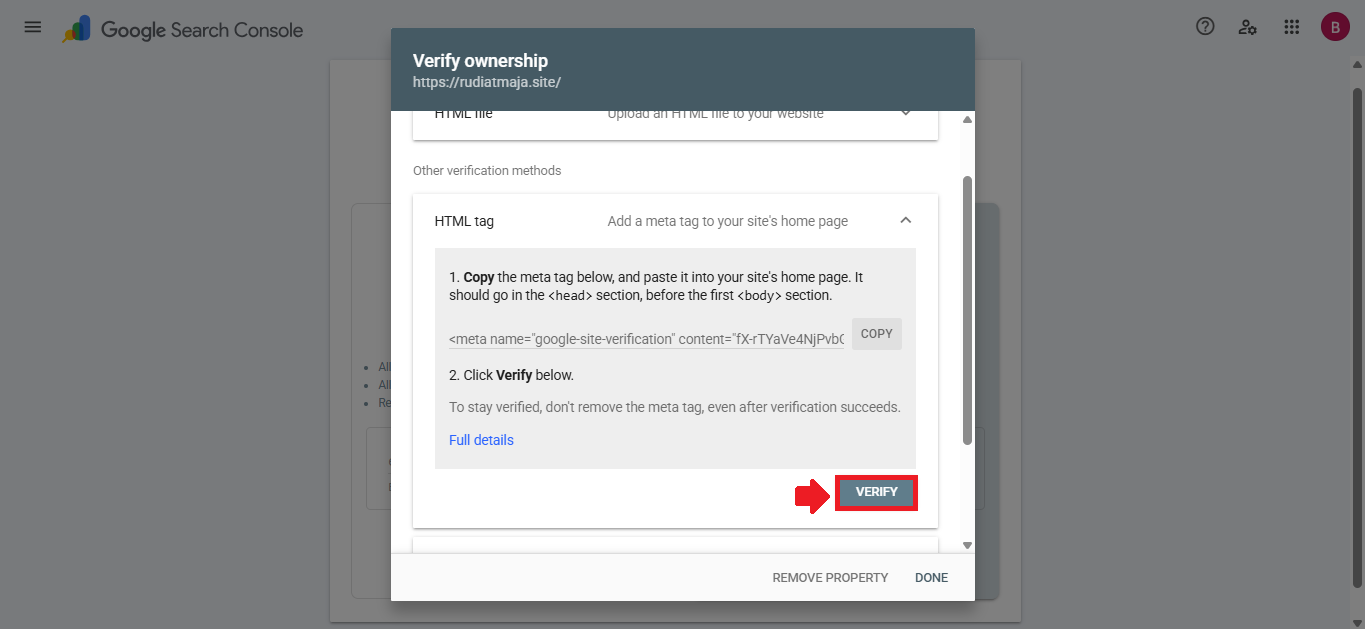
After that, go back to your Google Search Console tab. There, click the “Verify” button located under the HTML tag section to complete the verification process.
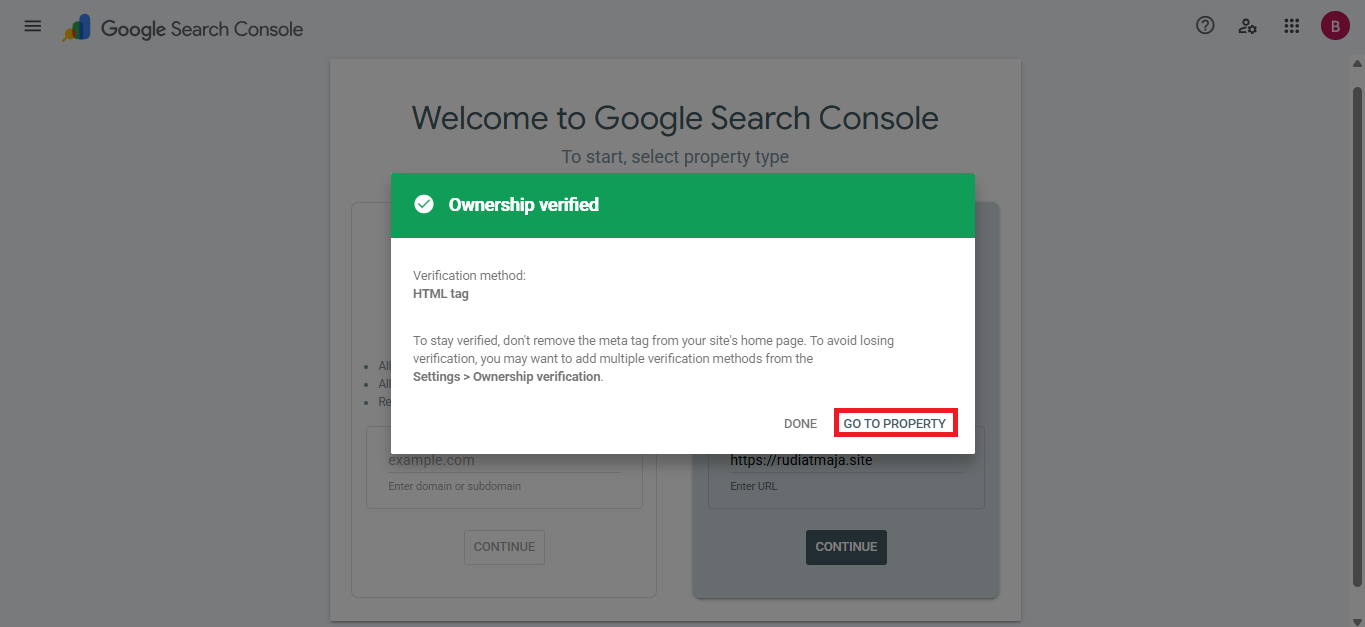
After your domain ownership has been successfully verified, click the “Go to Property” option.
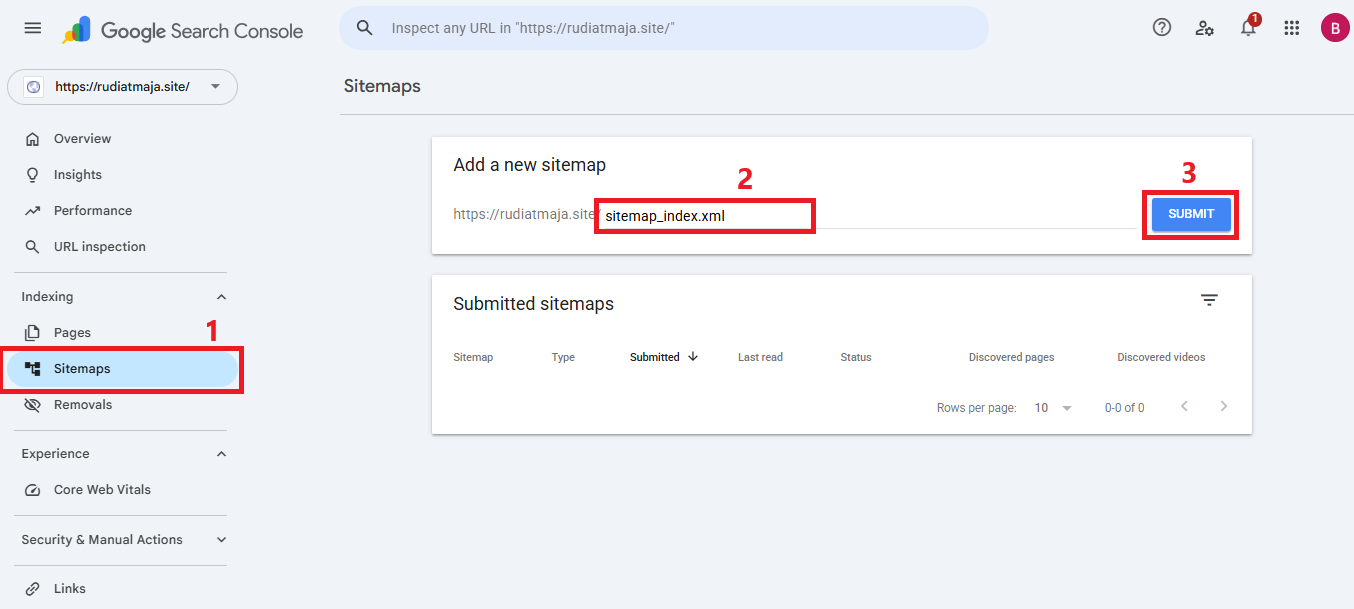
Next, click on the Sitemaps menu and enter sitemap_index.xml in the Add a new sitemap field, then click the Submit button.
If your blog already has content such as posts, pages, and post categories, you can also add post-sitemap.xml, page-sitemap.xml, and category-sitemap.xml one by one in the same section.
After this, you can continue writing blog posts on your WordPress.com site as usual, and don’t forget to optimize their SEO using the same steps explained in stage 6. You can also optimize your pages in exactly the same way to improve their visibility in search engines.
Final Thoughts
Optimizing SEO on WordPress.com may seem technical at first, but once you understand the basic structure, it becomes a straightforward process you can apply consistently to every part of your website. From configuring Yoast SEO and setting up permalinks to managing categories, posts, and sitemaps, each step plays an important role in helping search engines understand and rank your content properly.
The key is consistency. When you apply SEO settings across your site in a structured way, you create a strong foundation that makes it easier for your content to appear in search results over time. You don’t need to master everything at once—what matters most is building good habits and applying optimization step by step as you publish new content.
With everything set up, your WordPress.com site is now ready to grow. Keep publishing useful content, continue refining your SEO practices, and your blog will gradually become more visible, more discoverable, and more effective at reaching the audience you want.