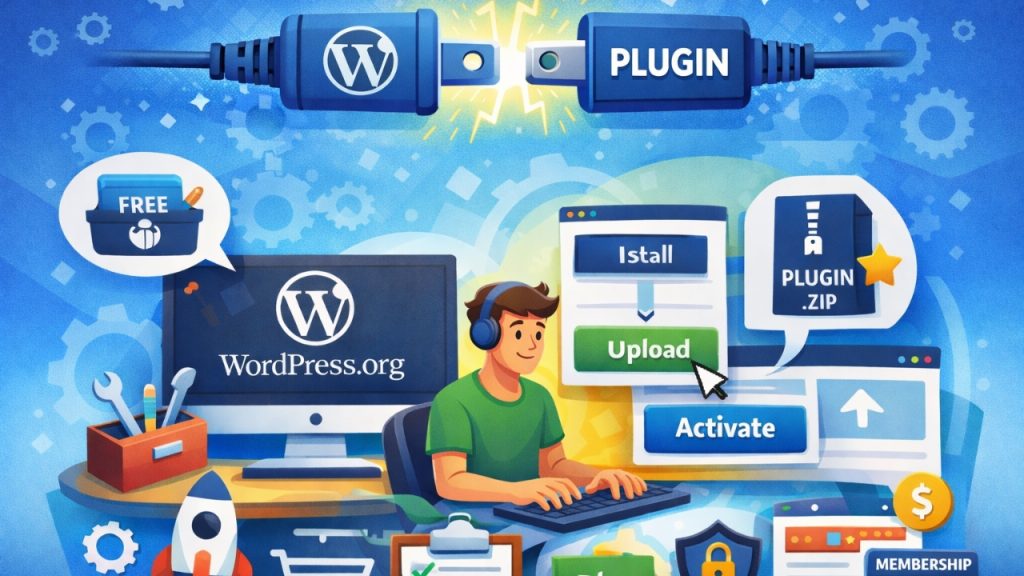
If you’re building a website with WordPress, chances are you’ll eventually need to install a plugin. Plugins are what make WordPress so powerful – they let you add new features without touching a single line of code. Whether you want better SEO, stronger security, contact forms, or page builders, there’s almost always a plugin that can help you get the job done faster and easier.
In this guide, we’re going to walk through how to install a WordPress plugin using two easy methods that anyone can follow. You don’t need to be a developer or have technical experience. As long as you can log in to your WordPress dashboard, you’re already halfway there. By the end of this article, you’ll feel confident installing plugins on your own site.
Before we go any further, it’s important to clarify something. The WordPress we’re talking about here is WordPress.org, not WordPress.com. With WordPress.org, you have full control over your website, including the ability to install and customize plugins freely. WordPress.com, on the other hand, has limitations depending on your plan, and plugin installation isn’t always available. So make sure you’re using the self-hosted version from WordPress.org if you want to follow along.
If you’re still new to the platform and not entirely sure how WordPress works, you might want to check out our article “What is WordPress” first. It explains the basics of what WordPress is, how it powers websites, and why it’s one of the most popular content management systems in the world. Having that foundation will make everything in this guide much easier to understand.
One of the reasons WordPress.org is so popular is its massive plugin ecosystem. There are thousands of free plugins available directly from the official repository, plus countless premium plugins offered by third-party developers. This flexibility allows you to turn a simple website into an online store, membership site, portfolio, blog, or almost anything else you can imagine.
Installing a plugin might sound technical at first, but it’s actually a straightforward process. In most cases, it only takes a few clicks from your dashboard. And if you’re installing a premium plugin, there’s an equally simple method for uploading it manually. Once installed and activated, the plugin immediately adds its features to your site.
Now that you know what to expect and which version of WordPress we’re using, let’s dive into the two easy methods for installing a WordPress plugin. Follow along step by step, and you’ll have your plugin up and running in no time.
Read Also: WordPress Themes vs Plugins
Install a Free Plugin from the WordPress Repository
If you’re using self-hosted WordPress from WordPress.org, the easiest way to install a plugin is directly from the official WordPress Plugin Repository. This built-in feature allows you to browse, search, install, and activate free plugins without ever leaving your dashboard. It’s the fastest and most beginner-friendly method available.
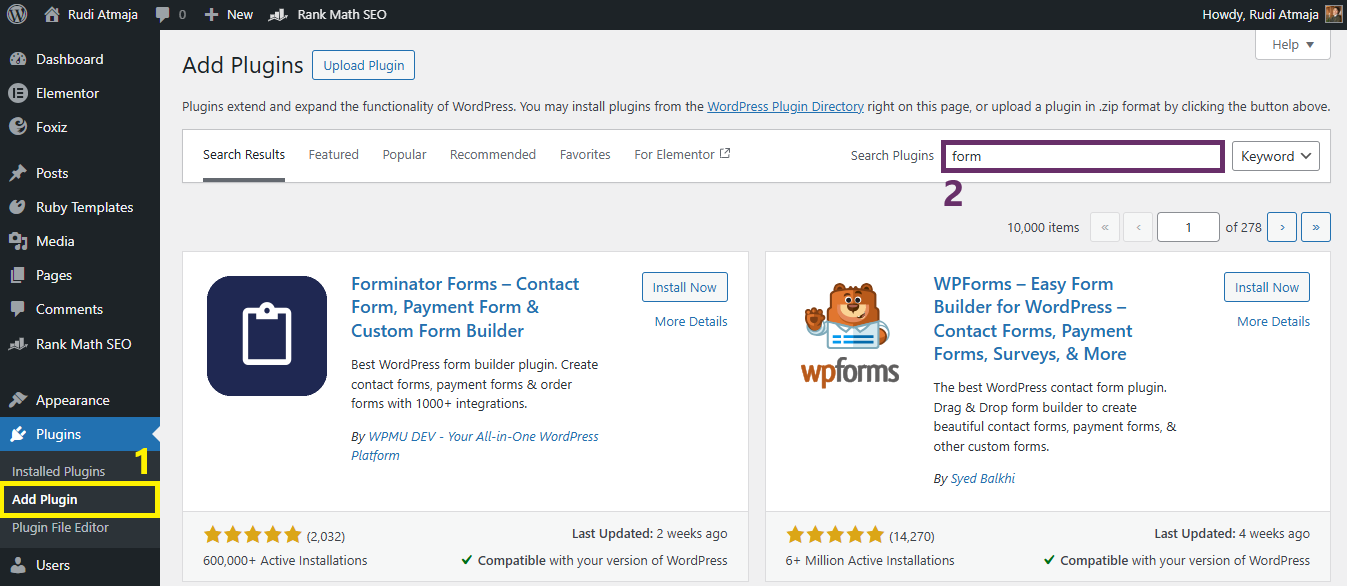
To get started, log in to your WordPress admin area. From the left-hand menu, go to Plugins and click Add Plugin. You’ll be taken to the plugin directory screen, where you can explore featured, popular, and recommended plugins. If you already know the name of the plugin you want, simply type it into the search bar in the top-right corner.
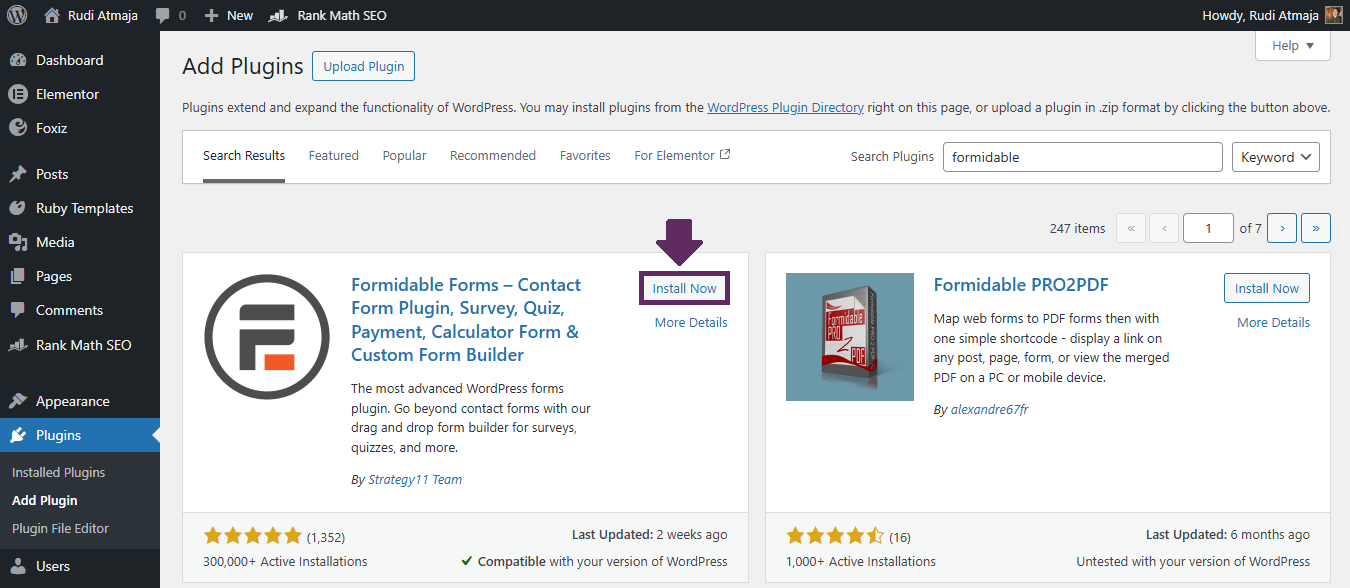
Once you find the plugin you’re looking for, click the Install Now button. WordPress will automatically download the plugin from the official repository and install it on your website. This process usually takes just a few seconds, depending on your internet connection and hosting speed.

After the installation is complete, the Install Now button will change to Activate. Click Activate to enable the plugin on your site. Keep in mind that installing a plugin doesn’t automatically turn it on—you need to activate it before it starts working.
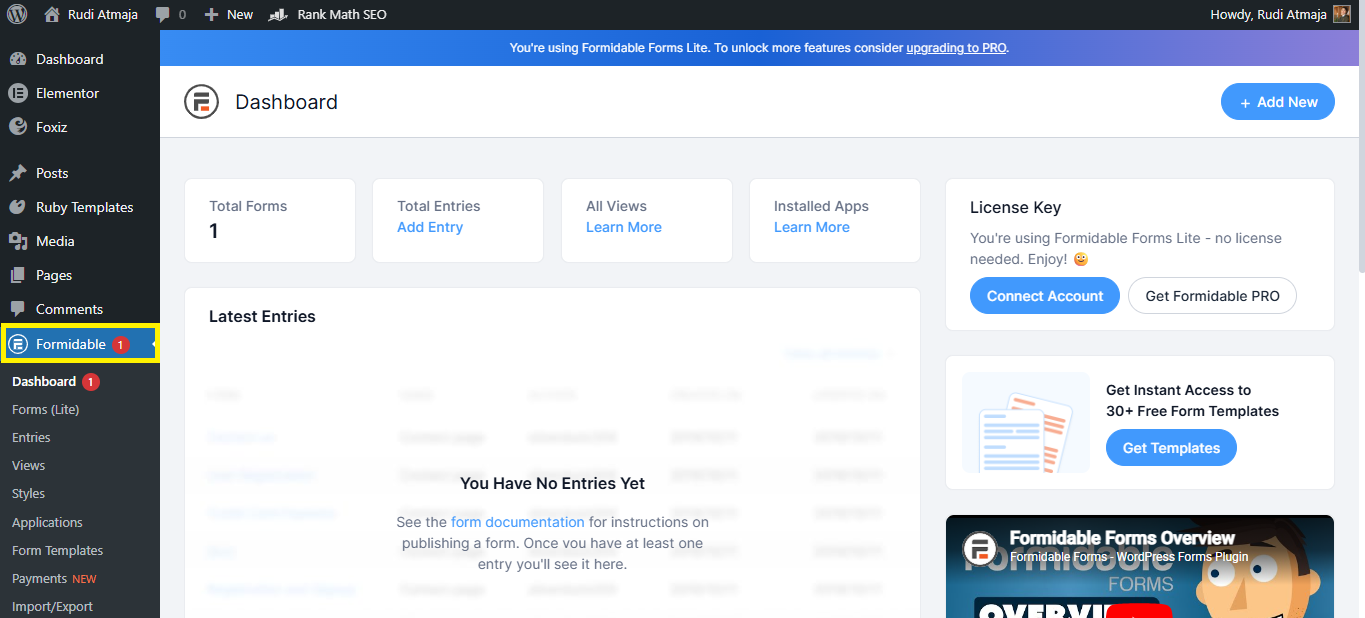
Once activated, most plugins will add a new menu item to your dashboard or appear under the Settings menu. From there, you can configure the plugin according to your needs. Some plugins work immediately with little to no setup, while others may require additional configuration.
That’s it. Installing a free plugin from the official repository is quick, safe, and straightforward. Since these plugins are hosted on WordPress.org, they go through a review process, which adds an extra layer of reliability compared to downloading plugins from unknown sources.
Upload and Install a Plugin Manually
The second method is perfect if you’re installing a premium plugin or a plugin you downloaded from a third-party developer. Unlike free plugins from the official directory on WordPress.org, premium plugins usually come as a ZIP file that you need to upload manually through your dashboard.
To begin, make sure you’ve downloaded the plugin file from the developer’s website. The file should be in .zip format. Do not unzip it on your computer, because WordPress requires the compressed ZIP file for the upload process.
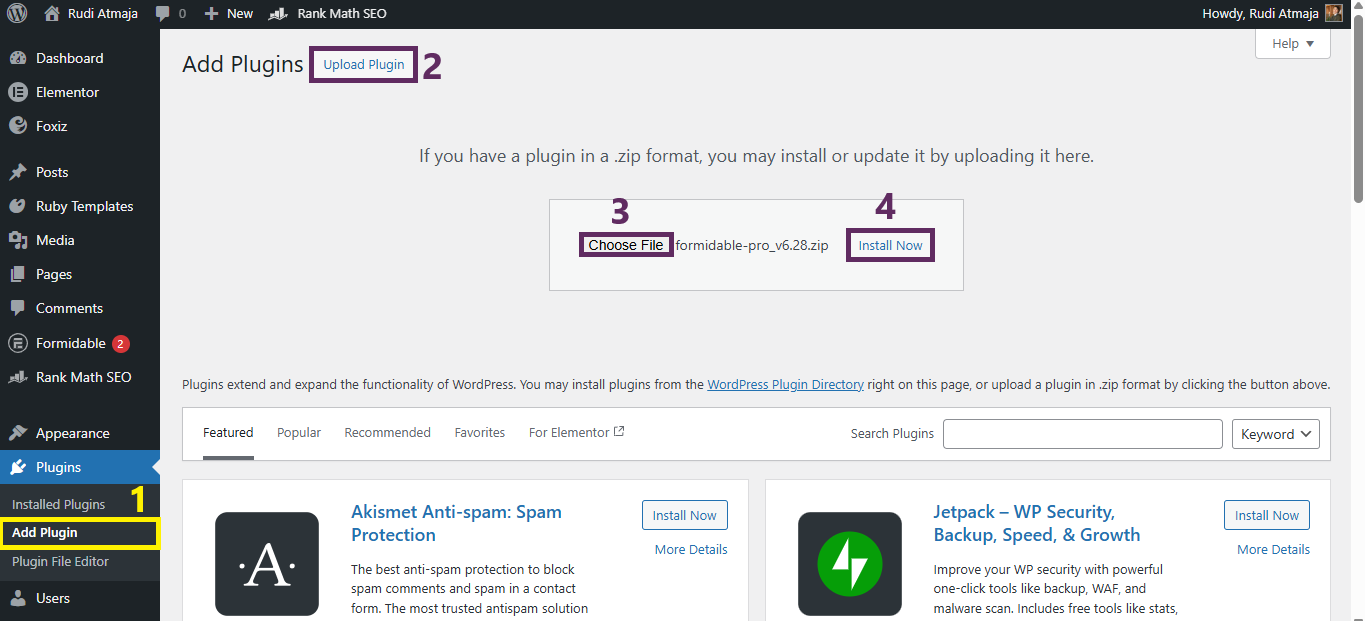
Next, log in to your WordPress admin area and go to Plugins, then click Add New. At the top of the page, you’ll see an Upload Plugin button. Click it, then select Choose File and locate the ZIP file on your computer. Once selected, click Install Now to start the upload.
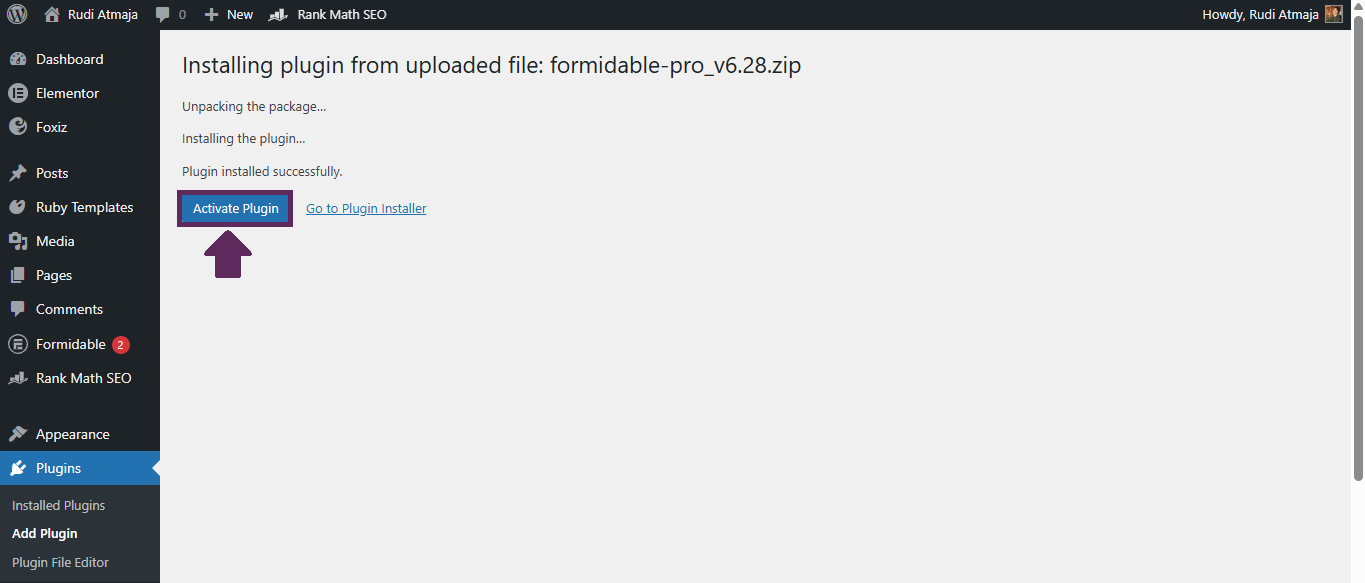
WordPress will automatically upload and install the plugin for you. After the installation is complete, just like with the first method, you’ll need to click the Activate Plugin button to make it live on your website. Without activation, the plugin won’t function.
After activation, check your dashboard menu or the Settings section to configure the plugin. Many premium plugins include setup wizards to help you get started quickly. Take a few minutes to review the settings to ensure everything is configured properly.
And that’s it. Manually uploading a plugin is just as simple as installing one from the repository. As long as you’re using the self-hosted version of WordPress from WordPress.org, both methods give you full control over the plugins you add to your site.
Final Thoughts on Installing WordPress Plugins
Installing a plugin in WordPress.org is much easier than most beginners expect. Whether you’re choosing a free plugin from the official repository or uploading a premium plugin manually, the entire process only takes a few minutes. Once you understand these two methods, you’ll be able to expand your website’s functionality anytime you need.
Plugins are one of the biggest reasons WordPress is so flexible. With the right combination of tools, you can transform a simple website into an online store, a booking platform, a membership site, or a fully optimized blog. The key is knowing how to install and manage plugins properly so your site runs smoothly.
That said, try not to install too many plugins at once. While plugins add powerful features, installing unnecessary ones can slow down your website or create compatibility issues. Always choose well-reviewed plugins, keep them updated, and remove the ones you no longer use.
Now that you know the two easy methods, you’re ready to start exploring the vast WordPress plugin ecosystem. Take your time, experiment carefully, and build a website that fits your goals perfectly.